Turn on suggestions
Auto-suggest helps you quickly narrow down your search results by suggesting possible matches as you type.
Showing results for
Turn on suggestions
Auto-suggest helps you quickly narrow down your search results by suggesting possible matches as you type.
Showing results for
BIM Coordinator Program (INT) April 22, 2024
Find the next step in your career as a Graphisoft Certified BIM Coordinator!
Modeling
About Archicad's design tools, element connections, modeling concepts, etc.
- Graphisoft Community (INT)
- :
- Forum
- :
- Modeling
- :
- Custom Window
Options
- Subscribe to RSS Feed
- Mark Topic as New
- Mark Topic as Read
- Pin this post for me
- Bookmark
- Subscribe to Topic
- Mute
- Printer Friendly Page
Custom Window
Anonymous
Not applicable
Options
- Mark as New
- Bookmark
- Subscribe
- Mute
- Subscribe to RSS Feed
- Permalink
- Report Inappropriate Content
2017-06-24
01:36 PM
- last edited on
2023-05-24
08:30 AM
by
![]() Rubia Torres
Rubia Torres
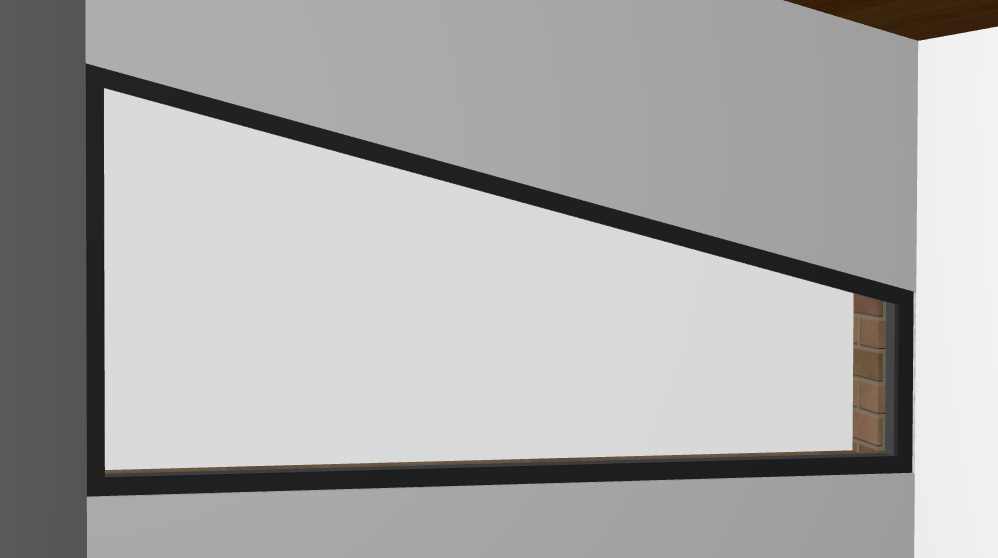
After placing the custom window in the wall, the materials that make up the composite wall (brick/air gap/timber framing) are showing in the wall hole of the window. I was hoping that the wall hole would take on the surface of the exterior wall (or interior wall depending on placement) for a clean finish.
In the image provided the window also shows that it's frame is set behind the 10mm interior plasterboard rather than sitting flush with the plasterboard.
The steps I have followed are:
1. Create frame with the slab tool to desired thickness and shape.
2. Use subtract polygon to create space for glazed area.
3. Cover the subtracted area with a second slab (Material = glass) to the desired thickness.
4. Cover the entire window shape with a third slab that follows the form of the outer edge of the frame. Open the properties of this slab, and change the ID to ‘wallhole’.
5. Select all 3 modelled slabs, save the selection as a window.
6. Insert window into the wall.
What do I need to do to fix this? Thanks in advance.
4 REPLIES 4
Options
- Mark as New
- Bookmark
- Subscribe
- Mute
- Subscribe to RSS Feed
- Permalink
- Report Inappropriate Content
2017-06-24 06:34 PM
With a custom window (or door), you must model everything. You have the window frame - but did not model the jambs/sill to cover up the wall cavity...and any (as you decide) interior/exterior trim.
Typically, I would recommend using tiny walls for the frame vs cutting a hole in a slab... then you have parametric control over the frame thickness.
At this point, I would just model the jambs with tiny thin walls, sufficiently tall to match the wall cavity between the frame and exterior wall surface.
If this is really just a wide rectangle, as in your screenshot, I'm not sure why you're creating a custom (non parametric) window though? Maybe the screenshot is just to illustrate the problem for us?
Cheers,
Karl
PS I should add that the old tutorials on creating custom windows were written before AC had the ability to show the skins, including air gaps, of composites as in your screenshot, so didn't address what you're encountering.
One of the forum moderators
AC 27 USA and earlier • macOS Ventura 13.6.6, MacBook Pro M2 Max 12CPU/30GPU cores, 32GB
AC 27 USA and earlier • macOS Ventura 13.6.6, MacBook Pro M2 Max 12CPU/30GPU cores, 32GB
Anonymous
Not applicable
Options
- Mark as New
- Bookmark
- Subscribe
- Mute
- Subscribe to RSS Feed
- Permalink
- Report Inappropriate Content
2017-06-25 01:15 AM
Options
- Mark as New
- Bookmark
- Subscribe
- Mute
- Subscribe to RSS Feed
- Permalink
- Report Inappropriate Content
2017-06-25 01:32 AM
Glad that helped.
Can see the trapezoid now.😉 If it is really a trapezoid you need, there is a standard trapezoid window. Search for it in the windows setting dialog to download if not in your AUS library. The advantage of standard parts of course is that they provide all kinds of parametric behavior, particularly wall closure options.
Cheers,
Karl

Can see the trapezoid now.
Cheers,
Karl
One of the forum moderators
AC 27 USA and earlier • macOS Ventura 13.6.6, MacBook Pro M2 Max 12CPU/30GPU cores, 32GB
AC 27 USA and earlier • macOS Ventura 13.6.6, MacBook Pro M2 Max 12CPU/30GPU cores, 32GB
Anonymous
Not applicable
Options
- Mark as New
- Bookmark
- Subscribe
- Mute
- Subscribe to RSS Feed
- Permalink
- Report Inappropriate Content
2017-06-25 01:43 AM
Thanks again Karl, trapezoid window was in my library. Not sure how I missed that one  . Anyhow, the information you provided will be useful for future reference.
Cheers,
Kieran
Cheers,
Kieran
Learn and get certified!

Still looking?
