Turn on suggestions
Auto-suggest helps you quickly narrow down your search results by suggesting possible matches as you type.
Showing results for
Turn on suggestions
Auto-suggest helps you quickly narrow down your search results by suggesting possible matches as you type.
Showing results for
BIM Coordinator Program (INT) April 22, 2024
Find the next step in your career as a Graphisoft Certified BIM Coordinator!
Modeling
About Archicad's design tools, element connections, modeling concepts, etc.
- Graphisoft Community (INT)
- :
- Forum
- :
- Modeling
- :
- Wall Finish Between Two Roofs
Options
- Subscribe to RSS Feed
- Mark Topic as New
- Mark Topic as Read
- Pin this post for me
- Bookmark
- Subscribe to Topic
- Mute
- Printer Friendly Page
SOLVED!
Wall Finish Between Two Roofs
Anonymous
Not applicable
Options
- Mark as New
- Bookmark
- Subscribe
- Mute
- Subscribe to RSS Feed
- Permalink
- Report Inappropriate Content
2020-12-13
05:04 PM
- last edited on
2023-05-09
03:47 PM
by
![]() Rubia Torres
Rubia Torres
I was using Archicad while I am in college, and start to use it again in my projects. I have trouble about roofs and cannot find any solution in this forum. So maybe it is not a problem for most of you but I need your help
*By the way, I cannot find how to upload project as attachment. If you can tell me I can upload the .pln file.
Thank you for your time
Solved! Go to Solution.
1 ACCEPTED SOLUTION
Accepted Solutions
Solution
Options
- Mark as New
- Bookmark
- Subscribe
- Mute
- Subscribe to RSS Feed
- Permalink
- Report Inappropriate Content
2020-12-14 10:14 AM
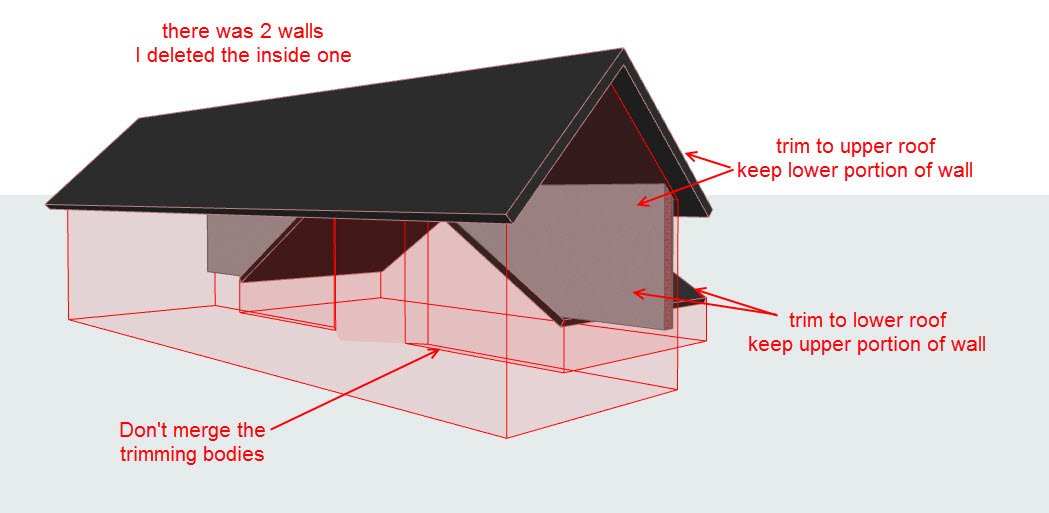
I have looked at your file.
In one set of roofs you have 2 walls in the same location.
I deleted the wall on the inside.
Then it is possible to 'trim to roof' - first to the upper roof and keep the lower portion of wall.
then to the lower roof and keep the upper portion of wall.
You don't want the trimming bodies (roofs) to be merged - they need to be separate.
With any trim to roof the trimming body must overlap the wall.
With an SEO, the actual roof must overlap the wall.
If you don't want to see the roof on the inside of the wall, then adjust the building material strengths, so the roof is weaker that the wall.
Strong wins out.
You will now see the bottom of the wall cutting the roof.
Because the upper roof is level, I would adjust the wall top height so it sits just below the roof (that is how it would actually be built as well).
Then you just need to trim or SEO to the lower roof.
Barry.
One of the forum moderators.
Versions 6.5 to 27
Dell XPS- i7-6700 @ 3.4Ghz, 16GB ram, GeForce GTX 960 (2GB), Windows 10
Lenovo Thinkpad - i7-1270P 2.20 GHz, 32GB RAM, Nvidia T550, Windows 11
Versions 6.5 to 27
Dell XPS- i7-6700 @ 3.4Ghz, 16GB ram, GeForce GTX 960 (2GB), Windows 10
Lenovo Thinkpad - i7-1270P 2.20 GHz, 32GB RAM, Nvidia T550, Windows 11
8 REPLIES 8
Anonymous
Not applicable
Options
- Mark as New
- Bookmark
- Subscribe
- Mute
- Subscribe to RSS Feed
- Permalink
- Report Inappropriate Content
2020-12-13 10:11 PM
Seyma wrote:Anyone can help me?
Hello everyone,
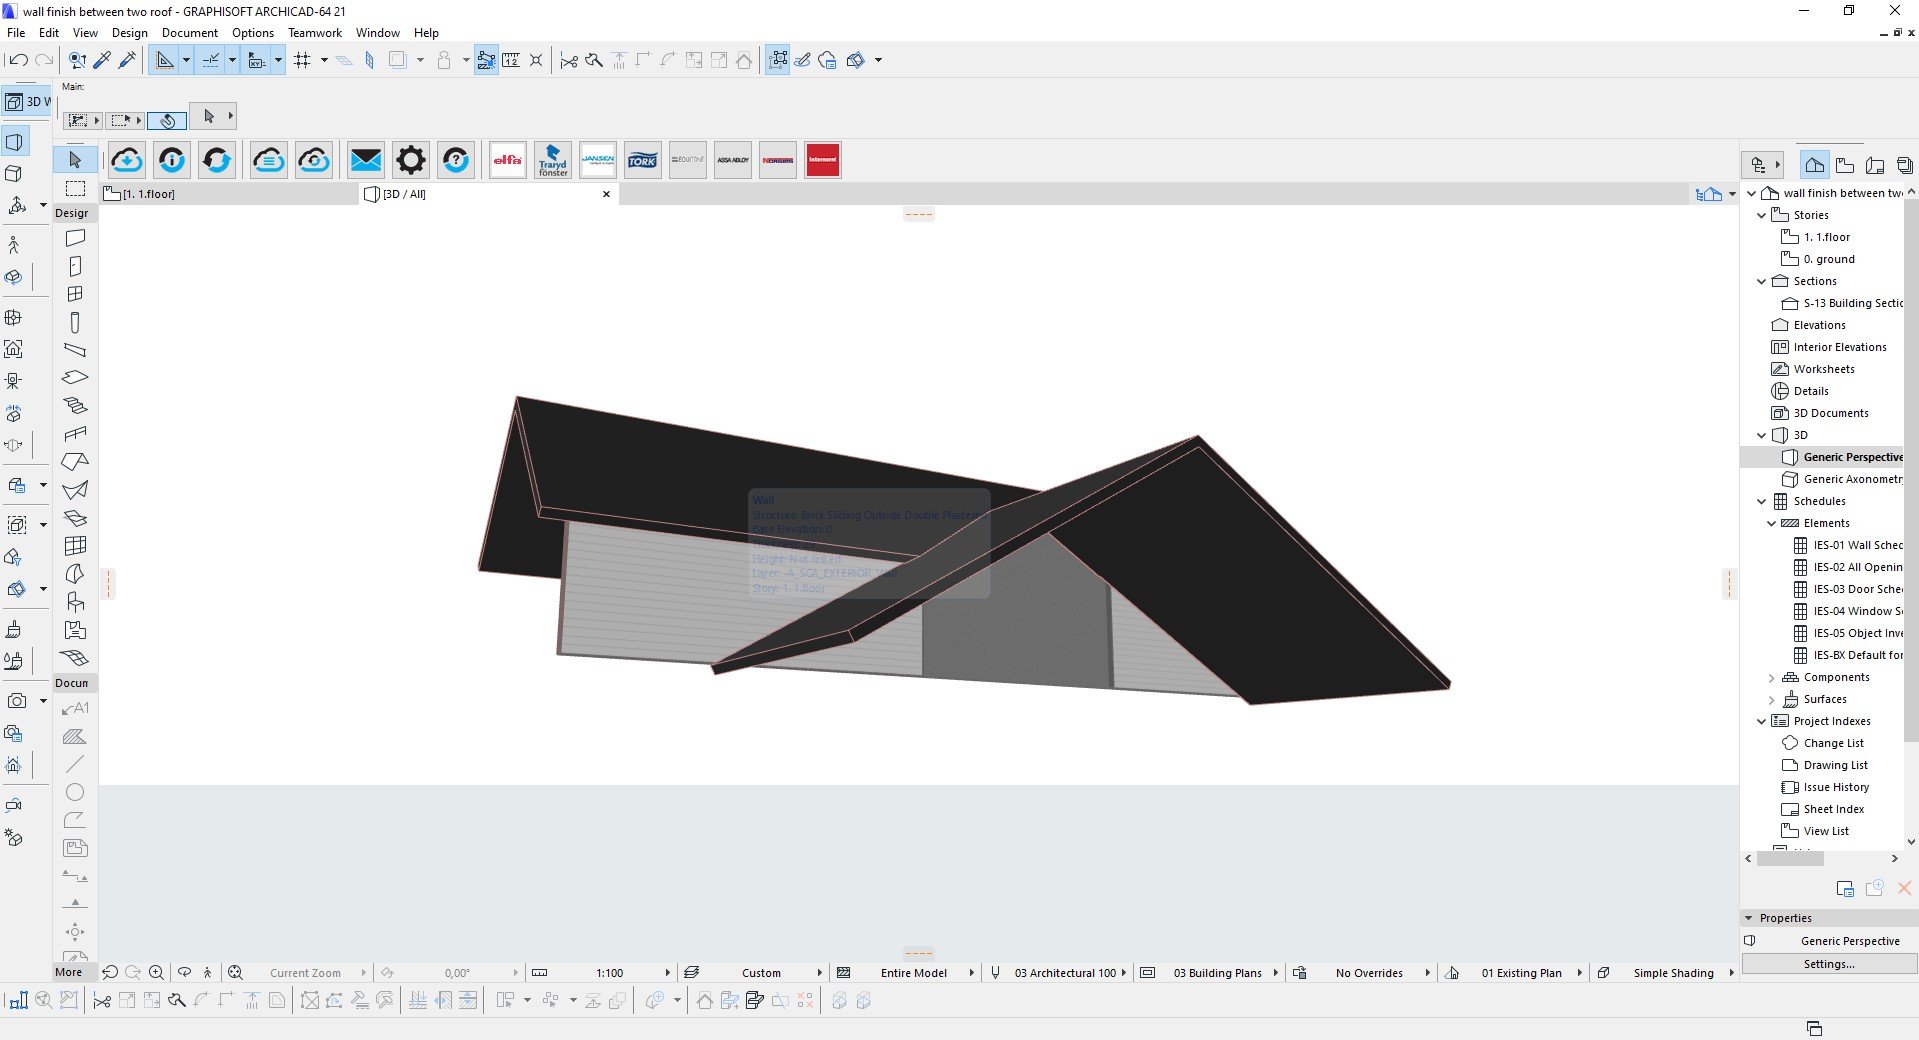
I was using Archicad while I am in college, and start to use it again in my projects. I have trouble about roofs and cannot find any solution in this forum. So maybe it is not a problem for most of you but I need your helpI use archicad 21 and two roofs in two layers. I created wall composites one for exterior wall, one for interior wall. As you can see in screenshots, they have different problems. if I use trim roofs to each other, my walls finish doesn't act as I want. If I don't use trim roofs, the lower roofs material seen on the wall. I cannot find any solution. If I am not clear enough, sorry about that my english is not good, please look at the screenshots.
*By the way, I cannot find how to upload project as attachment. If you can tell me I can upload the .pln file.
Thank you for your time
( I just misclicked "solved" button and cannot undo it.)
Options
- Mark as New
- Bookmark
- Subscribe
- Mute
- Subscribe to RSS Feed
- Permalink
- Report Inappropriate Content
2020-12-14 02:00 AM
In this particular case I would not use the trim to roof command, as that uses the roof trimming body.
I would use the old school Solid Element Operations.
Select the wall and the upper roof and the subtract with upward extrusion - this will leave the wall below the roof.
Then select the wall and the lower roof and subtract with downward extrusion - this will leave the wall above the roof.
So now you should be left with the wall between the two roofs if that is what you are after.
To upload a PLN as an attachment you will have to ZIP it - but there is still a size limit on this forum.
Otherwise upload it to a file sharing folder such as Dropbox or iCloud, and then share the link to the file for others to download.
Barry.
One of the forum moderators.
Versions 6.5 to 27
Dell XPS- i7-6700 @ 3.4Ghz, 16GB ram, GeForce GTX 960 (2GB), Windows 10
Lenovo Thinkpad - i7-1270P 2.20 GHz, 32GB RAM, Nvidia T550, Windows 11
Versions 6.5 to 27
Dell XPS- i7-6700 @ 3.4Ghz, 16GB ram, GeForce GTX 960 (2GB), Windows 10
Lenovo Thinkpad - i7-1270P 2.20 GHz, 32GB RAM, Nvidia T550, Windows 11
Anonymous
Not applicable
Options
- Mark as New
- Bookmark
- Subscribe
- Mute
- Subscribe to RSS Feed
- Permalink
- Report Inappropriate Content
2020-12-14 08:32 AM
Barry wrote:Thank you Barry for your reply
In this particular case I would not use the trim to roof command, as that uses the roof trimming body.
I would use the old school Solid Element Operations.
Select the wall and the upper roof and the subtract with upward extrusion - this will leave the wall below the roof.
Then select the wall and the lower roof and subtract with downward extrusion - this will leave the wall above the roof.
So now you should be left with the wall between the two roofs if that is what you are after.
To upload a PLN as an attachment you will have to ZIP it - but there is still a size limit on this forum.
Otherwise upload it to a file sharing folder such as Dropbox or iCloud, and then share the link to the file for others to download.
Barry.
I've tried in one like you said solid element operations but I don't want to roof material seen from the wall. That's why I am trying to trim roofs to each other.
But you are correct, the way you are telling is the nearest way what I want
I upload pln file. Thank you for sharing that knowledge too
If you want, you can download file in here
Solution
Options
- Mark as New
- Bookmark
- Subscribe
- Mute
- Subscribe to RSS Feed
- Permalink
- Report Inappropriate Content
2020-12-14 10:14 AM
I have looked at your file.
In one set of roofs you have 2 walls in the same location.
I deleted the wall on the inside.
Then it is possible to 'trim to roof' - first to the upper roof and keep the lower portion of wall.
then to the lower roof and keep the upper portion of wall.
You don't want the trimming bodies (roofs) to be merged - they need to be separate.
With any trim to roof the trimming body must overlap the wall.
With an SEO, the actual roof must overlap the wall.
If you don't want to see the roof on the inside of the wall, then adjust the building material strengths, so the roof is weaker that the wall.
Strong wins out.
You will now see the bottom of the wall cutting the roof.
Because the upper roof is level, I would adjust the wall top height so it sits just below the roof (that is how it would actually be built as well).
Then you just need to trim or SEO to the lower roof.
Barry.
In one set of roofs you have 2 walls in the same location.
I deleted the wall on the inside.
Then it is possible to 'trim to roof' - first to the upper roof and keep the lower portion of wall.
then to the lower roof and keep the upper portion of wall.
You don't want the trimming bodies (roofs) to be merged - they need to be separate.
With any trim to roof the trimming body must overlap the wall.
With an SEO, the actual roof must overlap the wall.
If you don't want to see the roof on the inside of the wall, then adjust the building material strengths, so the roof is weaker that the wall.
Strong wins out.
You will now see the bottom of the wall cutting the roof.
Because the upper roof is level, I would adjust the wall top height so it sits just below the roof (that is how it would actually be built as well).
Then you just need to trim or SEO to the lower roof.
Barry.
One of the forum moderators.
Versions 6.5 to 27
Dell XPS- i7-6700 @ 3.4Ghz, 16GB ram, GeForce GTX 960 (2GB), Windows 10
Lenovo Thinkpad - i7-1270P 2.20 GHz, 32GB RAM, Nvidia T550, Windows 11
Versions 6.5 to 27
Dell XPS- i7-6700 @ 3.4Ghz, 16GB ram, GeForce GTX 960 (2GB), Windows 10
Lenovo Thinkpad - i7-1270P 2.20 GHz, 32GB RAM, Nvidia T550, Windows 11
Anonymous
Not applicable
Options
- Mark as New
- Bookmark
- Subscribe
- Mute
- Subscribe to RSS Feed
- Permalink
- Report Inappropriate Content
2020-12-14 12:41 PM
Barry wrote:
I have looked at your file.
In one set of roofs you have 2 walls in the same location.
I deleted the wall on the inside.
Then it is possible to 'trim to roof' - first to the upper roof and keep the lower portion of wall.
then to the lower roof and keep the upper portion of wall.
You don't want the trimming bodies (roofs) to be merged - they need to be separate.
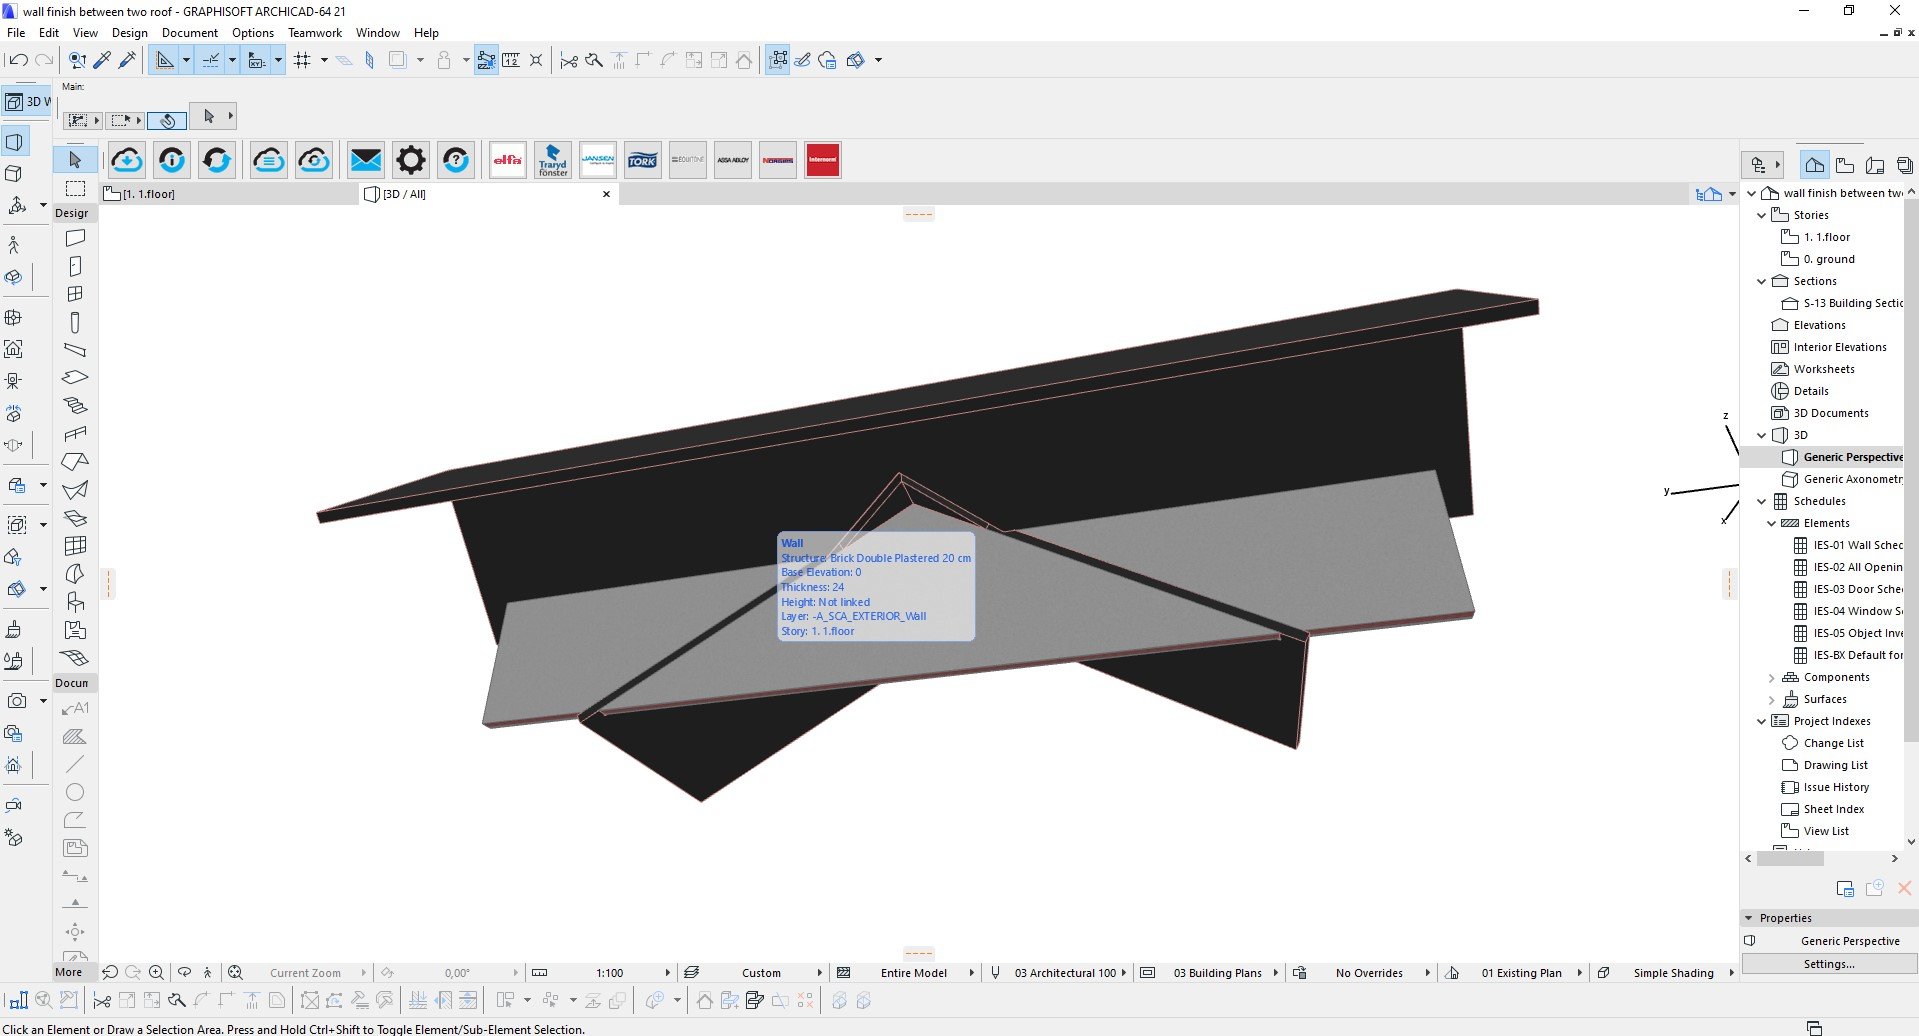
roof_trimming_1.jpg
With any trim to roof the trimming body must overlap the wall.
With an SEO, the actual roof must overlap the wall.
If you don't want to see the roof on the inside of the wall, then adjust the building material strengths, so the roof is weaker that the wall.
Strong wins out.
You will now see the bottom of the wall cutting the roof.
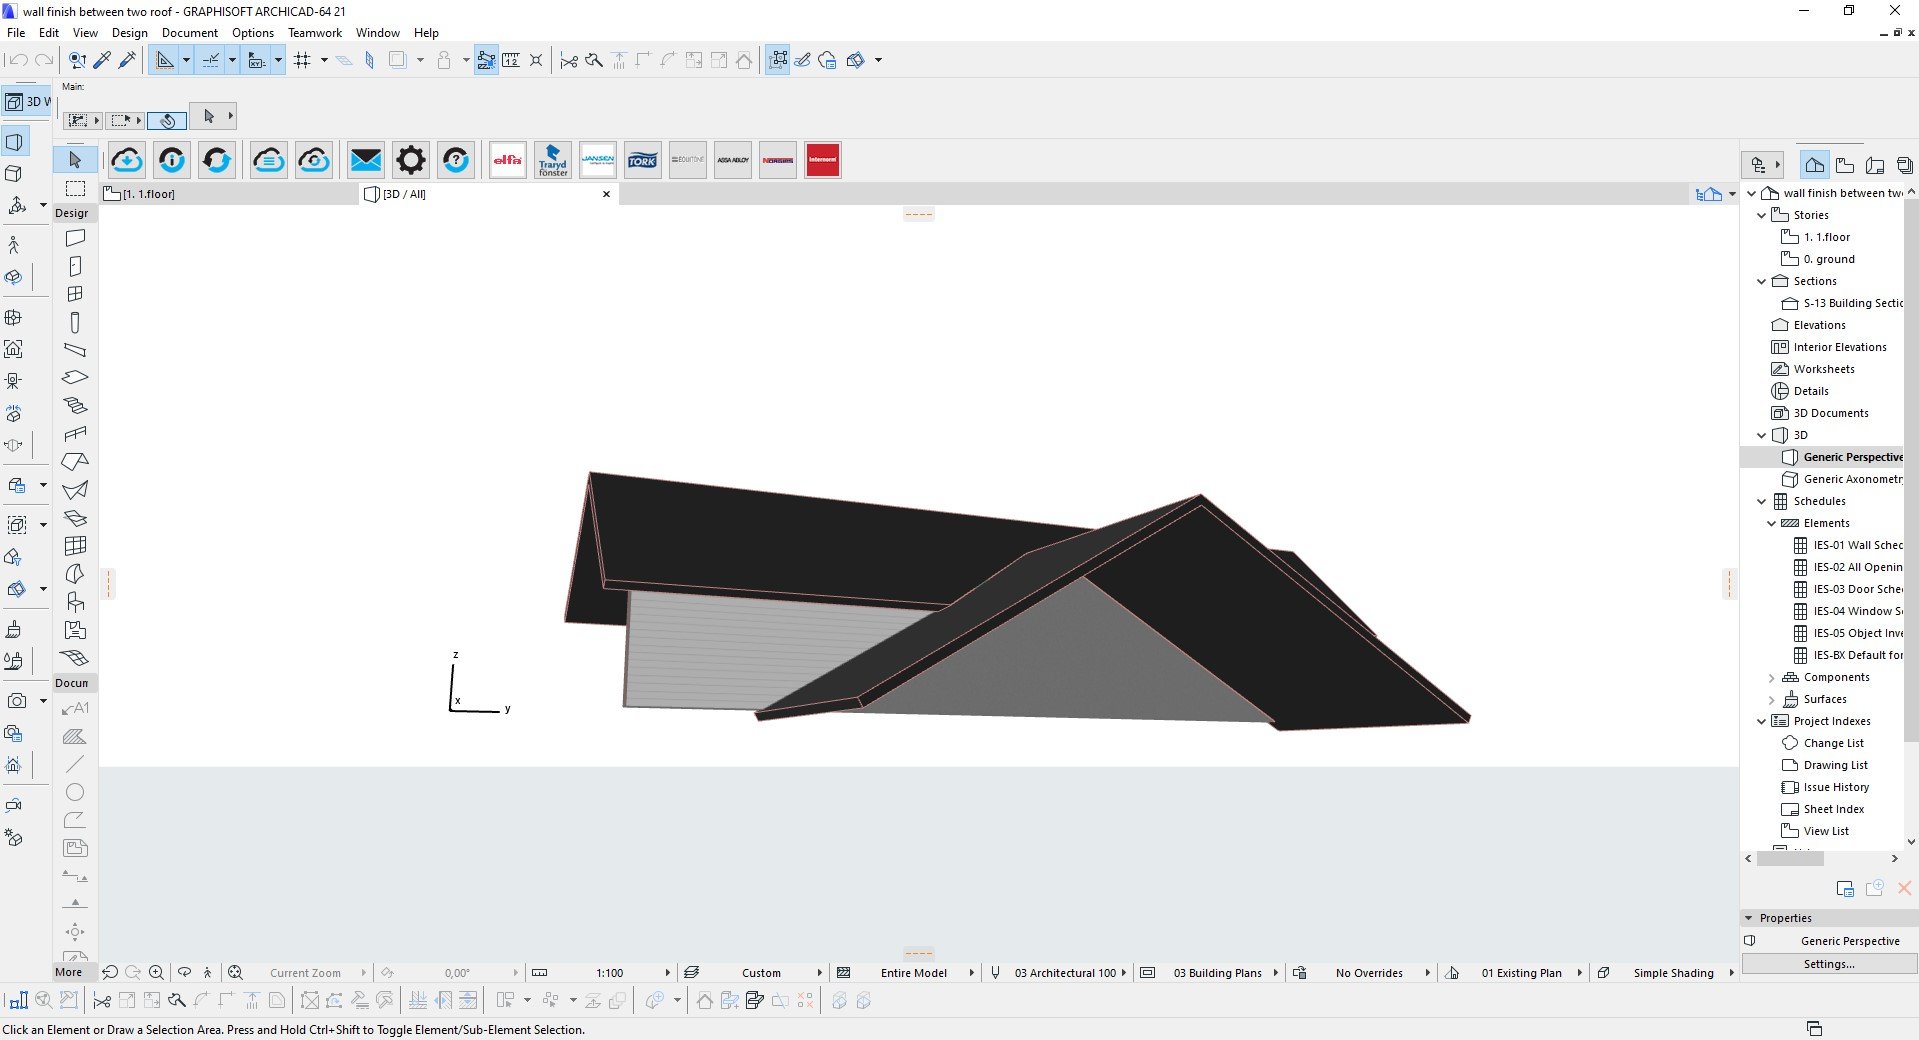
roof_trimming_2.jpg
Because the upper roof is level, I would adjust the wall top height so it sits just below the roof (that is how it would actually be built as well).
Then you just need to trim or SEO to the lower roof.
Barry.
Thank you so much Barry
Anonymous
Not applicable
Options
- Mark as New
- Bookmark
- Subscribe
- Mute
- Subscribe to RSS Feed
- Permalink
- Report Inappropriate Content
2021-02-03 08:49 PM
Options
- Mark as New
- Bookmark
- Subscribe
- Mute
- Subscribe to RSS Feed
- Permalink
- Report Inappropriate Content
2021-02-03 09:51 PM
Daniel wrote:It's doing what it should. In life, that would be built/assembled as two (or three) stacked walls, so that's really how you should model it.
HI, i need help with this same topic.
When i cut a wall between two roofs (solid elements operations - with downward extrusion).
The wall below is cut too.
How can it be solved?
One of the forum moderators
AC 27 USA and earlier • macOS Ventura 13.6.6, MacBook Pro M2 Max 12CPU/30GPU cores, 32GB
AC 27 USA and earlier • macOS Ventura 13.6.6, MacBook Pro M2 Max 12CPU/30GPU cores, 32GB
Anonymous
Not applicable
Options
- Mark as New
- Bookmark
- Subscribe
- Mute
- Subscribe to RSS Feed
- Permalink
- Report Inappropriate Content
2021-02-03 09:59 PM
Thanks for your time.
Learn and get certified!

Related articles
- Some walls showing on roof plan others not in Modeling
- Proposal for improvement on directories in Wishes
- Export IFC surface colors in Collaboration with other software
- Joint modeling error when using the roof and wall tool in Modeling
- Roof loadbearing calculations in Collaboration with other software
Still looking?
