Turn on suggestions
Auto-suggest helps you quickly narrow down your search results by suggesting possible matches as you type.
Showing results for
EN
Turn on suggestions
Auto-suggest helps you quickly narrow down your search results by suggesting possible matches as you type.
Showing results for
Options
- Subscribe to RSS Feed
- Mark Topic as New
- Mark Topic as Read
- Pin this post for me
- Bookmark
- Subscribe to Topic
- Mute
- Printer Friendly Page
Anonymous
Not applicable
Options
- Mark as New
- Bookmark
- Subscribe
- Mute
- Subscribe to RSS Feed
- Permalink
- Report Inappropriate Content
2015-12-17
03:37 PM
- last edited on
2023-05-24
08:44 AM
by
Rubia Torres
Sinusoidal Headache
2015-12-17
03:37 PM
We have previously been using a complex profile wall, where the outer 'skin' is a fill in the shape of a sinusoidal wave. This works great for rendering but..
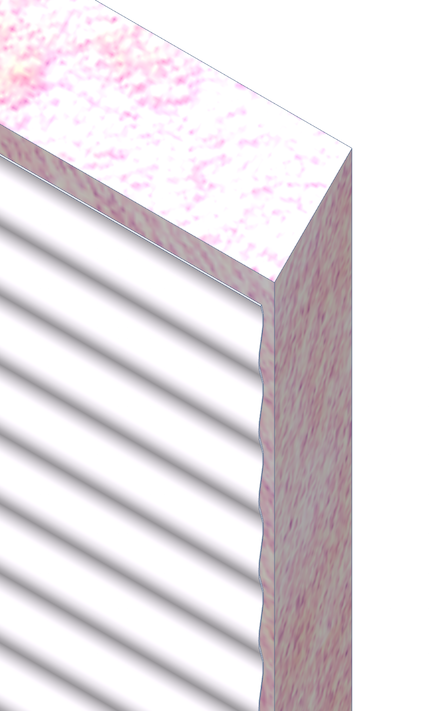
i) The cladding is what it is in elevation. Every point that forms the 'wave' in complex profile/section translates to a 'line' in elevation. Which makes the elevations way too...liney, and unpleasant to look at.

So, I came up with a workaround which involved removing the physical representation of the wave in our complex profile and replacing it with material/surface that uses a jpeg manually shaded to look like a wave. Then we use vectorial hatch/cover fill that is just a horizontal line that we can alter independently for use in elevation.
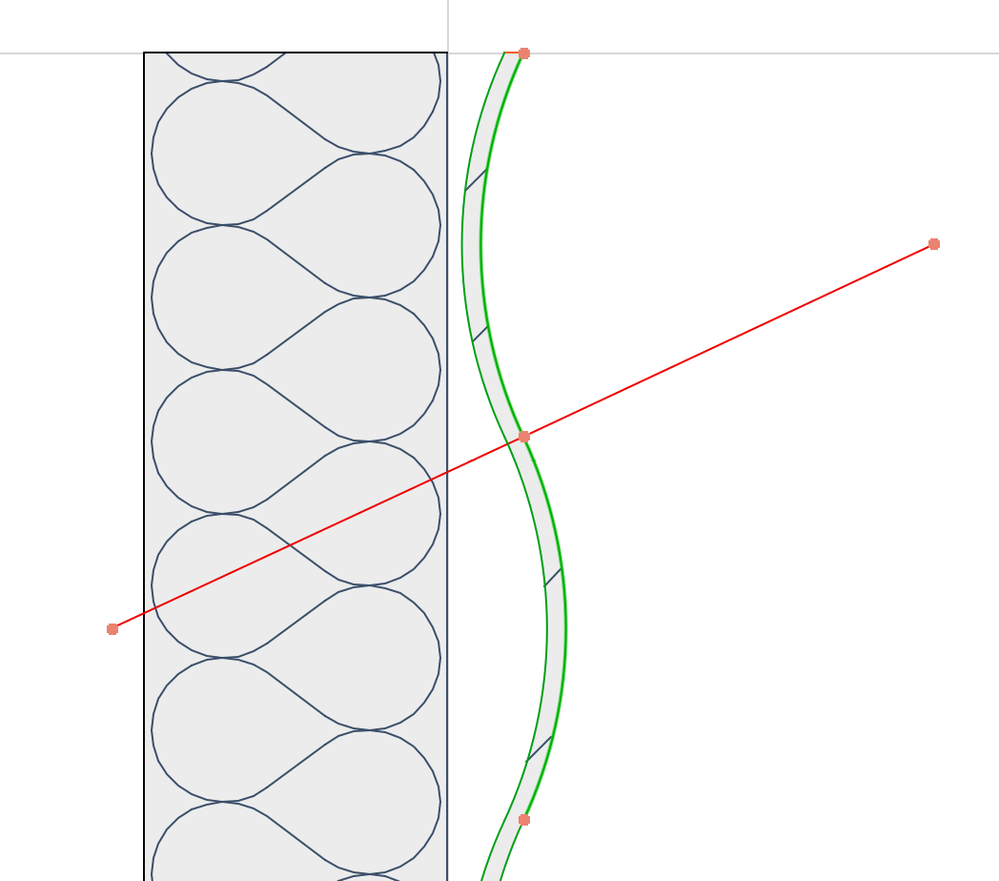
Then for a correct representation in section I created a fill which looks like the wave. The trouble with this approach is;
ii) In plan, the wave fill pattern appears the same, so it appears that in plan we have a sinusoidal wave applied vertically, and in section the wave appears horizontally. Can we overcome this issue?
iii) If I create a curved wall using my complex profile, my new 'wave' material becomes unaligned??

6 Replies 6
Anonymous
Not applicable
Options
- Mark as New
- Bookmark
- Subscribe
- Mute
- Subscribe to RSS Feed
- Permalink
- Report Inappropriate Content
2015-12-18 02:24 AM
2015-12-18
02:24 AM
Regarding your last point:
Check direction that curved element is drawn; may need to mirror or draw in specific (same) 'direction' as adjoining elements to avoid texture showing upside down. Alternatively, experiment with the <Align 3d Texture> tool in the Design menu to adjust appearance.
Check direction that curved element is drawn; may need to mirror or draw in specific (same) 'direction' as adjoining elements to avoid texture showing upside down. Alternatively, experiment with the <Align 3d Texture> tool in the Design menu to adjust appearance.
Hmooslechner
Moderator
Options
- Mark as New
- Bookmark
- Subscribe
- Mute
- Subscribe to RSS Feed
- Permalink
- Report Inappropriate Content
2015-12-18 08:51 AM
2015-12-18
08:51 AM
How about using a profile-wall for this? Make a new profile with profile-manager for this and assign it t a wall. There absolutely will no gap between straigt and curved segments of the wall.
To make a profile - simply copy Your section into a new profile and assign the buildingmaterial to each hatch. Define each hatch for the right structure-kind and give the profile a name and dedicate it for usage for walls. Then open the wall-dialoge and swith it to profile, select Your new profile and draw the wall.
To make a profile - simply copy Your section into a new profile and assign the buildingmaterial to each hatch. Define each hatch for the right structure-kind and give the profile a name and dedicate it for usage for walls. Then open the wall-dialoge and swith it to profile, select Your new profile and draw the wall.
AC5.5-AC27EduAut, PC-Win10, MacbookAirM1, MacbookM1Max, Win-I7+Nvidia
Anonymous
Not applicable
Options
- Mark as New
- Bookmark
- Subscribe
- Mute
- Subscribe to RSS Feed
- Permalink
- Report Inappropriate Content
2015-12-18 10:12 AM
2015-12-18
10:12 AM
rob_o,
Thanks. I had already tried mirroring/making sure the direction of the wall was the same with no success. I have now more or less aligned the texture using 'align 3D texture'.
So thankfully a workaround for now, but if anyone knows what the root cause of this is to begin with it would be useful to know to avoid having to manually align the texture every time. What is strange to me is I formed the curve using the Chamfer function.
Hmooslechner,
If I'm reading your reply correctly then I think this is the point at which I started (with a complex profile)? Unless I'm being dim, even with a sine wave that has no straight section there will still be a 'joint' where there is a change of direction for the curve?
To be honest I think for a number of reasons we are quite happy with the idea of the fake .jpeg looking wall (I hope you agree the picture I attached on my first post was fairly convincing?).
The only other option I had considered is using a bumpmap/alpha version of the same jpeg to actually form the curve - but unfortunately bump map/displacement settings in cinerender is a bit beyond me at the moment.
David Maudlin
Rockstar
Options
- Mark as New
- Bookmark
- Subscribe
- Mute
- Subscribe to RSS Feed
- Permalink
- Report Inappropriate Content
2015-12-18 02:27 PM
2015-12-18
02:27 PM
Daniel:
I think you can achieve what you want using your first method (Complex Profile with curved fill for cladding). Just make sure there are no straight segments in the fill, and the curves are tangent where they meet.
David

I think you can achieve what you want using your first method (Complex Profile with curved fill for cladding). Just make sure there are no straight segments in the fill, and the curves are tangent where they meet.
David

David Maudlin / Architect
www.davidmaudlin.com
Digital Architecture
AC29 USA Perpetual • Mac mini M4 Pro OSX15 | 64 gb ram • MacBook Pro M3 Pro OSX14 | 36 gb ram
www.davidmaudlin.com
Digital Architecture
AC29 USA Perpetual • Mac mini M4 Pro OSX15 | 64 gb ram • MacBook Pro M3 Pro OSX14 | 36 gb ram
Hmooslechner
Moderator
Options
- Mark as New
- Bookmark
- Subscribe
- Mute
- Subscribe to RSS Feed
- Permalink
- Report Inappropriate Content
2015-12-18 07:21 PM
2015-12-18
07:21 PM
I really tried to do it but i cant get the profiles without the lines between.  Ill try some ideas but there seems to be some limitation...
AC5.5-AC27EduAut, PC-Win10, MacbookAirM1, MacbookM1Max, Win-I7+Nvidia
David Maudlin
Rockstar
Options
- Mark as New
- Bookmark
- Subscribe
- Mute
- Subscribe to RSS Feed
- Permalink
- Report Inappropriate Content
2015-12-19 03:03 PM
2015-12-19
03:03 PM
Hmooslechner:
1. Draw an Arc for one part of the double curve (sine wave). Rotate this Arc so the radius of its midpoint is horizontal.
2. Rotate a copy of this Arc around the endpoint of the original Arc. These two Arcs will be tangent to each other (a Line draw from one Arc center-point to the other Arc's center-point will pass through the endpoint connection of both Arcs, as per my earlier illustration).
3. Drag a copy of the two Arcs horizontally the thickness of the cladding.
4. Select these 4 Arcs and Multiply them the height of the Wall.
5. Draw lines at the top and the bottom of the Arc shapes to connect them (so the two undulating Arc shapes have a boundary.
6. Magic Wand the Fill for the cladding inside this bounded shape.
7. Save Profile.
David

David Maudlin / Architect
www.davidmaudlin.com
Digital Architecture
AC29 USA Perpetual • Mac mini M4 Pro OSX15 | 64 gb ram • MacBook Pro M3 Pro OSX14 | 36 gb ram
www.davidmaudlin.com
Digital Architecture
AC29 USA Perpetual • Mac mini M4 Pro OSX15 | 64 gb ram • MacBook Pro M3 Pro OSX14 | 36 gb ram
