- Graphisoft Community (INT)
- :
- Knowledge Base
- :
- Project data & BIM
- :
- Using Expressions to Calculate the Maximum Number ...
- Subscribe to RSS Feed
- Mark as New
- Mark as Read
- Bookmark
- Subscribe to Topic
- Printer Friendly Page
- Report Inappropriate Content
Using Expressions to Calculate the Maximum Number of Occupants Automatically
- Subscribe to RSS Feed
- Mark as New
- Mark as Read
- Bookmark
- Subscribe to Topic
- Printer Friendly Page
- Report Inappropriate Content
on
2019-11-26
04:00 PM
- edited on
2023-05-15
05:23 PM
by
Emoke Csikos

Creating Groups, Properties & Expressions
1. Go to Options > Property Manager... to open the Property Manager dialogue box.
2. Click the New button to the New Property / Group dialogue box.

3. In the New Property / Group dialogue box, select Group, enter the Group Name and click OK.
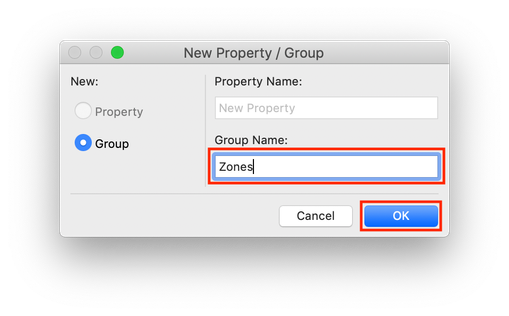
4. Click the New button to open the New Property / Group dialogue box.
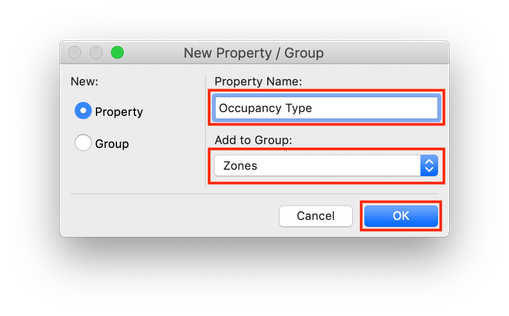
5. In the New Property / Group dialogue box, select Property, enter "Occupancy Type" for Property Name, set Add to Group to the group that was just created and click OK.
6. Select the Occupancy Type property and under the Value Definition tab make sure that Data Type is set to Option Set and Default Value is set to Value. Once Value is selected, the Options Setup dialogue will automatically open. This dialogue box can also be accessed by clicking the Options Setup... button.

7. Click the Add button to create a list of occupancy types. The name should include a descriptor (ex. Library), followed by a separating character (ex. | or /), followed by the area required in the space per person. Once all values have been created, click OK.
 NOTE: By including the area per person in the occupancy type title, the total occupants per room can be automatically calculated whenever the occupancy type changes. The separating character will allow the title to be split and the numeric data extracted and applied to later formulas. Keep in mind that the values in this example are in imperial units. The numbers in the titles below denote the number of square feet needed per occupant in the space. For metric, substitute square meters. Make sure that whatever unit is chosen remains constant throughout.
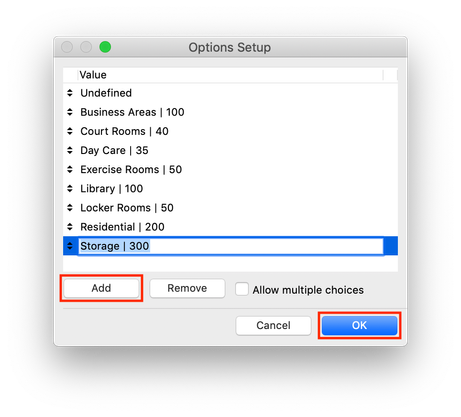
8. Back in the Property Manager dialogue box, click the New button to open the New Property / Group dialogue box.
9. In the New Property / Group dialogue box, select Property, enter "Occupant Load" for Property Name, set Add to Group to the same group as in previous steps and click OK.

10. Select the newly created Occupancy Load property and under the Value Definition tab make sure that Data Type is set to Integer and Default Value is set to Expression. Once Expression is selected, the Expression Editor dialogue will automatically open. This dialogue box can also be accessed by clicking the Add... button.
 NOTE: The expression in this property will extract the numeric value from the title of Occupancy Type property.
11. In the Expression Editor dialogue box, click the Operators & Functions button.
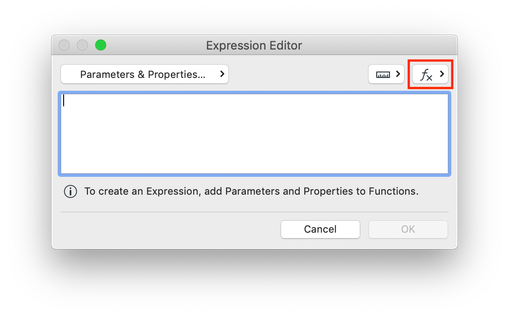
12. In the pull down menu, under Data conversion, select Number from string [ STRTONUM ] and click Add.
 NOTE: This function converts all text to numeric data. This numeric information can then be used in equations. All numbers in fields that also include text will be considered text until this function is used. In this case, the area requirements in the occupancy type titles will be converted to usable numbers.
13. Select "Text" (including the quotation marks) and click the Operators & Functions button.
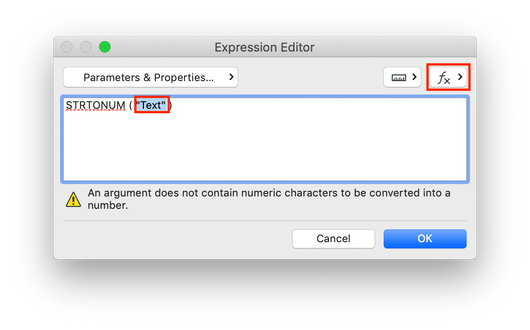
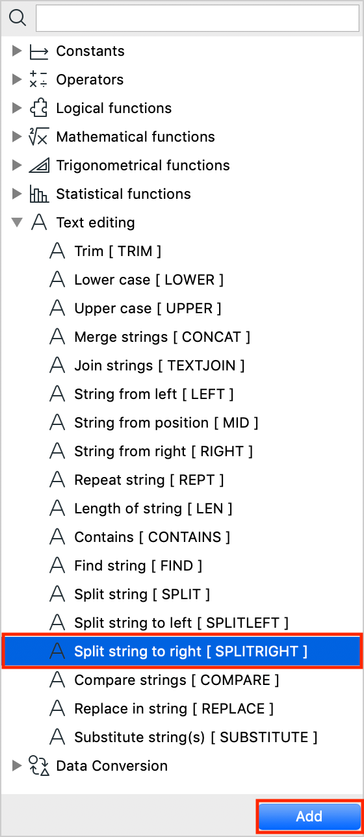
14. In the pull down menu, under Text editing, select Split string to right [ SPLITRIGHT ] and click Add.
 NOTE: The text in the Occupancy Type property value options must be removed before the numeric data can be converted to usable numbers. The SPLITRIGHT command discards the first text part of the title.
15. Select "Text" (including the quotation marks) and click the Parameters & Properties... button.
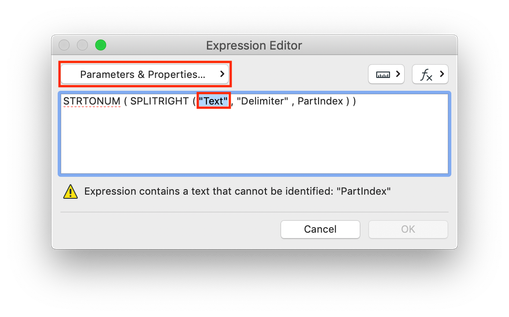
16. In the pulldown menu, under the Properties > Zones tab, select Occupancy Type and click Add.

17. Select and delete Delimiter (DO NOT include the quotation marks) and enter the trimming character and the space that follows it "| ".

18. Select and delete PartIndex, enter "2" and click OK.

19. Back in the Property Manager dialogue box, click the New button to open the New Property / Group dialogue box.
20. In the New Property / Group dialogue box, select Property, enter "Occupants" for Property Name, set Add to Group to the same group as in previous steps and click OK.
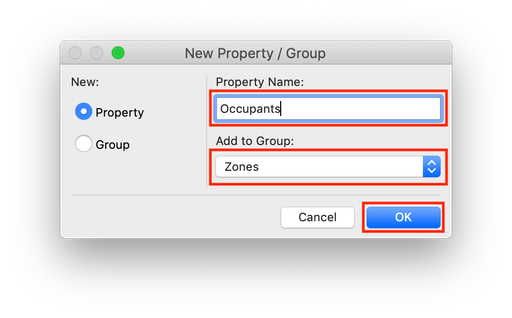
21. Select the newly created Occupants property and under the Value Definition tab make sure that Data Type is set to Integer and Default Value is set to Expression. Once Expression is selected, the Expression Editor dialogue will automatically open. This dialogue box can also be accessed by clicking the Add... button.
 NOTE: The expression in this property will take the numeric data extracted in the previous property and apply it to the area of the zone to determine the allowable number of occupants.
22. In the Expression Editor dialogue box, click the Operators & Functions button.
23. In the pull down menu, under Mathematical functions, select Round up [ ROUNDUP ] and click Add.
 NOTE: This will take the resulting value and round it up to the nearest integer.
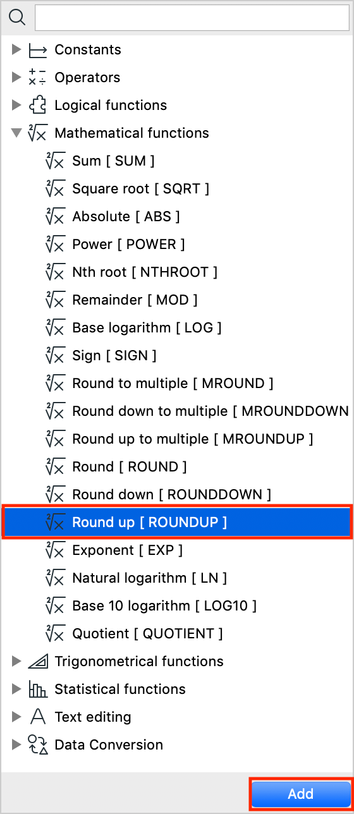
24. Select Number and click the Parameters & Properties... button.
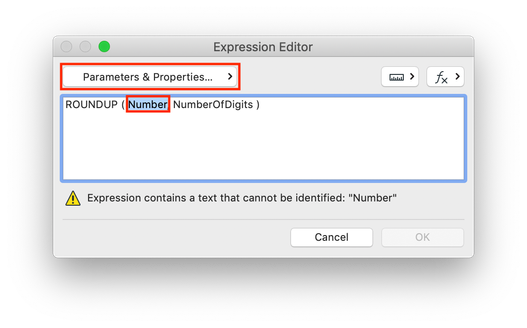
25. In the pulldown menu, under the Zone tab, select Measured Area and click Add.

26. Add a space after "Measured Area" and click the Operators & Functions button.
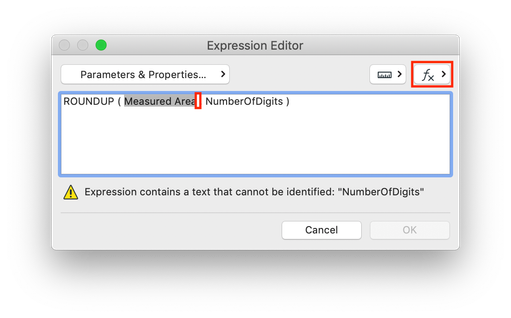
27. In the pull down menu, under Operators, select Divide [ / ] and click Add.

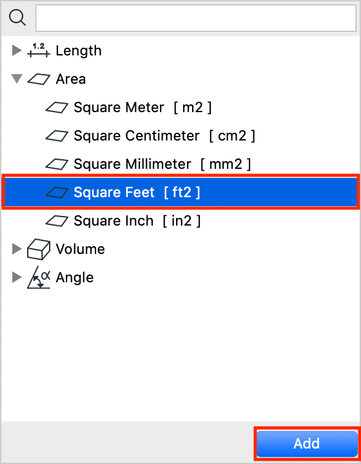
28. Enter the number 1 after the division sign but before the comma and click the Units button.

29. In the pull down menu, under Area, select Square feet [ ft2 ] and click Add.
 NOTE: This unit should match the unit of the numeric value in the Occupancy Type title.
30. Add parentheses before "Measured Area" and after "1 ft2" and add a space after the second. Click the Operators & Functions button.
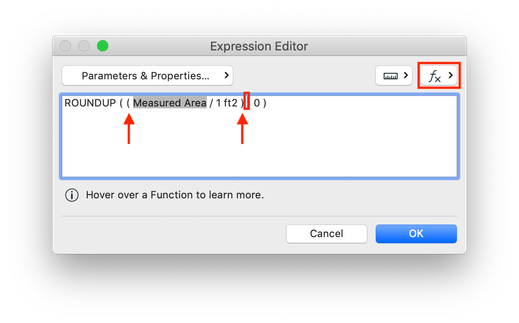
31. In the pull down menu, under Operators, select Divide [ / ] and click Add.
32. Add a space after the division sign but before the comma and click the Parameters & Properties... button.

33. In the pulldown menu, under the Properties > Zones tab, select Occupancy Load and click Add.
 NOTE: This will divide the area of the space by the area need per occupant.
34. Select and delete NumberOfDigits, enter the number 0 and click OK.
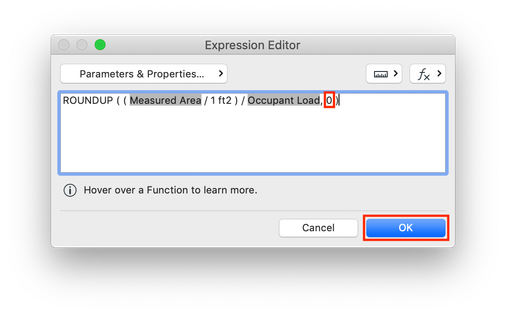
35. Select the 3 newly created properties, under the Availability for Classifications tab select Custom and click Edit...

36. In the Availability dialogue box select Space and click OK.
 NOTE: This will allow the property being created to be used with zones in the project. If a different classification system exists in the file, choose the classification that is used for zones.
37. Click OK in the Property Manager dialogue box to exit.

Applying Expressions to Zones
The example below uses the Zone Stamp 01 22. If another stamp is used steps 1-4 will remain the same but ability for the zone to display property information might not exist1. Open the floor plan.
2. Select a zone and open the Zone Selection Settings dialogue box.

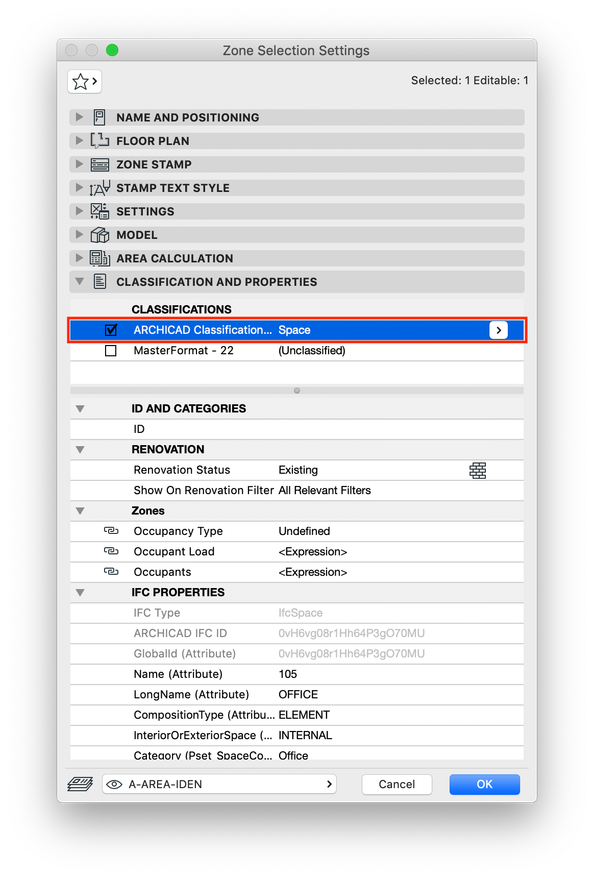
3. Under Classifications and Properties, navigate to the Classifications section. Make sure that the classification is set to the one associated with the expression properties created earlier.
 NOTE: In this example, the Space classification needs to be enabled for the 3 properties to appear.
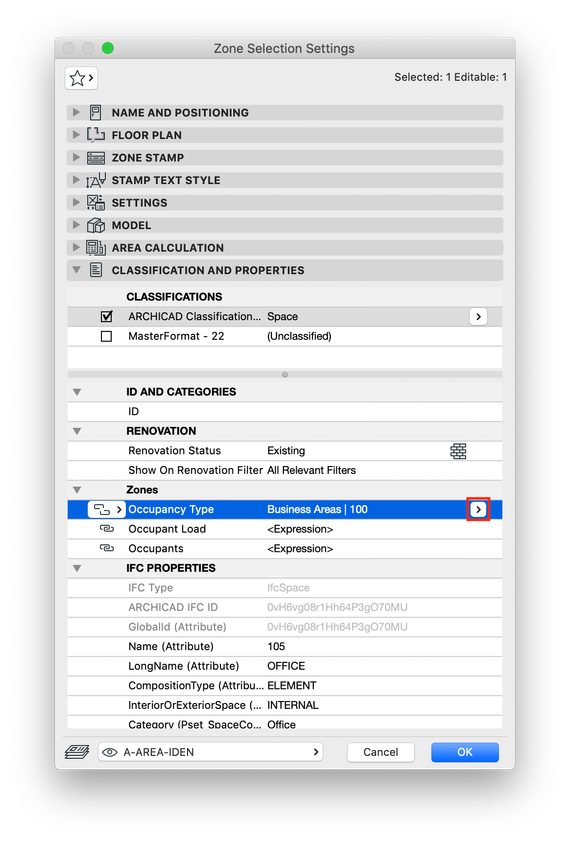
4.Under the Zones section, set the Occupancy Type for the selected zone.
 NOTE: If left undefined, the Occupants will not be calculated.
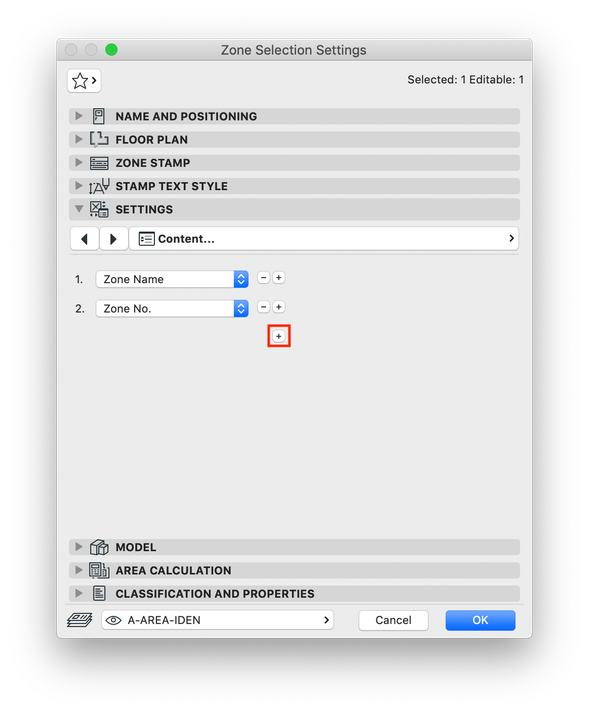
5. Under the Settings tab, navigate to the Content section and click the + button.
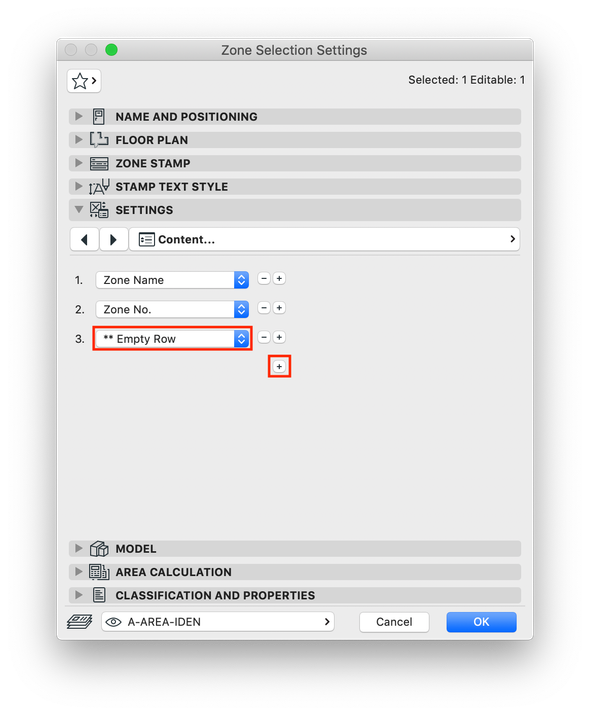
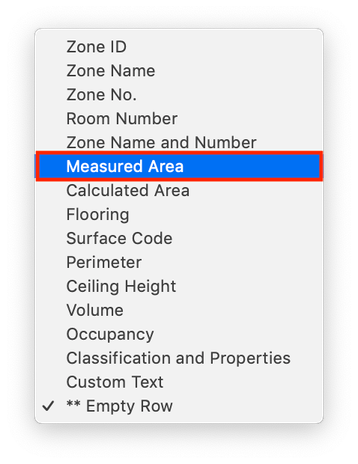
6. Click on the new field entitled "** Empty Row" and choose Measured Area. Click the + button to add another field.
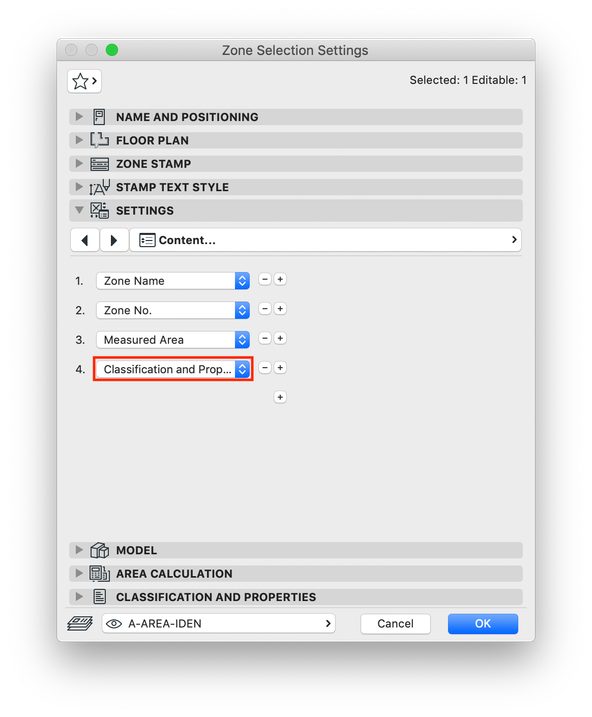
7. Click on the new field entitled "** Empty Row" and choose Classification and Properties.
8. Under the Settings tab, navigate to the Classifications and Properties. Set the Select Data field to Create Sorting. Set the Display Data by field to Parameter Name and Value. Select row 1 and click the arrow.
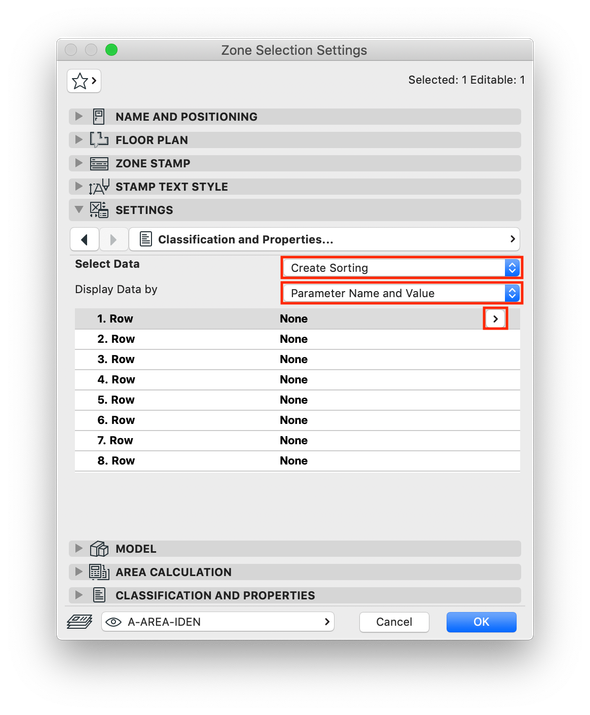
9. Select the Occupants property and click OK.
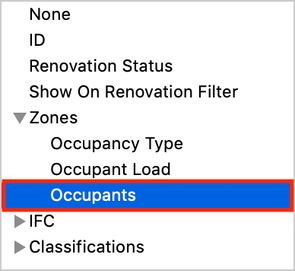
10. The maximum number of occupants will now appear in the zone stamp.
 NOTE: If the Occupancy Type is changed this value will update.

11. Repeat the process for other zones in the project.
 NOTE: Once the zones have all been classified and their Occupancy Types chosen, this information can be scheduled.
- Mark as Read
- Mark as New
- Bookmark
- Permalink
- Report Inappropriate Content
perhaps the Option set could be created from the Zone Categories in the future
- Mark as Read
- Mark as New
- Bookmark
- Permalink
- Report Inappropriate Content
Interesting!
I will check it out compared to the requirements of some local building codes.
- Mark as Read
- Mark as New
- Bookmark
- Permalink
- Report Inappropriate Content
We can get a total but how to add some text (or create a unit) to the total so its clear what the total refers to.
For example 47 occupants. (the schedule area says 141.93 m2 but the occupants have no units)
It seems to me that the whole issue with Expressions is that we can't create new units. This wasn't the case with the "OLD" Properties. Perhaps I have missed something.
- Mark as Read
- Mark as New
- Bookmark
- Permalink
- Report Inappropriate Content
@David Shorter I am not sure the number of occupants needs to be expressed in some units. To calculate occupancy load, we can directly refer to our respective local building code(s) to check it out compared to that of the Archicad zone properties.
- Mark as Read
- Mark as New
- Bookmark
- Permalink
- Report Inappropriate Content
@Martin Jules There are a number of reasons why totals need to be expressed with specific units and this should be a basic function.
Here are two examples.
The above is a Farm plan with a layout of the paddocks.
The paddock areas are measured in hectares and are scheduled as such
BUT its impossible to show the total in Ha
Here is another example where I cant show the total as bricks
or define the total as blocks
Its really silly to have export the schedules to Excel just to define the 'units'
- Mark as Read
- Mark as New
- Bookmark
- Permalink
- Report Inappropriate Content
I agree it would be nice to have the units in the totals, but you heading does say what that column is.
Barry.
- Mark as Read
- Mark as New
- Bookmark
- Permalink
- Report Inappropriate Content
@Barry Kelly With a long schedule you may not see the top and why then be able to put M2 or m3 against the total and not the more obscure units. With the OLD properties this easy as units were applied at the end of the calculation just like Excel.
- Mark as Read
- Mark as New
- Bookmark
- Permalink
- Report Inappropriate Content
You can freeze the header in 25.
I'm not sure how many versions back that can be done or if it is just new in 25.
This is only on-screen in Archicad.
In the layouts you can split the schedules across multiple pages and i am pretty sure that duplicates the headers.
Barry.
- Mark as Read
- Mark as New
- Bookmark
- Permalink
- Report Inappropriate Content
@Barry Kelly OK but its a workaround for something which should be accessible by default.
Unfortunately with the complications of having to specify and use units during the calculation I suspect it almost impossible.
- Mark as Read
- Mark as New
- Bookmark
- Permalink
- Report Inappropriate Content
@David Shorter I will check it out again this week-end and will let you know.


