Cylinder and Elbow Intersection
Anonymous
Not applicable
Options
- Mark as New
- Bookmark
- Subscribe
- Mute
- Subscribe to RSS Feed
- Permalink
- Report Inappropriate Content
2021-02-04
03:07 AM
- last edited on
2021-09-14
01:26 PM
by
![]() Noemi Balogh
Noemi Balogh
2021-02-04
03:07 AM
Hello All,
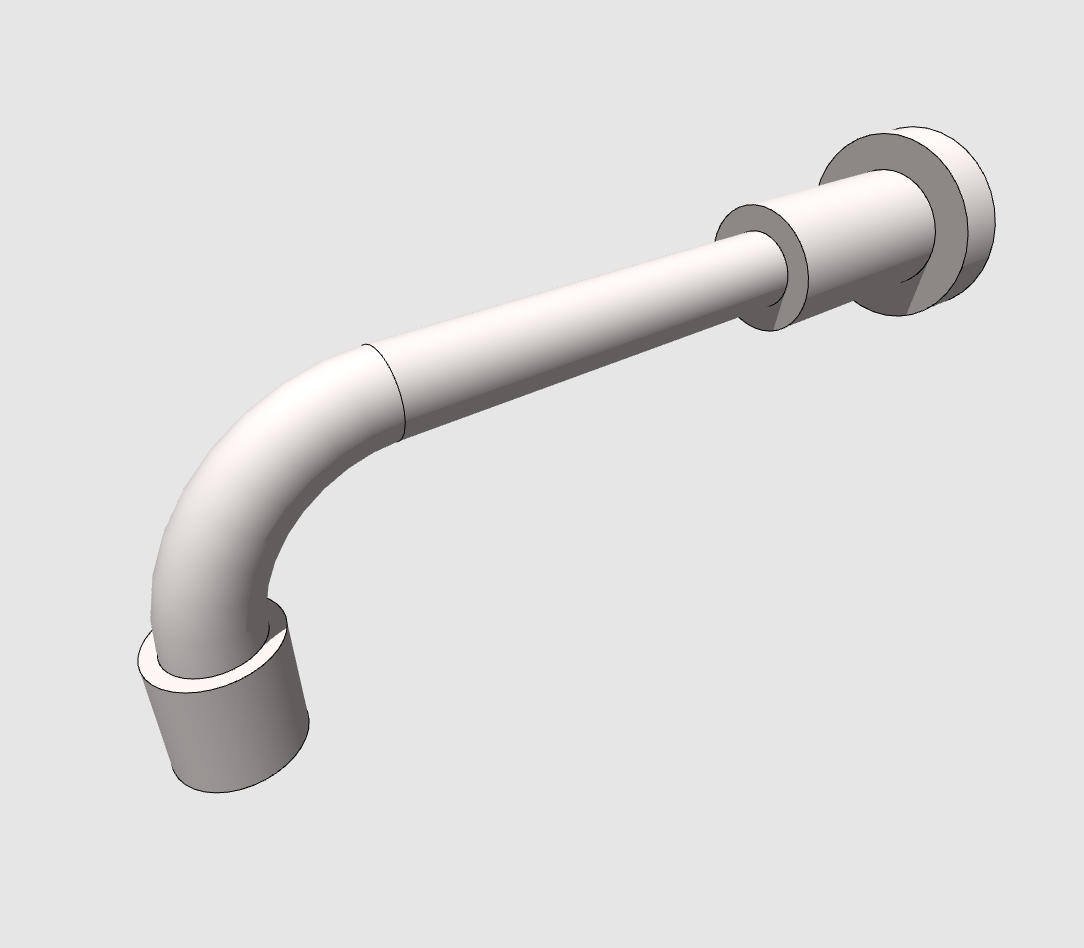
I'm using cylinders and elbows to make a bath tub faucet. Is there a way to eliminate the line between the intersection of the cylinder and elbow, the line appears in 3d, plan and elevation.
Or is there a better tool that I should be using to make this j shape?
I’ve attached a couple images and the code. Thank you!
![]()

I'm using cylinders and elbows to make a bath tub faucet. Is there a way to eliminate the line between the intersection of the cylinder and elbow, the line appears in 3d, plan and elevation.
Or is there a better tool that I should be using to make this j shape?
I’ve attached a couple images and the code. Thank you!
!ROUND
HOTSPOT 0,0,0

MATERIAL Material_color

!PLATE
ROTX 90
CYLIND .5", W/2

!BRACKET
ADDZ .5"
CYLIND 2", .625"
ADDZ 2"
CYLIND 4", 3/8"

!CONNECTION
ADDZ 4"
ROTZ 270
ELBOW 1.5", 90, 3/8"
ADDZ 1.5"
ADDX 1.5"
ROTY 90
CYLIND 1", .5”
Labels:
- Labels:
-
Library (GDL)
13 REPLIES 13
Options
- Mark as New
- Bookmark
- Subscribe
- Mute
- Subscribe to RSS Feed
- Permalink
- Report Inappropriate Content
2021-02-05 02:20 AM
2021-02-05
02:20 AM
potterandrew wrote:
The line was still visible for me when using the group command between the CYLIND and ELBOW.
Seems I was wrong about that - sorry.
potterandrew wrote:
The PRISM_ and REVOLVE worked perfectly for everything except the front elevation view. Now there is no line where the spout meets the wall bracket. I tried to solve it with changing the status code but it seems that both ends of the PRISM_ are either visible or hidden. Is there a status code i'm missing to just make the back line visible and leave the front line off?
Unfortunately that seems to be a problem with the masking works.
The lines at the front of the spout are masked as you want but as they are exactly the same size as the rear of the spout, the front blocks the rear lines.
A trick is to add a very slightly bigger prism, cylinder, plane or just lines/circle on the flat surface behind.
Here I have added an extra prism the same as the spout, made it slightly larger and very short.
You could make it even shorter and not as wide but there will be a limit before it gets hidden again.
!ROUND
HOTSPOT 0,0,0

MATERIAL Material_color

!PLATE
ROTX 90
CYLIND .5", W/2

!BRACKET
ADDZ .5"
CYLIND 2", .625"

!SPOUT
ADDZ 2"
ROTZ 270

!!!!new extra prism added for spout line.*******************************
PRISM_ 7, 0.00001,
				 3/8"+0.0001,    0.0,    15+64,
				    0,    0.0,    900,
				    0,    180,    4015+64,
			    -3/8"-0.0001,    0.0,    11+64,
				    0,    0.0,    900,
				    0,    180,    4015+64,
				 3/8"+0.0001,    0.0,    -1
!!!!new extra prism added for spout line.*******************************

PRISM_ 7, 4",
				 3/8",    0.0,    11+64,
				    0,    0.0,    900,
				    0,    180,    4011+64,
			    -3/8",    0.0,    11+64,
				    0,    0.0,    900,
				    0,    180,    4011+64,
				 3/8",    0.0,    -1
ROTz 90
ADD 0, -1.5",4"
REVOLVE 7, 90, 1*0+2*0+4*0+16*0+32*1+64*0,
				3/8",   1.5",   1,
				0,       1.5",  900,
				0,       180,   4011+64,
			   -3/8",   1.5",   1,
				0,       1.5",  900,
				0,       180,   4011+64,
				3/8",   1.5",   1
ADDZ 1.5"
ROTX 90
CYLIND 1", .5"

END
Barry.
One of the forum moderators.
Versions 6.5 to 27
i7-10700 @ 2.9Ghz, 32GB ram, GeForce RTX 2060 (6GB), Windows 10
Lenovo Thinkpad - i7-1270P 2.20 GHz, 32GB RAM, Nvidia T550, Windows 11
Versions 6.5 to 27
i7-10700 @ 2.9Ghz, 32GB ram, GeForce RTX 2060 (6GB), Windows 10
Lenovo Thinkpad - i7-1270P 2.20 GHz, 32GB RAM, Nvidia T550, Windows 11
Options
- Mark as New
- Bookmark
- Subscribe
- Mute
- Subscribe to RSS Feed
- Permalink
- Report Inappropriate Content
2021-02-05 02:54 AM
2021-02-05
02:54 AM
Hi All,
The best way to build this element and have all perfect representation is to use REVOVLE and TUBE.
These two elements will give you control over edge visibility and most important will show the contours in elevation.
The curved elements also also respond to a resol command to reduce polygon count.
Also the comments on the tube being segmented and not responding to resol can be resolved if you script using PUT and GET statements and a for n = 0 to nAngle step nAngle/(ceil(nAngle/(360/resol)))
try this:
	!!-------------set variable, but these should be parameters
	dSpout = .160
	radSpout = .025
	curveSpout = .070

	put 0, .060/2, 0
	put .012, .060/2, 0
	put .012, radSpout/2 +.005, 0
	put .060, radSpout/2 +.005, 0
	revolve nsp/3, 360, 1+2+4+8+16+32,
		get(nsp)


	!!-------------------tube profile
	cntNSP_1 = 0
	put 0, 0, 901: 			cntNSP_1 = cntNSP_1 +1
	put radSpout/2, 360, 4001: 	cntNSP_1 = cntNSP_1 +1
	!!-------------------tube path
	cntNSP_2 = 0
	put .059, 0, 0, 0: cntNSP_2 = cntNSP_2 +1
	put .060, 0, 0, 0: cntNSP_2 = cntNSP_2 +1
	for n = 0 to 90 step 90/(ceil(90/(360/gs_resol)))
		put dSpout +curveSpout*sin(n), 0, -curveSpout +curveSpout*cos(n), 0: cntNSP_2 = cntNSP_2 +1
	next n
	put dSpout +curveSpout*sin(91), 0, -curveSpout +curveSpout*cos(91), 0: cntNSP_2 = cntNSP_2 +1
	tube cntNSP_1, cntNSP_2, 1+2+16+32,
		get(nsp)

	!!--------------------nossle
	add dSpout +curveSpout, 0, -curveSpout
	roty 90
		put .000, radSpout/2 +.003, 0
		put .030, radSpout/2 +.003, 0
		revolve nsp/3, 360, 1+2+4+8+16+32,
			get(nsp)
	del 2
Options
- Mark as New
- Bookmark
- Subscribe
- Mute
- Subscribe to RSS Feed
- Permalink
- Report Inappropriate Content
2021-02-05 03:00 AM
2021-02-05
03:00 AM
Barry wrote:You weren't wrong. it can be done using the ADDGROUP{2} command which enables you to smooth the lines. it works really well especially when carving out a toilet geometry which curves in multiple directions.
Joachim wrote:Sorry I was wrong about the grouping will merge the lines.
Barry: You can 'Group' them and they will mergeHow does this work with GROUP commands?
I could have sworn I had done that before, but it seems not.
Options
- Mark as New
- Bookmark
- Subscribe
- Mute
- Subscribe to RSS Feed
- Permalink
- Report Inappropriate Content
2021-02-05 03:12 PM
2021-02-05
03:12 PM
Just about everything I code is done using tubes. They are by far my favorite
- « Previous
-
- 1
- 2
- Next »
- « Previous
-
- 1
- 2
- Next »
