Turn on suggestions
Auto-suggest helps you quickly narrow down your search results by suggesting possible matches as you type.
Showing results for
Turn on suggestions
Auto-suggest helps you quickly narrow down your search results by suggesting possible matches as you type.
Showing results for
- Graphisoft Community (INT)
- :
- Forum
- :
- Modeling
- :
- Moving the cursor...
Options
- Subscribe to RSS Feed
- Mark Topic as New
- Mark Topic as Read
- Pin this post for me
- Bookmark
- Subscribe to Topic
- Mute
- Printer Friendly Page
Modeling
About Archicad's design tools, element connections, modeling concepts, etc.
Moving the cursor...
Anonymous
Not applicable
Options
- Mark as New
- Bookmark
- Subscribe
- Mute
- Subscribe to RSS Feed
- Permalink
- Report Inappropriate Content
2014-02-12
12:21 AM
- last edited on
2023-05-24
09:04 AM
by
![]() Rubia Torres
Rubia Torres
2014-02-12
12:21 AM
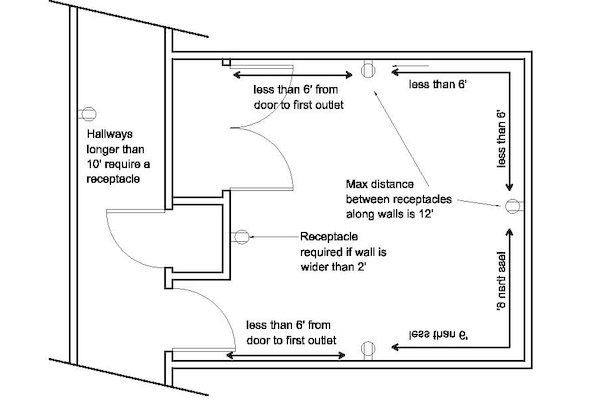
Also, I am working on my electrical plan now, and if any of you happen to have gone through this you'll know that there's that annoying code about the placement of plug outlets: they have to be placed at a maximum distance of 12 feet, 6 feet from a door opening etc. etc. -_-
Well, this involves measuring the inner edge of a wall, often going over a corner, therefore I need the Cumulative Distance, which is available in the Measure Tool. But it's kind of hard to do the math in my head or using an external calculator application.
Here's an image:
Also, it would be nice to have a couple of dimensions on the electrical plan marking the distance between the receptacles, but I can't find a method in ArchiCAD's dimension tool that allows an alteration in the direction of measurement.
5 REPLIES 5
Options
- Mark as New
- Bookmark
- Subscribe
- Mute
- Subscribe to RSS Feed
- Permalink
- Report Inappropriate Content
2014-02-12 03:11 AM
2014-02-12
03:11 AM
Sounds like you might want to look at using the special snap point tool.
http://helpcenter.graphisoft.com/guides/archicad-17-int-reference-guide/interaction/on-screen-input-...
Set your 6' distance and hover the cursor over the wall and you will see snap points for where you can place your objects.
Or you can use the measure tool and use the "mark location" icon (small circular crosshair next to the tick) to place guidelines at the distance you type into the distance field.
Also any figures in the tracker/measurement fields can be adde or subtracted to by using what I call back to front maths (I am sure there is a proper term for it).
Whatever figure you see you can then just type a number and then press '+' or '-' after it and it will be added or subtracted from the original figure.
So you could measure (click) in one corner, move to another corner (don't click) and you will see a distance (i.e 10.2'). Now type 6- and the figure will change to 4.2' and the cursor will move as well. Press the makrk position icon to place guide lines.
I think because you are Imperial measurements you might need to type '6--', the first dash is 'feet' and the second dash is 'subtract'.
The measure tool is accumulative and will measure around corners but you can't mark the position of a distance around a corner.
Dimentions can't dimension around a corner, you have to place 2 separate dimensions.
Barry.
One of the forum moderators.
Versions 6.5 to 27
i7-10700 @ 2.9Ghz, 32GB ram, GeForce RTX 2060 (6GB), Windows 10
Lenovo Thinkpad - i7-1270P 2.20 GHz, 32GB RAM, Nvidia T550, Windows 11
Versions 6.5 to 27
i7-10700 @ 2.9Ghz, 32GB ram, GeForce RTX 2060 (6GB), Windows 10
Lenovo Thinkpad - i7-1270P 2.20 GHz, 32GB RAM, Nvidia T550, Windows 11
Options
- Mark as New
- Bookmark
- Subscribe
- Mute
- Subscribe to RSS Feed
- Permalink
- Report Inappropriate Content
2014-02-12 08:36 AM
2014-02-12
08:36 AM
Actually you don't need to use that temporary vector tool (or what ever it is called).
Just set your special snap distance and set the snap tool to 'between intersections' and then hover your mouse over the wall.
You will see the snap points at the distance you set.
Barry.

Just set your special snap distance and set the snap tool to 'between intersections' and then hover your mouse over the wall.
You will see the snap points at the distance you set.
Barry.
One of the forum moderators.
Versions 6.5 to 27
i7-10700 @ 2.9Ghz, 32GB ram, GeForce RTX 2060 (6GB), Windows 10
Lenovo Thinkpad - i7-1270P 2.20 GHz, 32GB RAM, Nvidia T550, Windows 11
Versions 6.5 to 27
i7-10700 @ 2.9Ghz, 32GB ram, GeForce RTX 2060 (6GB), Windows 10
Lenovo Thinkpad - i7-1270P 2.20 GHz, 32GB RAM, Nvidia T550, Windows 11
Anonymous
Not applicable
Options
- Mark as New
- Bookmark
- Subscribe
- Mute
- Subscribe to RSS Feed
- Permalink
- Report Inappropriate Content
2014-02-12 04:41 PM
2014-02-12
04:41 PM
Thanks so much Barry, I didn't know that you can set up a special snap point... well I guess I did but it didn't dawn on me I can manipulate it in this case. Well, that solves my problem. 
Too bad about the dimension, if I want I suppose I'll just put a line with arrowheads and insert a text.
Too bad about the dimension, if I want I suppose I'll just put a line with arrowheads and insert a text.
Anonymous
Not applicable
Options
- Mark as New
- Bookmark
- Subscribe
- Mute
- Subscribe to RSS Feed
- Permalink
- Report Inappropriate Content
2014-02-12 05:00 PM
2014-02-12
05:00 PM
Wait... it does help on a straight wall, but when a corner is involved things get complicated. I think I need to look at the 'Special Snap Points on Temporary Vector'. 
_______________________________________________________________
Edit: My bad, I didn't make myself clear about what I need. The previous image I supplied made it look like as if I needed to measure 6 ft. from a corner, but what I really need is to measure 12 ft. from one receptacle to another, and when they are separated by a corner it gets complicated. See attachment.
I think I know a way to resolve this, I will post back if it works out.
Anonymous
Not applicable
Options
- Mark as New
- Bookmark
- Subscribe
- Mute
- Subscribe to RSS Feed
- Permalink
- Report Inappropriate Content
2014-02-13 01:54 AM
2014-02-13
01:54 AM
Here is a sample of the code if you're interested. I had to save eight different scripts for the four variations of the directions of the corner, and the distance ( 6' and 12' ).
^!u::      ; this one programs the cursor to move up
Click
Loop, 5            ; this enters the 'Cumulative Distance' field
{
Send, {Tab}
Sleep, 200       ; The sleep pauses the script for an amount of time as to accommodate for ArchiCAD. I set it to 0.2 seconds just in case my computer laggs.
Send, ^c         ; Copy that distance
Sleep, 200
Send, y           ; If it's a left or right corner it should be "Send, x"
Sleep, 200
Send, 6'          ; the distance you want the cursor to jump, measured from the starting point
Send, {+}       ; move the cursor 6' up
Sleep, 200
Send, ^v
Sleep, 200
Send, {-}{-}    ; move it a distance down. this distance measured from the starting point to the corner.
Send, {Esc}
Send, {Esc}     ; Exits the measurement, now you can place electrical components.
return
See attached image as well.

Related articles
- Moving Layout Book elements from one project to another in Documentation
- Change Revision Manager & Tool Help in Documentation
- Locking the angle when moving or copying doesn't restrain the movement to the angle selected in Modeling
- Unlocking and moving a DWG in Collaboration with other software
- ArchiCAD-Autocad interoperability and issues with objects as blocks in Collaboration with other software
Still looking?
