
Turn on suggestions
Auto-suggest helps you quickly narrow down your search results by suggesting possible matches as you type.
Showing results for
EN
Turn on suggestions
Auto-suggest helps you quickly narrow down your search results by suggesting possible matches as you type.
Showing results for
Options
- Subscribe to RSS Feed
- Mark Topic as New
- Mark Topic as Read
- Pin this post for me
- Bookmark
- Subscribe to Topic
- Mute
- Printer Friendly Page
Michal Forejt
Booster
Options
- Mark as New
- Bookmark
- Subscribe
- Mute
- Subscribe to RSS Feed
- Permalink
- Report Inappropriate Content
2005-03-26 06:57 PM
Paint the 1/2 of the wall
2005-03-26
06:57 PM
probably this is another "stupid" question which should be solved by author in few minutes...in case he was more clever
I need to paint wall e.g. only 100 cm height with one color and the rest with another color. How can I do it?
Thanks in advance
Michal
ArchiCAD 28
MacOS 15.5
MacBook Pro M4 Pro
MacOS 15.5
MacBook Pro M4 Pro
9 Replies 9
Anonymous
Not applicable
Options
- Mark as New
- Bookmark
- Subscribe
- Mute
- Subscribe to RSS Feed
- Permalink
- Report Inappropriate Content
2005-03-26 09:37 PM
2005-03-26
09:37 PM
Michal wrote:Go to Extras/Accessories/Wall Accessories... and choose Moldings and Panels
I need to paint wall e.g. only 100 cm height with one color and the rest with another color. How can I do it?
woodster
Karl Ottenstein
Moderator Emeritus
Options
- Mark as New
- Bookmark
- Subscribe
- Mute
- Subscribe to RSS Feed
- Permalink
- Report Inappropriate Content
2005-03-27 03:50 AM
2005-03-27
03:50 AM
Michal wrote:If you really mean paint - something that shows in renderings - and not something that shows in line drawings, then you can do this just with a material... and this will work for columns and other objects, too. If only for walls, then Woody's method is definitely the way to go.
I need to paint wall e.g. only 100 cm height with one color and the rest with another color. How can I do it?
The method I’ll describe can apply to “roofs” (sloped surfaces), and any other textured surface too. (For roofs, it won’t be by height, but by distance from an edge for example.)
Creating a custom material for this situation is not as easy as saying "100 cm", which the wall accessory lets you do. Instead, you need to create an image in a photoediting program such as Photoshop (Elements or the full version).
This texture only needs to be a few pixels wide (enough to show some "noise" so that it is not just a solid color – which would not be believable)... and enough pixels high so that it will look good at your rendering size.
First, decide what the tallest surface is that you will map this texture onto. Since the texture will tile in both the x and y directions, you don’t want your 100 cm paint starting to appear again at the ceiling.
For this example, I assumed that my tallest wall, column, etc. that I wanted to paint would be 300 cm.
I created a new image in Photoshop that was 20 pixels wide by 600 pixels high. Using the Info Box to guide me, I stretched a marquee over the bottom 200 pixels and filled them with a dark green tone. I inverted the marquee (ctrl-shift-I) and filled the top with an off-white. Delete the marquee (ctrl-D). Add a small amount of noise to the entire image: Filter | Noise | Add Noise – 3.5% uniform monochromatic in the attachment. Saved as JPG at 100% quality (file is tiny anyway).
(Continued in next post….)

Vote for Wish: Copy/Paste in 3D
AC 29 USA and earlier • hardware key • macOS Tahoe 26.5 MacBook Pro M2 Max 12CPU/30GPU cores, 32GB
AC 29 USA and earlier • hardware key • macOS Tahoe 26.5 MacBook Pro M2 Max 12CPU/30GPU cores, 32GB
Karl Ottenstein
Moderator Emeritus
Options
- Mark as New
- Bookmark
- Subscribe
- Mute
- Subscribe to RSS Feed
- Permalink
- Report Inappropriate Content
2005-03-27 03:51 AM
2005-03-27
03:51 AM
In ArchiCAD, I created a new material by duplicating one of the existing ‘paint’ materials. (Keeps the similar settings.) In the Texture panel, I set the height to be 300 cm … my intended height of the designed material. Since the bottom third of my image was the different paint, that means that the bottom 100 cm of this texture will not be that dark paint. Before leaving the Material Settings dialog be sure to go to the LightWorks settings and click the “Match with Internal Engine” button so that the texture will be used by LightWorks, too. (More on this in a bit.)
(Continued in next post…)

(Continued in next post…)
Vote for Wish: Copy/Paste in 3D
AC 29 USA and earlier • hardware key • macOS Tahoe 26.5 MacBook Pro M2 Max 12CPU/30GPU cores, 32GB
AC 29 USA and earlier • hardware key • macOS Tahoe 26.5 MacBook Pro M2 Max 12CPU/30GPU cores, 32GB
Karl Ottenstein
Moderator Emeritus
Options
- Mark as New
- Bookmark
- Subscribe
- Mute
- Subscribe to RSS Feed
- Permalink
- Report Inappropriate Content
2005-03-27 03:52 AM
2005-03-27
03:52 AM
I drew three walls with heights 100cm, 300cm, and 400cm and applied the new material to each. Screenshot attached.
The 400 cm is shown just to reinforce that the material will tile continuously, and since I set up the texture image to be 300cm high, you see the green begin again at 300cm. If I wanted a texture that worked on 400cm walls, I’d have to edit my image in Photoshop and make it 800 pixels high instead of 600… so it pays to think through the usage ahead of time to avoid re-doing it.
(Continued in next post…)
Vote for Wish: Copy/Paste in 3D
AC 29 USA and earlier • hardware key • macOS Tahoe 26.5 MacBook Pro M2 Max 12CPU/30GPU cores, 32GB
AC 29 USA and earlier • hardware key • macOS Tahoe 26.5 MacBook Pro M2 Max 12CPU/30GPU cores, 32GB
Karl Ottenstein
Moderator Emeritus
Options
- Mark as New
- Bookmark
- Subscribe
- Mute
- Subscribe to RSS Feed
- Permalink
- Report Inappropriate Content
2005-03-27 03:55 AM
2005-03-27
03:55 AM
Look at the attached image generated by LightWorks. A bit of a problem, eh? The “Match with Internal Engine” button is clearly doing the wrong thing. This is a known bug.
(Continued in next post…)

(Continued in next post…)
Vote for Wish: Copy/Paste in 3D
AC 29 USA and earlier • hardware key • macOS Tahoe 26.5 MacBook Pro M2 Max 12CPU/30GPU cores, 32GB
AC 29 USA and earlier • hardware key • macOS Tahoe 26.5 MacBook Pro M2 Max 12CPU/30GPU cores, 32GB
Karl Ottenstein
Moderator Emeritus
Options
- Mark as New
- Bookmark
- Subscribe
- Mute
- Subscribe to RSS Feed
- Permalink
- Report Inappropriate Content
2005-03-27 03:59 AM
2005-03-27
03:59 AM
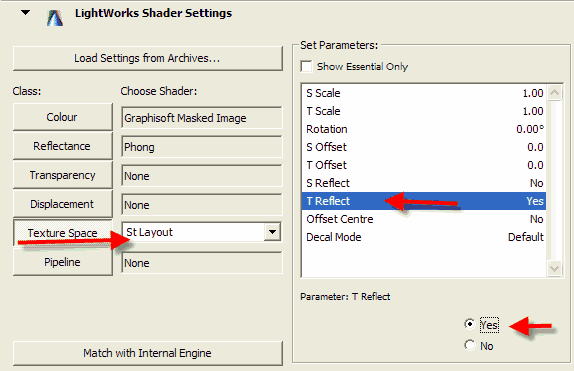
Ransom Ratcliff (AEC Infosystems / Baltimore) brought this “Match with…” problem and a solution to my attention. (Ransom makes uncountable contributions to the ArchiCAD community - Thanks, Ransom!)
To make the LW material match the internal/OpenGL material, click on Texture Space as in the attached screenshot, choose St Layout, then select T Reflect and change it to “yes”.
(Continued in next post…)
To make the LW material match the internal/OpenGL material, click on Texture Space as in the attached screenshot, choose St Layout, then select T Reflect and change it to “yes”.
(Continued in next post…)
Vote for Wish: Copy/Paste in 3D
AC 29 USA and earlier • hardware key • macOS Tahoe 26.5 MacBook Pro M2 Max 12CPU/30GPU cores, 32GB
AC 29 USA and earlier • hardware key • macOS Tahoe 26.5 MacBook Pro M2 Max 12CPU/30GPU cores, 32GB
Karl Ottenstein
Moderator Emeritus
Options
- Mark as New
- Bookmark
- Subscribe
- Mute
- Subscribe to RSS Feed
- Permalink
- Report Inappropriate Content
2005-03-27 04:03 AM
2005-03-27
04:03 AM
After that correction (temporary bug workaround), the image from LW appears correct as seen in the attached.
This takes less than a minute in total - Photoshop and all - once you're used to doing these kinds of things. Whether it is worth doing vs using the wall accessory depends totally on whether the wall accessory is enough for what you need to do. But, you can see how you can extend this technique to do all kinds of things ... color bands at various heights, vertical stripes, etc ... all at (reasonably) precise locations by thinking through the mapping of pixels to distances.
The columns in the attached image show something that cannot be done with the wall accessory.
(The tops of the columns are not consistent because of the texture mapping and the fact that columns can be assigned only one material ... not a separate one for the tops/bottoms. The only way to get the tops all one color would be to solid element subtract a slab from them with the op set to inherit the properties of the operator ... then the slab material would be mapped onto the column tops.)
Have fun with it,
Karl
Vote for Wish: Copy/Paste in 3D
AC 29 USA and earlier • hardware key • macOS Tahoe 26.5 MacBook Pro M2 Max 12CPU/30GPU cores, 32GB
AC 29 USA and earlier • hardware key • macOS Tahoe 26.5 MacBook Pro M2 Max 12CPU/30GPU cores, 32GB
Michal Forejt
Booster
Options
- Mark as New
- Bookmark
- Subscribe
- Mute
- Subscribe to RSS Feed
- Permalink
- Report Inappropriate Content
2005-03-27 02:32 PM
2005-03-27
02:32 PM
Thank you both for your answers...it seems that the "texture" tip is better for me.
BtBadKarl, is your only one job to post in forums? Your post is awesome step-by-step guide . I can't believe, you have enough time for your own job, lol.
Best
Michal
BtBadKarl, is your only one job to post in forums? Your post is awesome step-by-step guide
Best
Michal
ArchiCAD 28
MacOS 15.5
MacBook Pro M4 Pro
MacOS 15.5
MacBook Pro M4 Pro
Karl Ottenstein
Moderator Emeritus
Options
- Mark as New
- Bookmark
- Subscribe
- Mute
- Subscribe to RSS Feed
- Permalink
- Report Inappropriate Content
2005-03-27 11:12 PM
2005-03-27
11:12 PM
Michal wrote:
Karl, is your only one job to post in forums? Your post is awesome step-by-step guide
Thanks, Michal. Actually, when I post here it usually means that I'm procrastinating working on an awful project
Karl
Vote for Wish: Copy/Paste in 3D
AC 29 USA and earlier • hardware key • macOS Tahoe 26.5 MacBook Pro M2 Max 12CPU/30GPU cores, 32GB
AC 29 USA and earlier • hardware key • macOS Tahoe 26.5 MacBook Pro M2 Max 12CPU/30GPU cores, 32GB
Still looking?
