
Turn on suggestions
Auto-suggest helps you quickly narrow down your search results by suggesting possible matches as you type.
Showing results for
EN
Turn on suggestions
Auto-suggest helps you quickly narrow down your search results by suggesting possible matches as you type.
Showing results for
Options
- Subscribe to RSS Feed
- Mark Topic as New
- Mark Topic as Read
- Pin this post for me
- Bookmark
- Subscribe to Topic
- Mute
- Printer Friendly Page
Anonymous
Not applicable
Options
- Mark as New
- Bookmark
- Subscribe
- Mute
- Subscribe to RSS Feed
- Permalink
- Report Inappropriate Content
2006-12-16 02:53 AM
Contour lines and the magic wand
2006-12-16
02:53 AM
I drew splines as cut lines, then clicked the magic wand on them but i cant find anything where it specifies the height.
The training guide says "change the heights of the contour lines"....not much help there
21 Replies 21
Anonymous
Not applicable
Options
- Mark as New
- Bookmark
- Subscribe
- Mute
- Subscribe to RSS Feed
- Permalink
- Report Inappropriate Content
2006-12-16 05:51 AM
2006-12-16
05:51 AM
"-add new node to spline" should not be there because meshes
do not have splines. All contour lines are composed of straight segments.
You must mean the symbol for add new node,
or you are talking about the text of a help tag in which case you
have selected a spline which should have been deleted or hidden.
Make sure you don't have any splines left in the mesh area.
Try selecting the contour but not activating the mesh tool and see
if you can get the elevate button to show.
Peter Devlin
Anonymous
Not applicable
Options
- Mark as New
- Bookmark
- Subscribe
- Mute
- Subscribe to RSS Feed
- Permalink
- Report Inappropriate Content
2006-12-16 06:20 AM
2006-12-16
06:20 AM
I guess i dont know what is what. I draw a spline, apply the magic wand, and im left with 2 entities on the same layer, im assuming the one with less nodes is the original spline and the one with 3x as many nodes is the aledged contour line. Regardless of which one i have highlighted i still get the same pallete options.
I also noticed the wand has 2 modes, 1 with a black dot, and one with a white dot. Whats up with that? And when i do the wand, should i be directly on the spline, or inbetween 2 of them?
I also noticed the wand has 2 modes, 1 with a black dot, and one with a white dot. Whats up with that? And when i do the wand, should i be directly on the spline, or inbetween 2 of them?
Anonymous
Not applicable
Options
- Mark as New
- Bookmark
- Subscribe
- Mute
- Subscribe to RSS Feed
- Permalink
- Report Inappropriate Content
2006-12-16 06:42 AM
2006-12-16
06:42 AM
You must get rid of those splines. They are interfering with your ability
to edit the mesh. If you don't want to change their layer
and don't want to delete them then select all of them by going to
Edit->Find and Select choose spline as the element type and hit select
and then drag all the splines out of the area of the mesh a known distance.
The Magic wand has three cursor forms, the dark dot on a stick,
the white flag on a stick, and the sparkler on a stick.
The dark dot means your are touching a node or hotspot.
The white flag means you are touching an edge similar to the mercedes.
The sparkler means your are not touching any thing but may be inside
a closed polygon that the wand can detect the edges of.
For the present purpose you should move the wand over the spline
until the white flag appears then click.
Peter Devlin
Anonymous
Not applicable
Options
- Mark as New
- Bookmark
- Subscribe
- Mute
- Subscribe to RSS Feed
- Permalink
- Report Inappropriate Content
2006-12-16 02:52 PM
2006-12-16
02:52 PM
I started this morning with a fresh mind. Thought maybe i had the wrong tool active when wanding so i activated the mesh tool, wanded the splines, and still got the same result.
Theres nothing i would love more than to delete the un needed lines but since they are on the same layer, i dont know which is which.
If you want to try to talk me through this on the phone send me a pm and ill give you my number
Thanks for all your effort
Theres nothing i would love more than to delete the un needed lines but since they are on the same layer, i dont know which is which.
If you want to try to talk me through this on the phone send me a pm and ill give you my number
Thanks for all your effort
Anonymous
Not applicable
Options
- Mark as New
- Bookmark
- Subscribe
- Mute
- Subscribe to RSS Feed
- Permalink
- Report Inappropriate Content
2006-12-16 03:17 PM
2006-12-16
03:17 PM
OK, im getting closer. I finally have solid meshes, but they are in the form of 'steps' instead of sloping to each other
And the ones that are below the main square are hidden (the main square mesh was not subtracted)
And the ones that are below the main square are hidden (the main square mesh was not subtracted)
Djordje
Moderator Emeritus
Options
- Mark as New
- Bookmark
- Subscribe
- Mute
- Subscribe to RSS Feed
- Permalink
- Report Inappropriate Content
2006-12-16 04:03 PM
2006-12-16
04:03 PM
thebatmovile wrote:This is because you created new meshes with each magic wand click, instead of the points - and contours - on an existing one.
OK, im getting closer. I finally have solid meshes, but they are in the form of 'steps' instead of sloping to each other
1. Do the mesh outline
2. make sure the countours are overlaid
3. Set magic wand to the outline tracing that you need - probably not linear elements?
4. WITH THE MESH TOOL ACTIVE AND THE MESH SELECTED magic wand click WITH MERCEDES CURSOR on each of the contours
5. If you can't find the Mercedes cursor, that means that your contours have too many nodes, which is not good
6. WITH THE CHEKMARK CURSOR, input the elevation of each contour, check the "apply to all nodes" box
7. It should be OK
Before plowing on, search for terrain modeling and meshes ... this procedure has been explained at least 50 times already, with screen shots, etc ...
Djordje
ArchiCAD since 4.55 ... 1995
HP Omen
ArchiCAD since 4.55 ... 1995
HP Omen
Anonymous
Not applicable
Options
- Mark as New
- Bookmark
- Subscribe
- Mute
- Subscribe to RSS Feed
- Permalink
- Report Inappropriate Content
2006-12-16 04:07 PM
2006-12-16
04:07 PM
I think you are just missing one step, but I'll start from the beginning.
first draw your mesh, nothing else there, then draw your lines, splines...etc. to represent your contours. Now go select the mesh and activate the mesh tool, fastest way is to right-click on the edge of the mesh and use the select & activate tool option. Use the magic wand on the contours you have drawn WHILE THE MESH IS SELECTED, as each one is created you will be able to enter the height. It sounds to me like you were using the magic wand without the mesh being selected so AC didn't know you were trying to modify it. Remember that we if your contours go all the way out to the edges, the changing the heights using the select all option does not affect the two points on the mesh perimeter, but make sure you don't select all when adjusting the perimeter nodes, or the entire edge of your mesh will adjust to that height. Also, if you are using curves or spines for your contours, you may need to adjust the magic wand settings to get things right.
first draw your mesh, nothing else there, then draw your lines, splines...etc. to represent your contours. Now go select the mesh and activate the mesh tool, fastest way is to right-click on the edge of the mesh and use the select & activate tool option. Use the magic wand on the contours you have drawn WHILE THE MESH IS SELECTED, as each one is created you will be able to enter the height. It sounds to me like you were using the magic wand without the mesh being selected so AC didn't know you were trying to modify it. Remember that we if your contours go all the way out to the edges, the changing the heights using the select all option does not affect the two points on the mesh perimeter, but make sure you don't select all when adjusting the perimeter nodes, or the entire edge of your mesh will adjust to that height. Also, if you are using curves or spines for your contours, you may need to adjust the magic wand settings to get things right.
Anonymous
Not applicable
Options
- Mark as New
- Bookmark
- Subscribe
- Mute
- Subscribe to RSS Feed
- Permalink
- Report Inappropriate Content
2006-12-16 04:46 PM
2006-12-16
04:46 PM
OK, between Djordje and Scott R's instructions i think i have it figured out. Now to get some practice.
Thanks everyone!!!
Thanks everyone!!!
Anonymous
Not applicable
Options
- Mark as New
- Bookmark
- Subscribe
- Mute
- Subscribe to RSS Feed
- Permalink
- Report Inappropriate Content
2006-12-20 07:26 PM
2006-12-20
07:26 PM
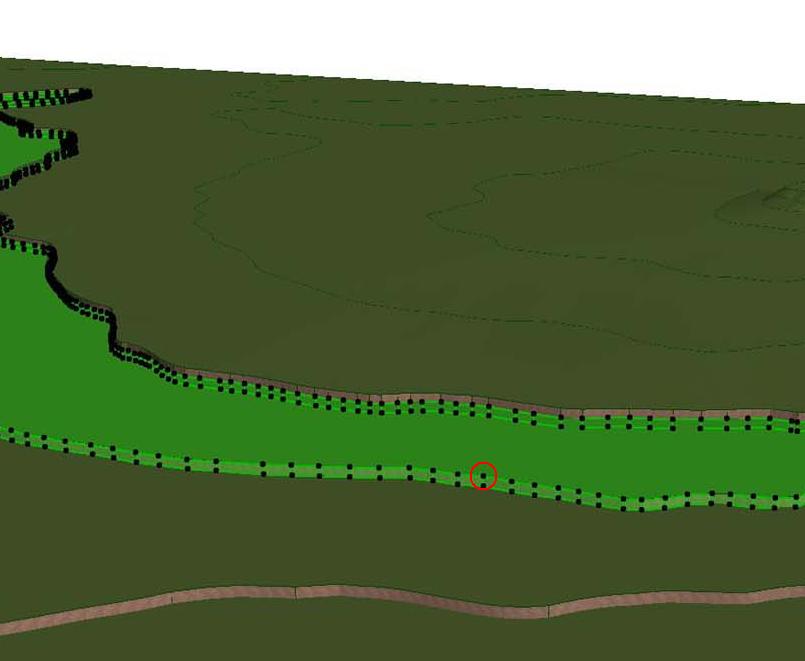
Do somebody mind if I ask a question about The Magic Wand?
This is a followup to the discussion onhttp://archicad-talk.graphisoft.com/viewtopic.php?t=13978
Anyway, I used the instructions you gave "thebatmovile", but when i want to heighten just some parts of a mesh, all of the points gets heighten.
It's the points which I illustrated with a red circle that I DON'T want to heighten. Am I attacking the problem the wrong way? Or can't I do this way with the meshtool?
________
LAMBORGHINI ESTOQUE HISTORY
This is a followup to the discussion on
Anyway, I used the instructions you gave "thebatmovile", but when i want to heighten just some parts of a mesh, all of the points gets heighten.
It's the points which I illustrated with a red circle that I DON'T want to heighten. Am I attacking the problem the wrong way? Or can't I do this way with the meshtool?
________
LAMBORGHINI ESTOQUE HISTORY
Anonymous
Not applicable
Options
- Mark as New
- Bookmark
- Subscribe
- Mute
- Subscribe to RSS Feed
- Permalink
- Report Inappropriate Content
2006-12-20 09:31 PM
2006-12-20
09:31 PM
I think the point that some may be missing here, is that there should only be one mesh, not a separate mesh for each contour.
Create a single mesh over the entire area concerned, select that mesh and magic wand the contour lines / splines. Then, when all contours are visble as ridges on your mesh (albeit still on the same plane) with mesh selected (and mesh tool active), click on a contour and select the "elevate mesh point" from pet palette, put in your elevation figure, and check the "apply to all" button, then OK. This will raise the contour to the height you want.
Hope this helps to clarify things.
Still looking?
Suggested topics
- Complex Profile: Thick Core Line Overridden/Cut Off at Window Junction in Modeling
- Stair Tolerance for Tread/Riser Gap in Modeling
- Missing Contour Lines at Door Openings (Wall Layout Plan) in Documentation
- Contour lines between zones? in Project data & BIM
- Is Archicad really suitable for medium-scale landscape projects? in Modeling
