- English
- :
- Knowledge Base
- :
- Modeling
- :
- Rhino – Grasshopper – Archicad Live Connection – S...
- Subscribe to RSS Feed
- Mark as New
- Mark as Read
- Bookmark
- Subscribe to Topic
- Printer Friendly Page
- Report Inappropriate Content
Rhino – Grasshopper – Archicad Live Connection – Simple Example
on 2022-04-26 10:04 AM
- Subscribe to RSS Feed
- Mark as New
- Mark as Read
- Bookmark
- Subscribe to Topic
- Printer Friendly Page
- Report Inappropriate Content
In this article I will be focusing on a simple example to demonstrate RH-GH-AC live connection, another wonderful OPEN BIM workflow from Graphisoft. We will start with an input from a Archicad (AC) file and based on that input a set of balconies will be created using Grasshopper (GH) which is running on top of Rhino (RH). There is not much use of RH but we need Rhino to run Grasshopper.
Initial Setup
Make sure all the three applications (AC, RH and GH) were installed along with live connection add-on from Graphisoft running.
Refer to Grasshopper Archicad Live Connection 2.3 User Guide from the following link:
Grasshopper-Archicad Live Connection 2.3 User Guide (Graphisoft.com)
Chapters to focus:
- Getting Started
- Launch the Applications
- Start the Connection
- Grasshopper Palette in Archicad
Grasshopper Help
To understand this exercise there is a need for basic understanding of Grasshopper. Please refer to the following links:
http://grasshopperprimer.com/en/1-foundations/1-1/2_the-grasshopper-ui.html
https://vimeopro.com/rhino/grasshopper-getting-started-by-david-rutten
Input from AC
- In Archicad create a simple building with 10 Story + Roof. Set the Story to Story height as 3000 mm. Create a Complex Profile for the railing as well.
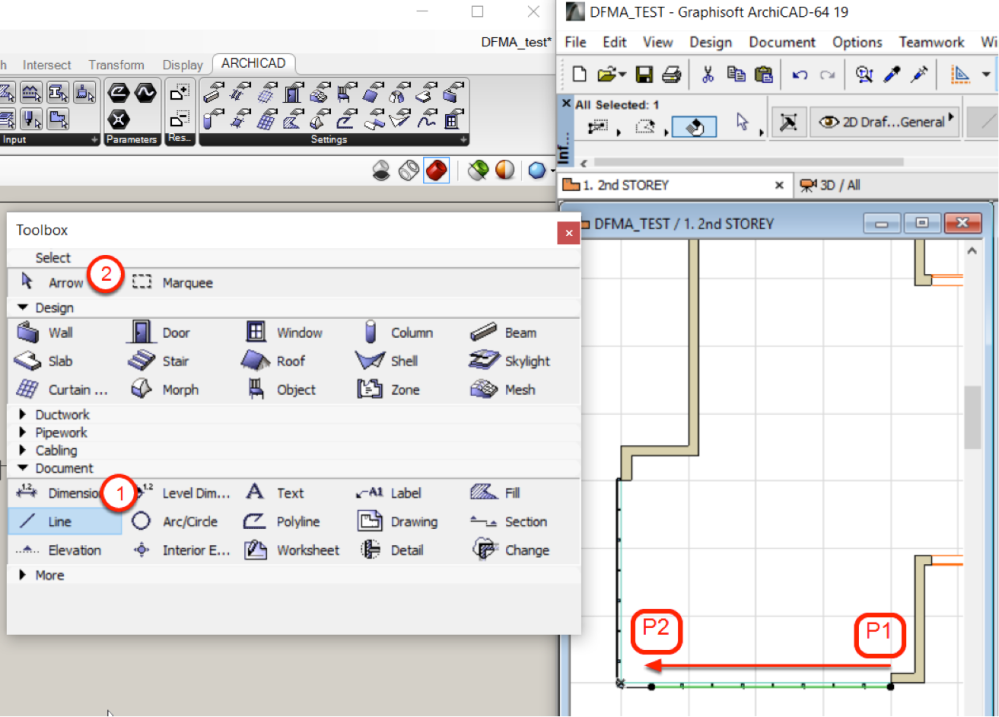
- Use Line tool to draw a line from point P1 to P2, suggest to draw the line in 2nd Storey.
- Select the line just drawn using the Arrow tool.
2D Curve in GH
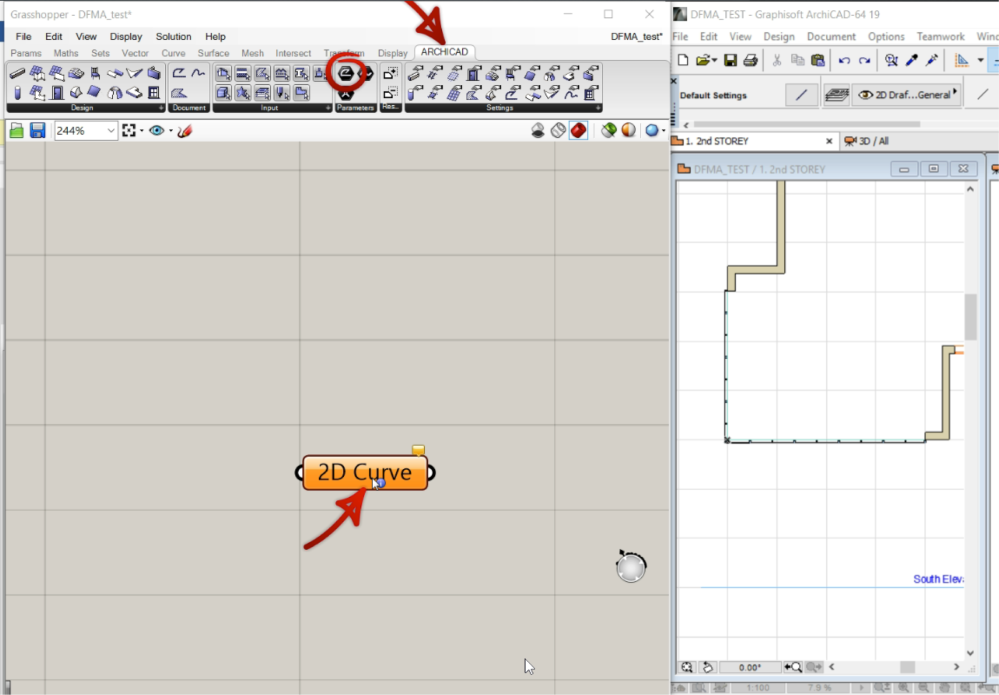
Place a 2D Curve component in GH from the Archicad tab.
Link the AC Line to GH 2D Curve Parameter
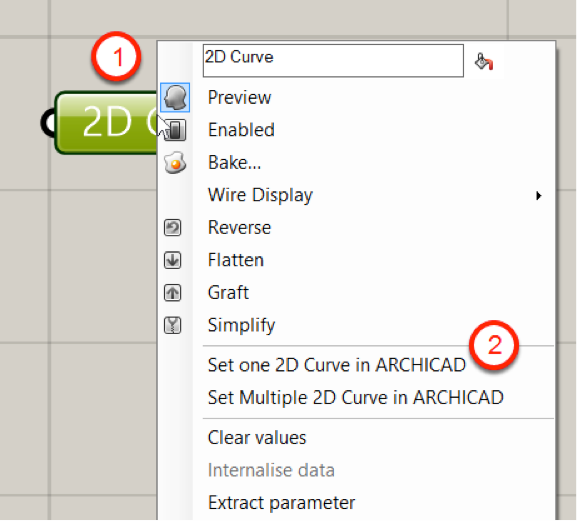
- Right click on the 2D Curve component in GH and
- Choose Set one 2D Curve in Archicad from the context menu,
- Now the 2D Curve in GH and the Line in AC are connected.
Move the Starting Position
Move the starting position to one storey up to start the first balcony location from 2nd Storey. This might not be required in all scenarios.
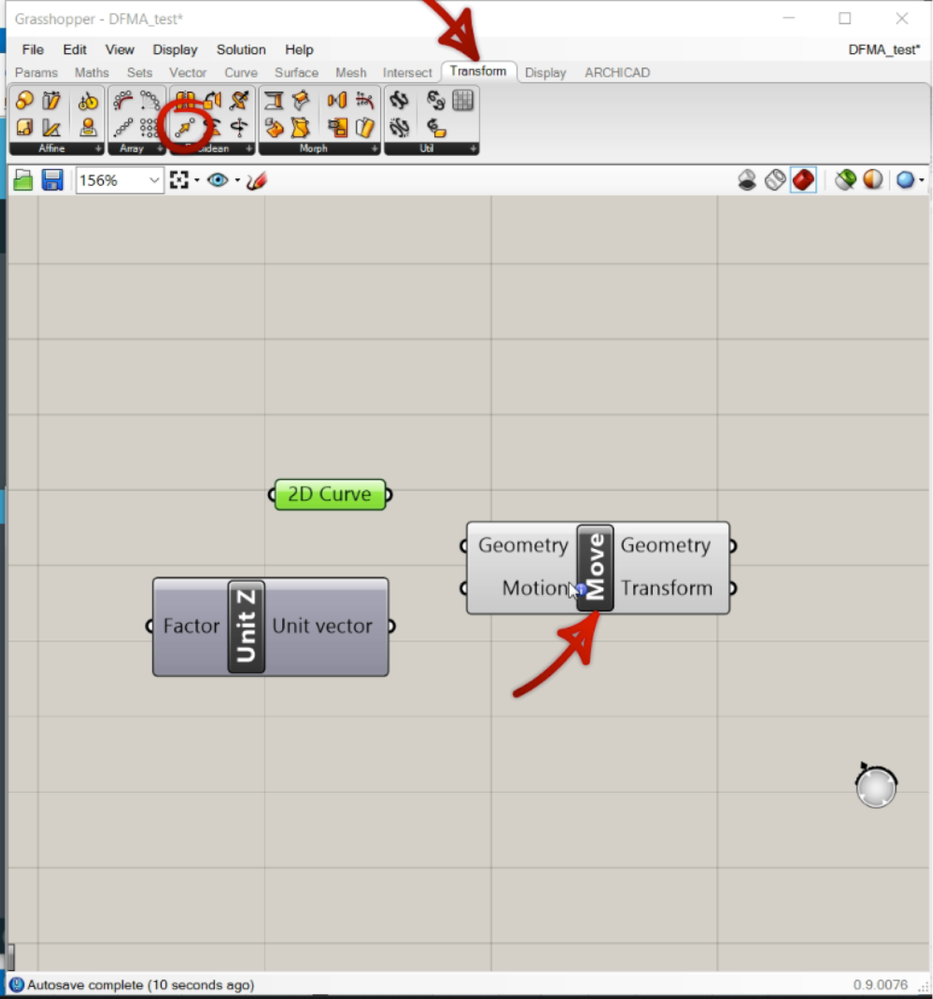
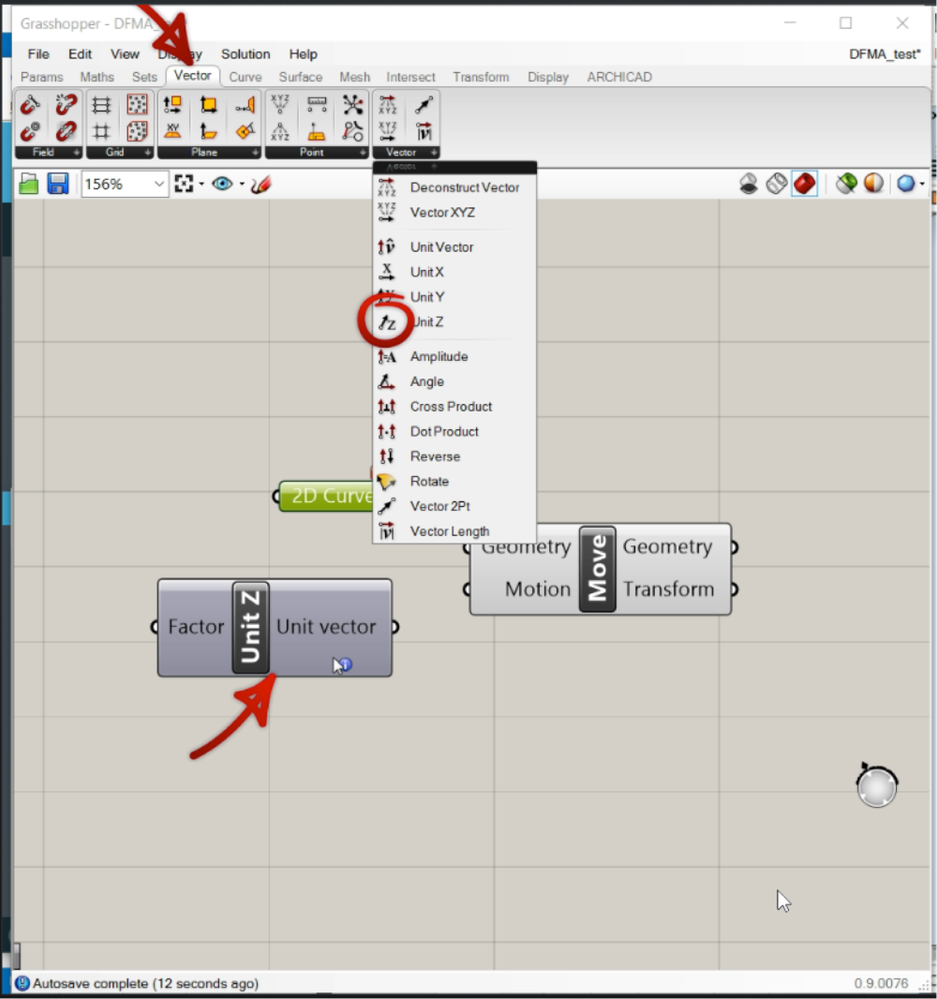
- Place a Move component in GH. This component takes 2 inputs, 1st is the Geometry to move and the 2nd is the Motion (direction + distance) and transforms the given geometry by the given motion.
Place Unit Z component which outputs a unit vector in the Z direction. Vector data holds both direction and distance. Unit vector is with a distance of one unit.
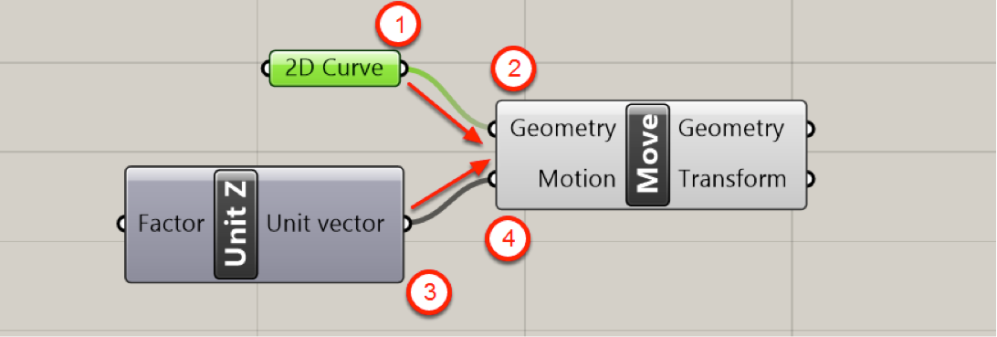
Connect the Components
- Left click on the semi-circle next to the outputs and inputs of the components in a sequence to connect them. 1 to 2 and 3 to 4.
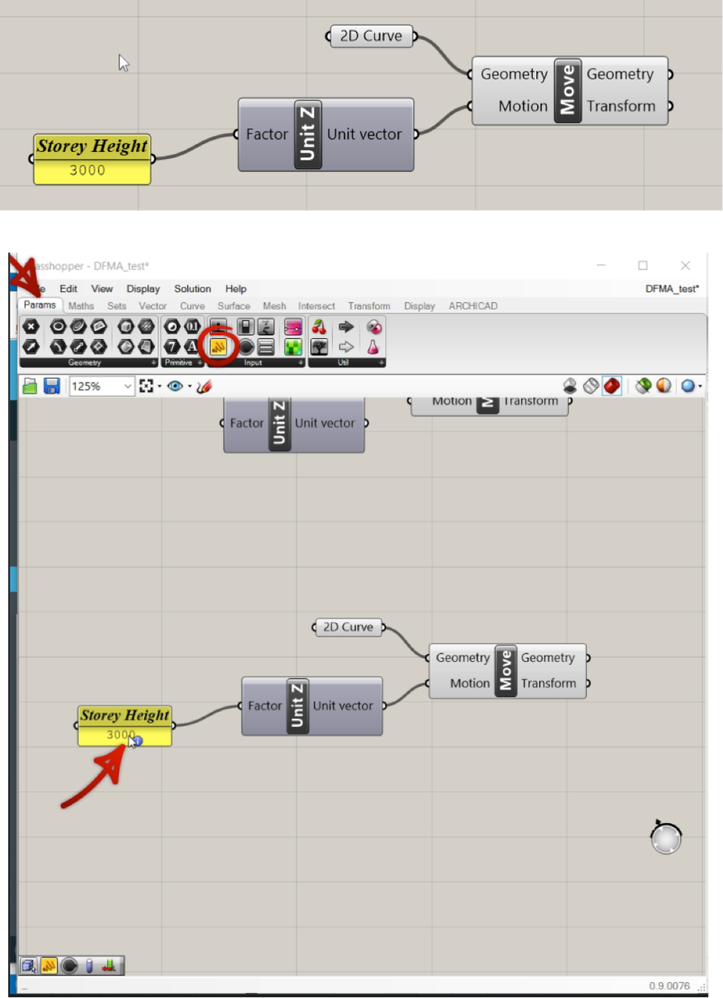
Unit Z component takes in an input Factor which multiplies the unit vector by the given input. Use the storey height (3000 mm) as the factor. Once done the vector will have the length as 3000 mm long and the direction as Z.
This can be done with a Panel component. Panel component is used because there will not be a drastic change in storey height and this will also be used in the later part of the solution. Right click on the panel component to rename it as Storey Height for the ease of identification.
Find the Unit Vector of the 2D Curve
Need to find the direction of the selected line (2D Curve) to decide the balcony orientation.
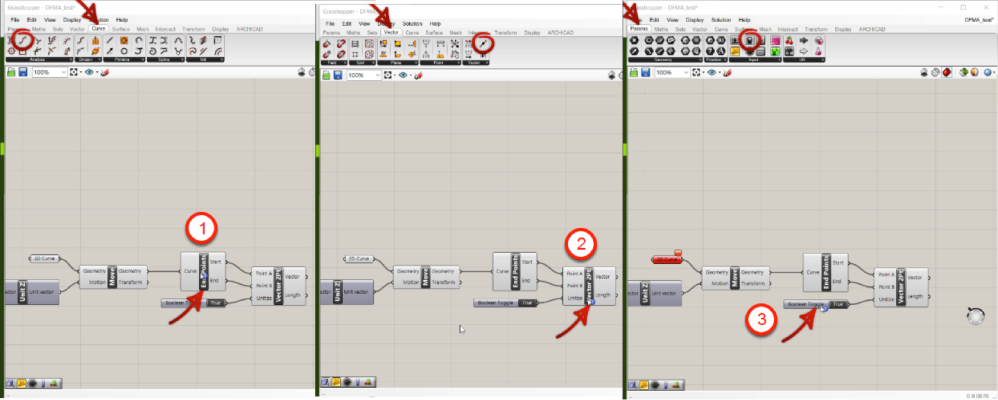
- Place End Points component which takes in Cure and extracts the Start point and End point
- Pass the points to Vector 2Pt This component will out put a vector from the points which has the length of the line.
- What we required is a unit vector. So, pass in a Boolean Toggle with the value set to True to the Unitize parameter to make the output vector as a unit vector.
Rotate the Vector
Need to rotate the vector to define the extrusion direction of the balcony. In addition make the rotation as parametric to allow design changes.
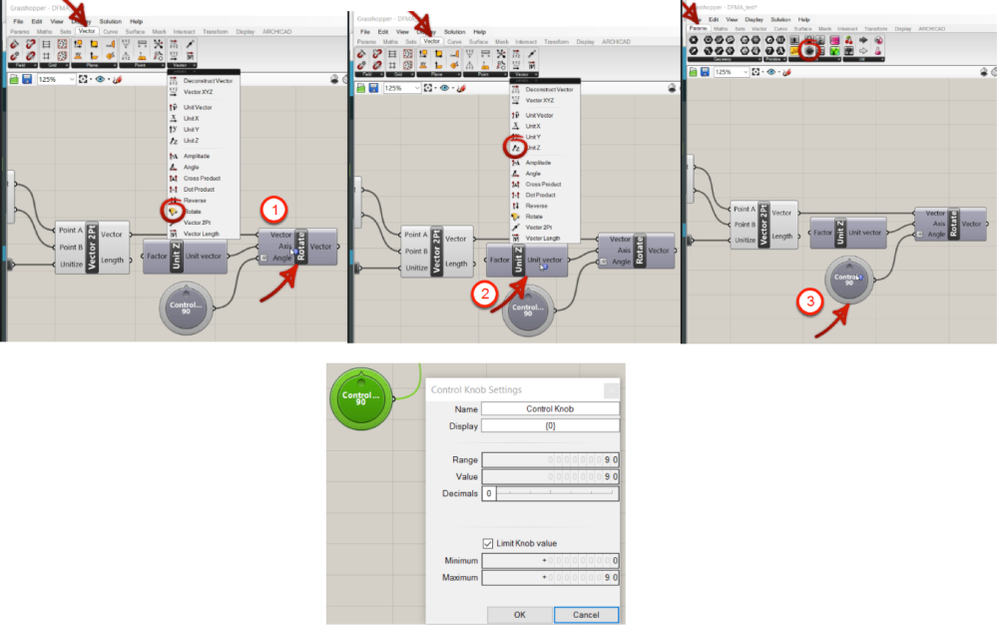
- Place a Rotate component and pass the vector output from the previous step.
- Place a Unit Z component (unit vector in Z direction) and pass it to the Axis parameter of Rotate component. This will act as an axis of rotation.
- Place a Control Knob component and pass it to the Angle parameter of Rotate component. This will allow to parametrically control the rotation of balcony extrusion.
- Set the Min and Max as 0 and 90 respectively. This gives the users a range of 90 degree.
Click OK to finish the settings.
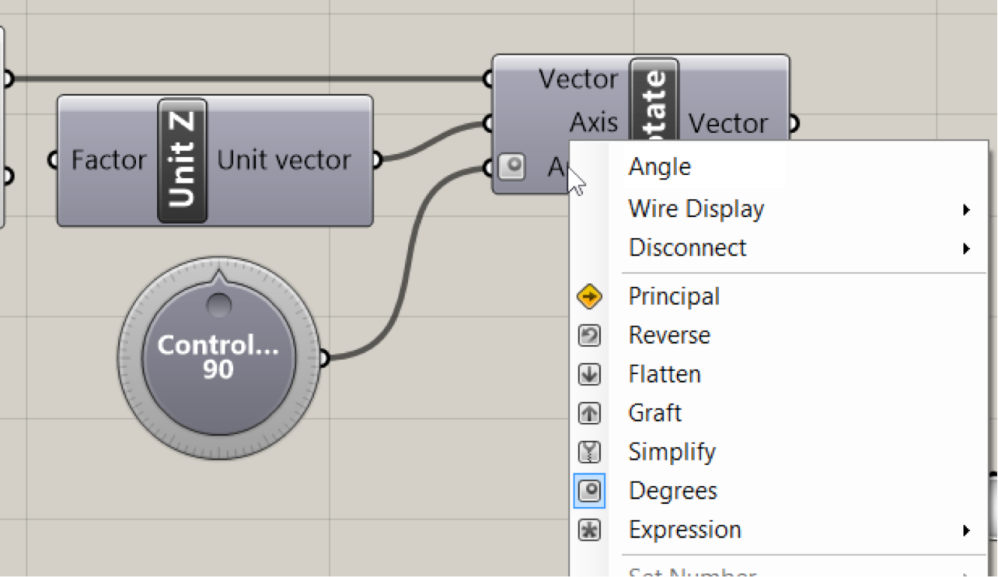
Right click on the Angle of the Rotate component to set to Degree. Default might not be degree.
Multiply the Vector by Balcony Width
This step is basically to add the width of the balcony as parameter to the solution. Need to multiply the vector by the width parameter.
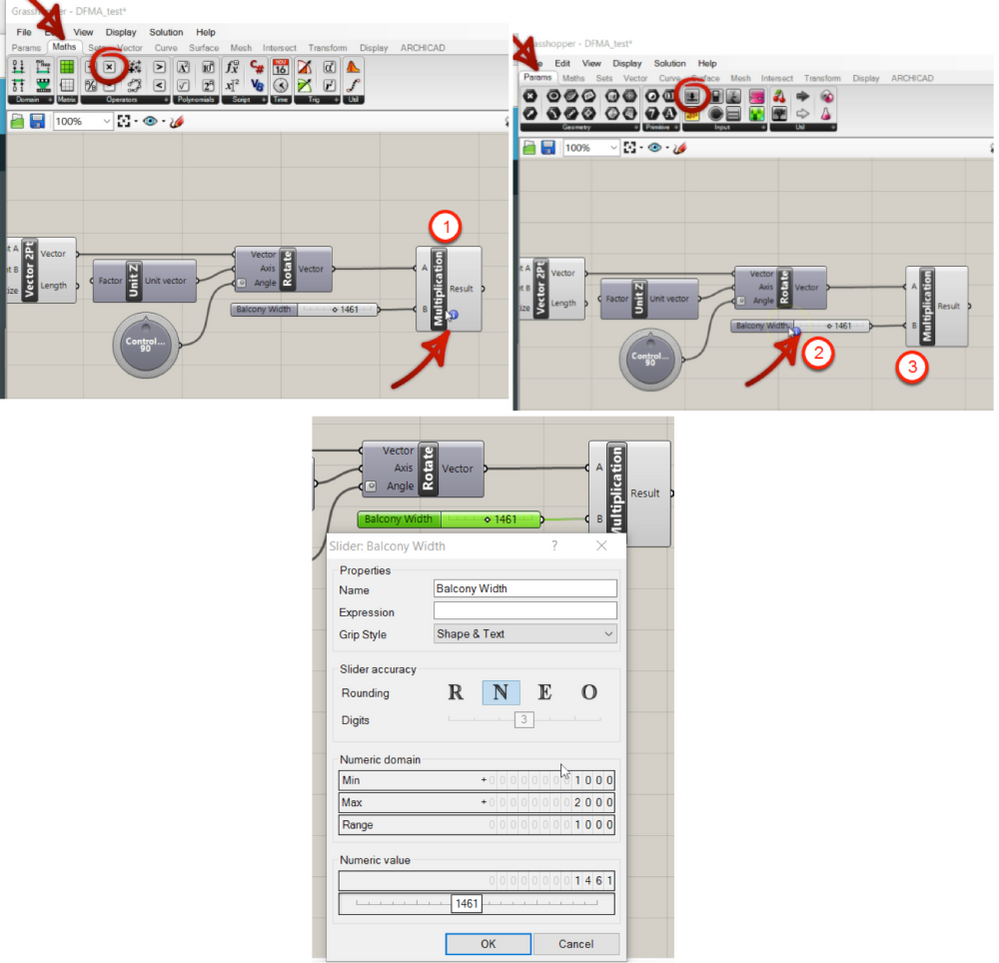
- Place a Multiplication Pass the vector from the previous step to the A parameter.
- Place a Slider component, double click on the Slider to access it’s settings
- Change the Name to Balcony Width for easy identification
- Set the Rounding to N (Integer Number)
- Set the Min and Max in the Numeric domain as 1000 and 2000 This gives the users a range of 1000 mm from 1000 mm to 2000 mm
- Click OK to finish the settings.
- Pass the Slider’s output to B parameter of Multiplication component. Now the vector will have the distance as the balcony width.
Corner Points of the Balcony
Create 4 corner points of our balcony from the data created in the previous steps
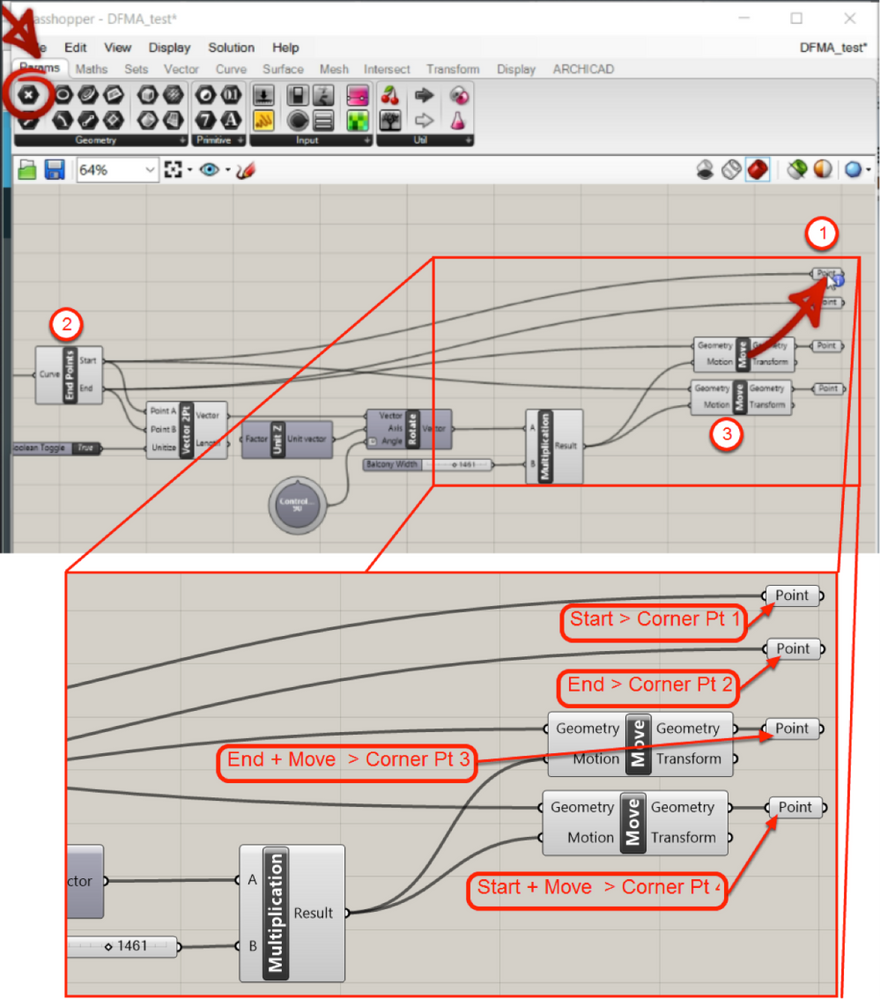
- Place 4 X Point
- Connect the Start of End Points component to Corner Pt 1, End of End Points component to Corner Pt 2, move (3) the End of End Points component by Balcony Width (Slider + Multiplication) and connect to Corner Pt 3 and finally move (3) the Start of End Points component by Balcony Width (Slider + Multiplication) and connect to Corner Pt 4. The points will be in an anti-clockwise direction. Direction does not matter but make sure the points are in sequence.
Create PolyLine for the Balcony Slab and Railing
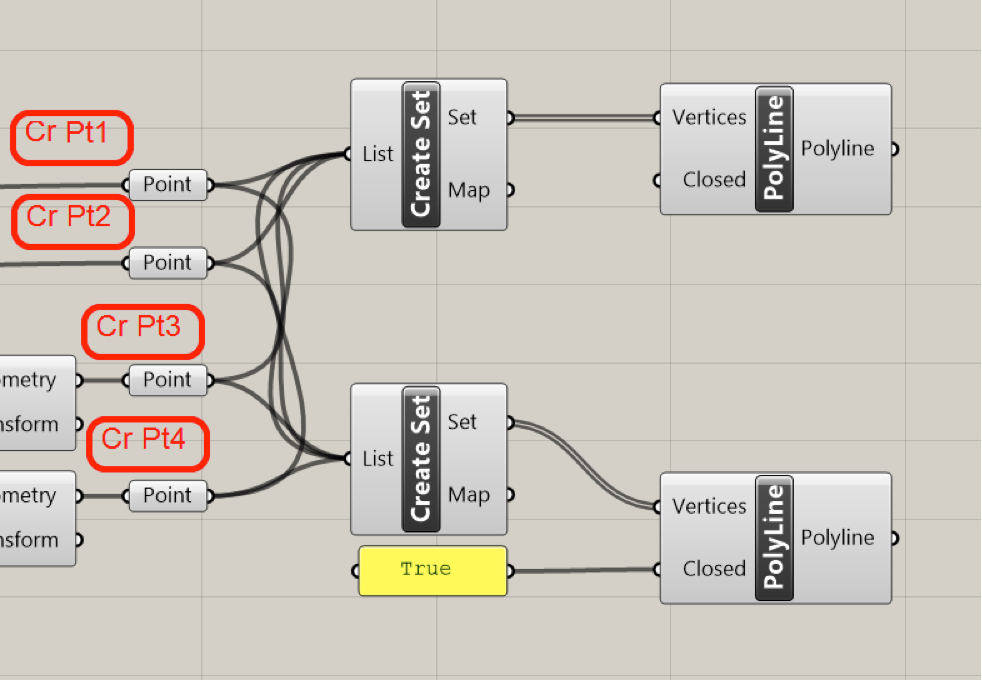
Create 2 X polyline, one for the balcony slab (must be closed) and another for the Railing or Parapet from the 4 corner points created in the previous step.
- Place Create Set
- Place PolyLine Pass the Set parameter of Create Set component to Vertices parameter of PolyLine component.
- Repeat this step for the slab polyline as well. In addition pass a True value with a Panel component to make the polyline closed.
Note: Please refer to previous steps on where to place Panel component from.
Pass the Points to the List parameter of the Create Set components. Please make sure of the points order. The order of the points is important as that will form the slab and railing correctly.
For Slab Cr Pt1, Cr Pt2, Cr Pt3 and Cr Pt4
For Railing Cr Pt2, Cr Pt3, Cr Pt4 and Cr Pt1
Note: Press Shift key in your keyboard to connect multiple output to single input of the components.
Array in Z Direction
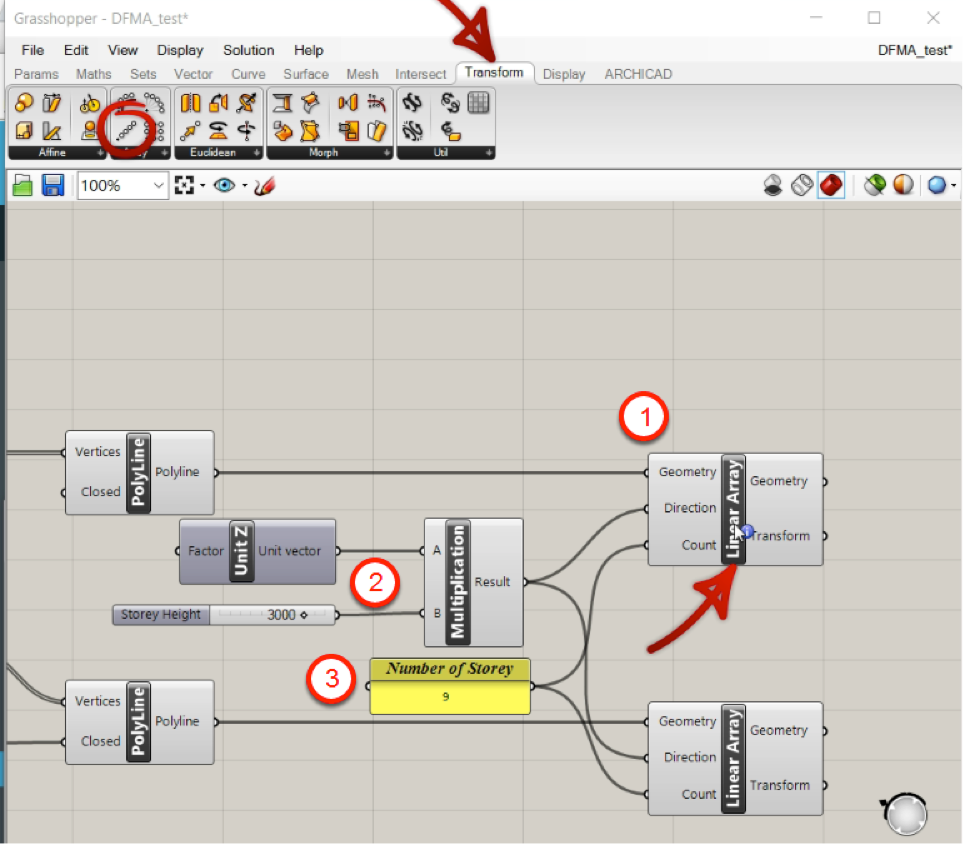
Need to array the both the polylines vertically based on the number of storey and storey height.
- Place Linear Array component, pass the polyline to Geometry
- Place UnitZ component and multiply it by 3000mm (Storey Height). Pass the Result to the Direction parameter of Linear Array component. The slider for Storey Height shall have the Min as 2000mm and Max 3500mm.
- Place a Panel component, name it as Number of Storey. Add a value as 9 (based on the number of storey the building has) and pass it to Count parameter of Linear Array component.
Repeat the steps for the slab’s polyline.
Note: Please refer to previous steps on where to place UnitZ and Panel components from.
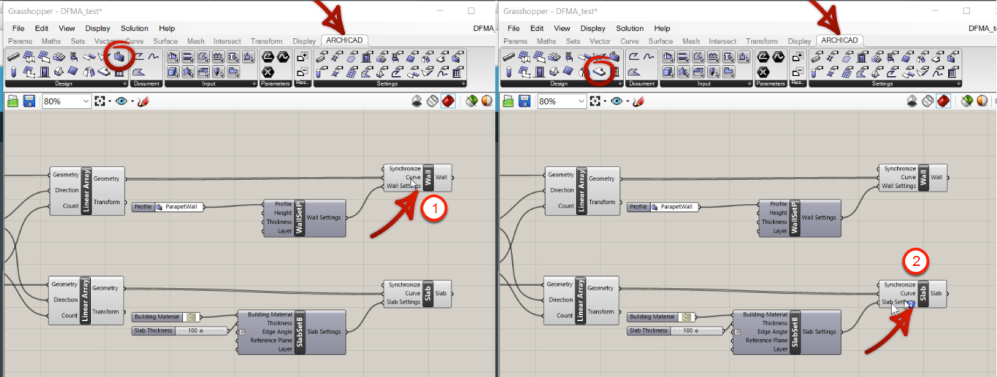
Create Slabs and Railings
- Place Wall
- Place Slab
Pass the Geometry created in the previous step to the Curve parameter of Wall and Slab.
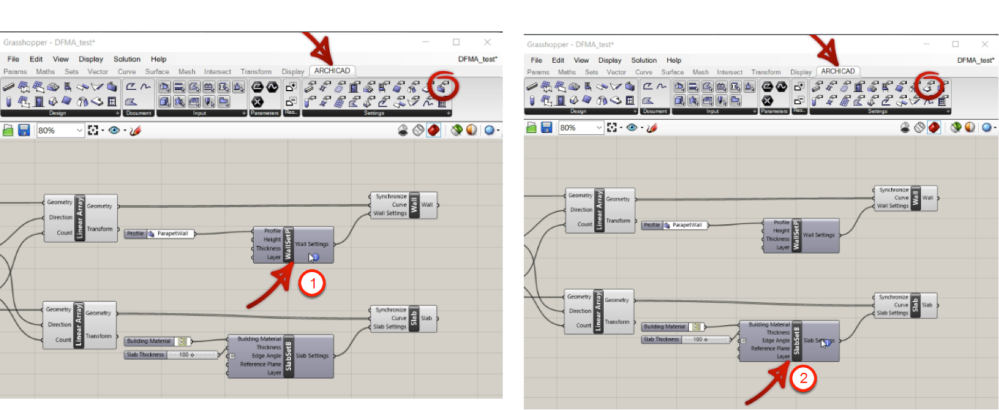
In addition:
- Place WallSetP (Profile) and
- Place SlabSetB
Pass the Settings parameter of both to Settings parameter of respective elements.
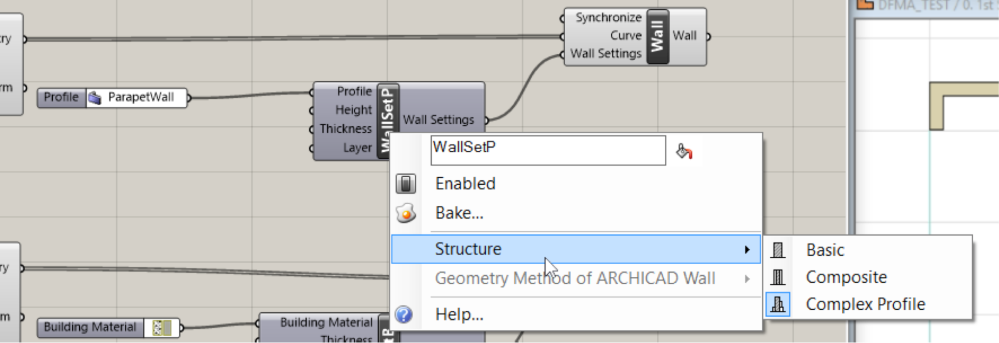
Note: To get the profile for the wall right click on the WallSet() component and choose Complex Profile from the Structure menu.
Next:
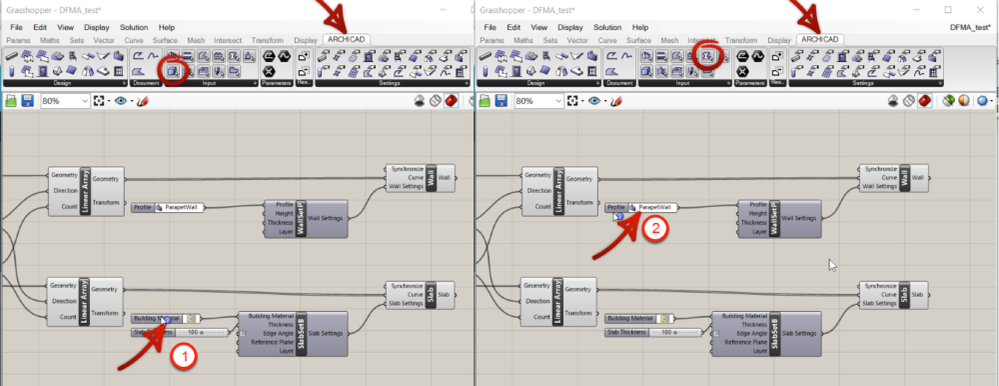
- Place Building Material component and pass it to Building Material parameter of the SlabSetB
- Place Profile component and pass it to Profile parameter of the WallSetP
Note: Building Material and Profile will be read from the linked AC file. The railing profile must be created in AC before linking in this step. Please refer to the link to learn how to create a complex profile.
Reference
Refer to the following document to understand how other elements in AC can be created from GH:
Grasshopper-Archicad Live Connection 2.3 User Guide (Graphisoft.com)
Just a little Tweak…
- Place a Random Pass Number of Storey to its Number parameter, Pass a Integer value (Slider shall be used to change the value to try different offsets) and any integer value shall be passed to the Seed parameter (Panel component can be used).
- Right click on the Random component and choose Integer Numbers.
- Round off the number with the nearest value with the Round
- Multiply the value with -1 to make it negative as the balcony in each floor need to move inwards the building.
- Take the vector created initially from the line (input from AC) and multiply in with the random number.
- Insert Move component before the Slab and Wall in the solution. Pass the Result from the previous step to the Motion parameters of the Move component and pass the Geometry from the Linear Arrays to the Geometry of Move component. Take the Geometry output of Move component and pass it to the Curve input of Slab and Wall.
Result
Catch-up with everyone soon with another post…
Still looking?
Browse more articles
Back to articlesSee latest solutions
Accepted solutionsStart a new discussion!
- Import architectural models or 2D drawings into Graphisoft's MEP Designer in MEP
- Smart roof editing in Archicad: When to crop, When to trim, When to use SEOs in Modeling
- Graphisoft MEP Designer: Quick-start guide for new users in Getting started
- MEP Designer - Overview in MEP
- MEP Designer – Modeling, documentation and calculations in MEP
