- Graphisoft Community (INT)
- :
- Knowledge Base
- :
- Modeling
- :
- Grasshopper Connection Object Guide - Loft Object
- Subscribe to RSS Feed
- Mark as New
- Mark as Read
- Bookmark
- Subscribe to Topic
- Printer Friendly Page
- Report Inappropriate Content
Grasshopper Connection Object Guide - Loft Object
- Subscribe to RSS Feed
- Mark as New
- Mark as Read
- Bookmark
- Subscribe to Topic
- Printer Friendly Page
- Report Inappropriate Content
on
2019-11-04
04:54 PM
- edited on
2021-11-26
01:13 PM
by
Rubia Torres
With the Grasshopper - ARCHICAD Connection tool, you can enhance your BIM model with complicated shapes that can not be defined easily with the default ARCHICAD tools. To be able to properly represent and document these shapes, while keeping the geometry and BIM information intact and the speed unaffected, we developed the Grasshopper Loft Object. This article explains what this tool is capable of, and how to use it.
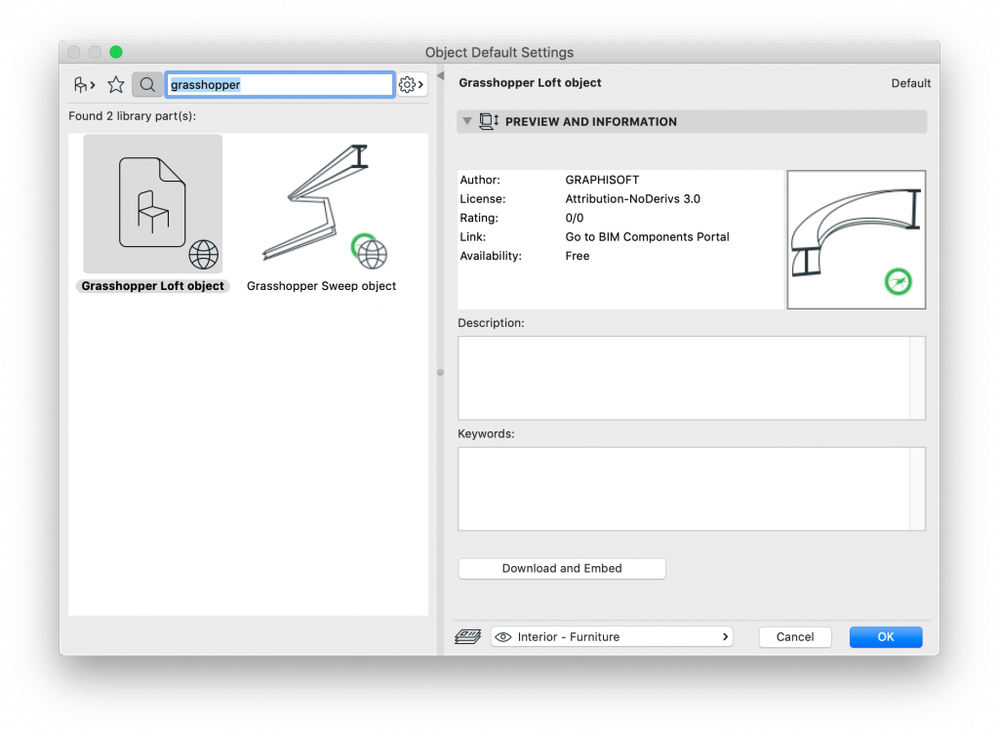
You can get the object from BIMcomponents.com, or you can search for them in the Object Tool Settings dialog Search bar, and download them directly into the embedded library.
Overview
This object is designed to be used through the Grasshopper - ARCHICAD connection tool. This means that to use it you will need to be familiar with Grasshopper, and there are several settings in the object that cannot be set in ARCHICAD.
The resulting object will be highly parametric: you can control the Building Material, Hotspot visibility, Level of Detail, Visibility of edges, etc.; and it also allows you to control the floor plan representation, which responds to cut plane settings.
What it does
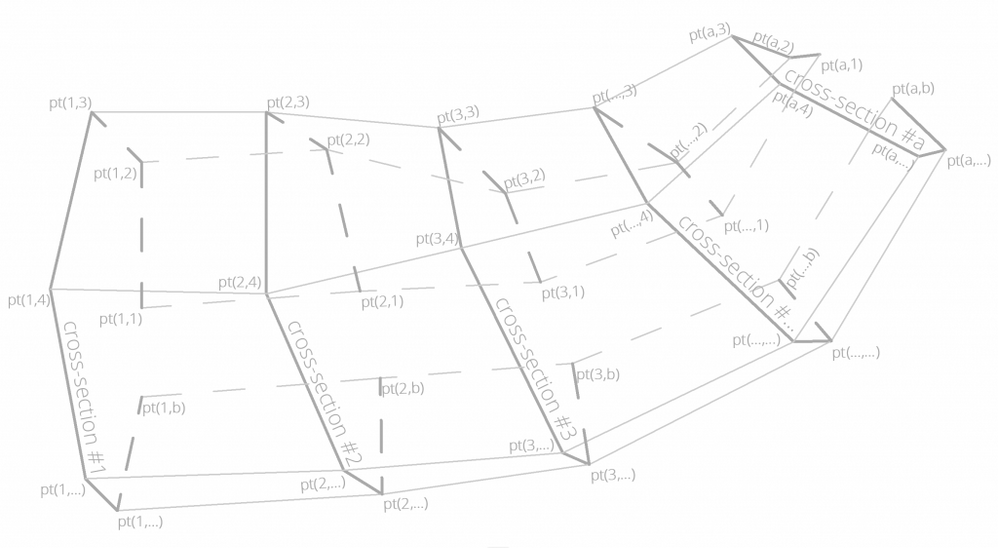
Similar to the Loft command in Rhino, this object takes different cross-sections as input and connects them to form a continuous surface or body. These cross-sections can be at any angle in the 3D space, but they should have the same amount of points, properly aligned. This can either be achieved by setting up the sections in Grasshopper, to begin with, or, if you already have a shape modeled, it can be sliced in Grasshopper to generate these cross-sections.
Settings in Grasshopper
Most settings can be controlled through Grasshopper as well, but there are two parameters available only through the Object Settings Grasshopper Component:
- XYZ vertices of cross-sections: A one-dimensional Array Parameter. It is a list of XYZ coordinates of all the points in each cross-section input, in the following format:
X11, Y11, Z11, X12, Y12, Z12, ..., X1b, Y1b, Z1b, X21, Y21, Z21, X22, Y22, Z22, …, X2b, Y2b, Z2b, X31, Y31, Z31, …, Xa1, Ya1, Za1, Xa2, Ya2, Za2, ..., Xab, Yab, Zab
Where "a" is the number of cross-sections and "b" is the number of points in the current cross-section. Each cross-section has to have the same number of points (b)! It can only be filled in Grasshopper. - Number of vertices in profiles: A single Integer number. It defines the number of points in each cross-section (b). Each cross-section has to have exactly the same number of points! It is used to redistribute the XYZ vertices of cross-sections into sections after receiving that input from Grasshopper.
The rest of the settings are to control the 2D and 3D representation of the Object. Most of these are standard to other ARCHICAD elements, but there are several settings that are specific to this object:
- Solidify: Checkbox parameter. When turned on, the shape will have a mass you can see on sections (Fill pattern based on Building Material Settings). If the cross-sections are not closed, turning on this option will close the shape automatically.
When turned off, even closed shapes have no mass. Turning this option on has serious performance impacts, so it is suggested to keep it turned off until the documentation stage of the project! - Show All Hotspots in 3D: Turns on all hotspots for each transferred point in all profiles to make it easier to snap to them. Turned off by default to improve performance.
- Show Profile Edges: Turning this checkbox on will display the edges of each profile with a line.
- Show Loft Edges: Turning this checkbox on will display the edges connecting the corresponding cross-section points to each other between neighboring cross-sections.
- 3D Detail Level: You can control the detail level of the 3D representation with this parameter on 3 levels. 'Full' displays the geometry as-is. 'Simplified' displays the geometry omitting 50% of the points. 'Schematic' greatly reduces the number of points, only displaying about 10% of them. Cross-sections with less than 10 points are not simplified (and simplifications never go under 10).
- Shadow: As in most objects, you can turn off shadow-casting to improve performance or hide unnecessary shadows from the model.
How to use the Loft Object
Let's see how to translate your Model to be able to use it with the Grasshopper Loft Object. In this example, we will translate a tube that changes its cross-section from one end to another. You can download the *.GH file used in this example from here.
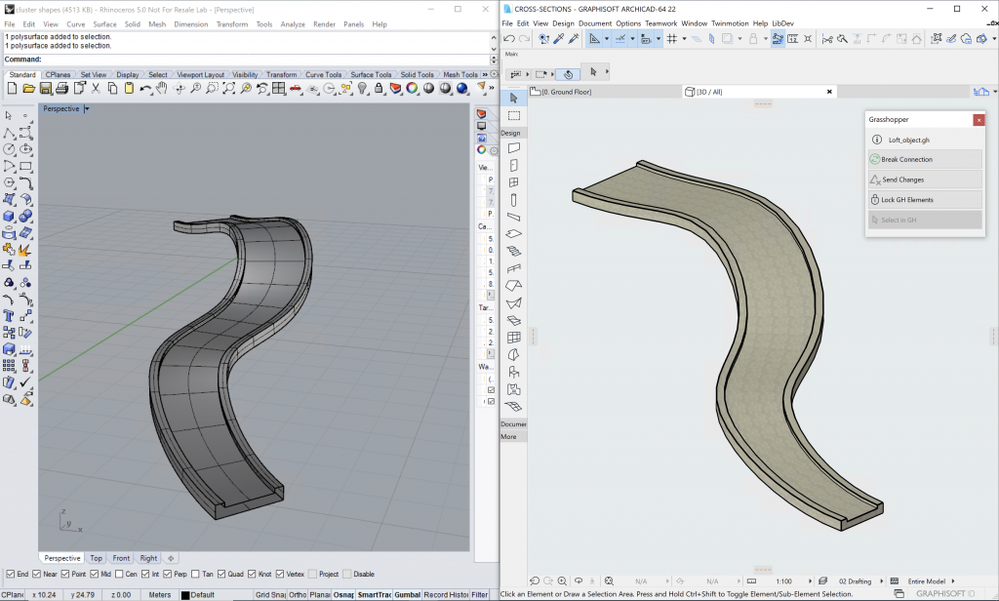
- Start ARCHICAD, Rhinoceros, and Grasshopper.
- The “Grasshopper Loft Object” is available on BIMcomponents.com, so if you open the Object tool in ARCHICAD, and search for its name, you will see it amongst the search results (provided you have an internet connection). Select this object from the search, and choose “Download and Embed”, to add it to your Embedded Library.
- Open the Grasshopper Connection Palette, and start the Grasshopper – ARCHICAD Connection (Window>Palettes>Grasshopper Connection Palette>Start Connection).
- First, we should slice the element into cross-sections in Grasshopper so that we can reconnect them in ARCHICAD to generate this shape. This element has a clear direction and cross-section (although the shape of the cross-section changes along the way). This means we can probably use one of its edges to place perpendicular planes on it and intersect these planes with the element to generate our sections.
 NOTE: The path has to be perfectly perpendicular to the beginning and ending plane of the shape. See the Tips & Tricks section to find out why.
- Break down the cross-sections into 3D points. Since this shape has polygonal cross-sections, we can just explode them into vertices.
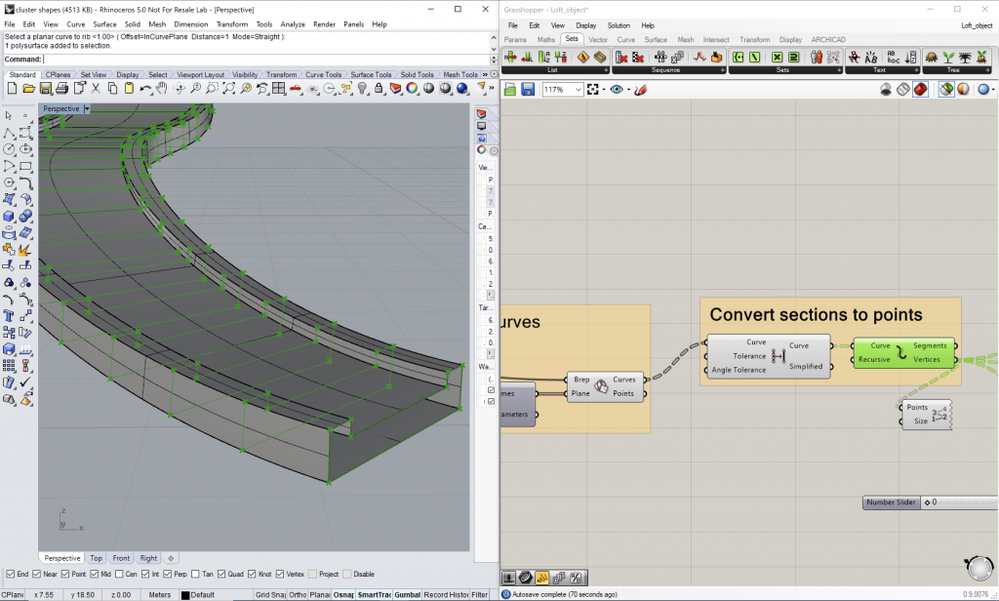
- Count how many points are in each cross-section. Make sure each section has the same amount of points! We used the Delete Consecutive component to get a single number and also verify that all sections have the same number of points.
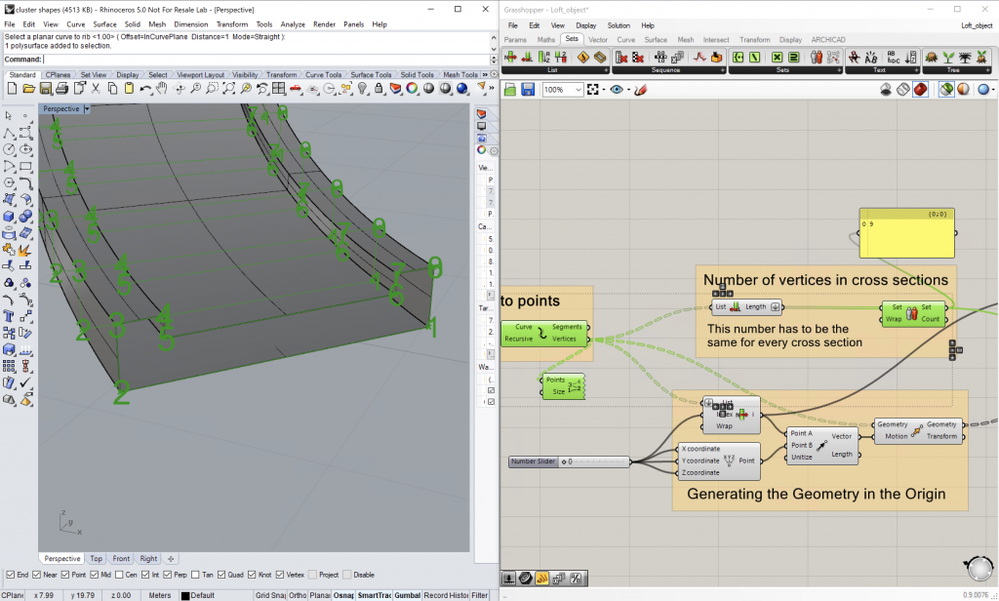
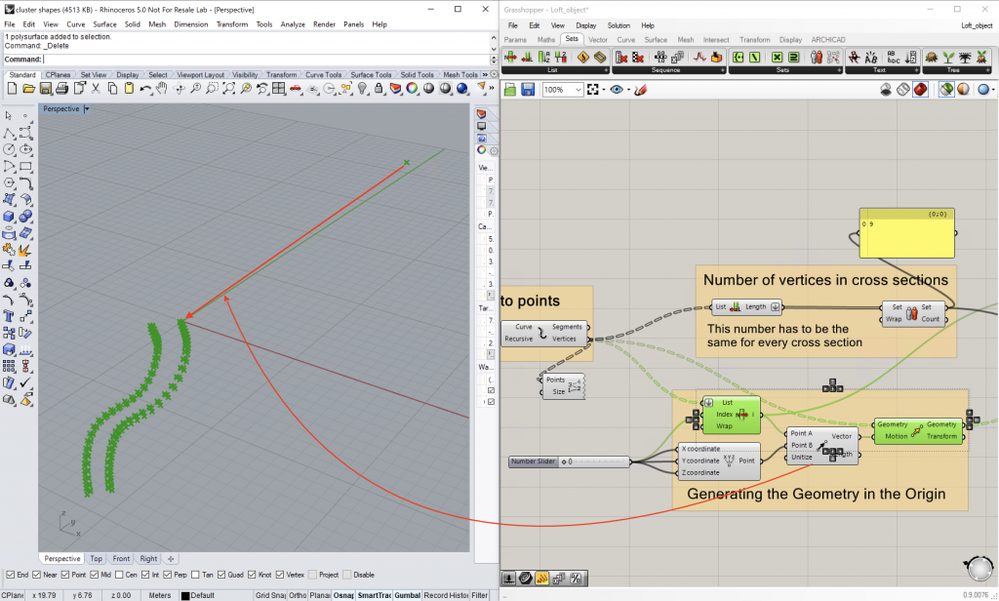
- When you generate an object through the connection tool in ARCHICAD, it will always take the Rhino Model origin as the origin for the object. To avoid creating objects that have their geometry far away from their actual origin, it is suggested to generate the object geometry right in the Rhino Origin, and then place the object in its original position after. To do this we picked the first point of the object as the insertion point, and moved every point into the origin relative to this point.
- Next, place an ARCHICAD Object Settings Component in Grasshopper
- Right-click on the component and choose “Use Existing Library Part”
- Right-click again to select the Object. Browse the object and choose its parameters as well, then click OK. For now, we will only need the “Number of Vertices in profiles” and the “XYZ Vertices of cross-section” parameters (but additionally you can use the "Building Material" and "Show Loft Edges" Parameters as well).
- The Object can only take a list of numbers (one-dimensional array), so you can’t input the points directly. You will need to flatten and convert the points (of the path) to a list of numbers. We are using the “Points to numbers” component to do this in this example. Connect this list to the “XYZ vertices of cross-section” Parameter.
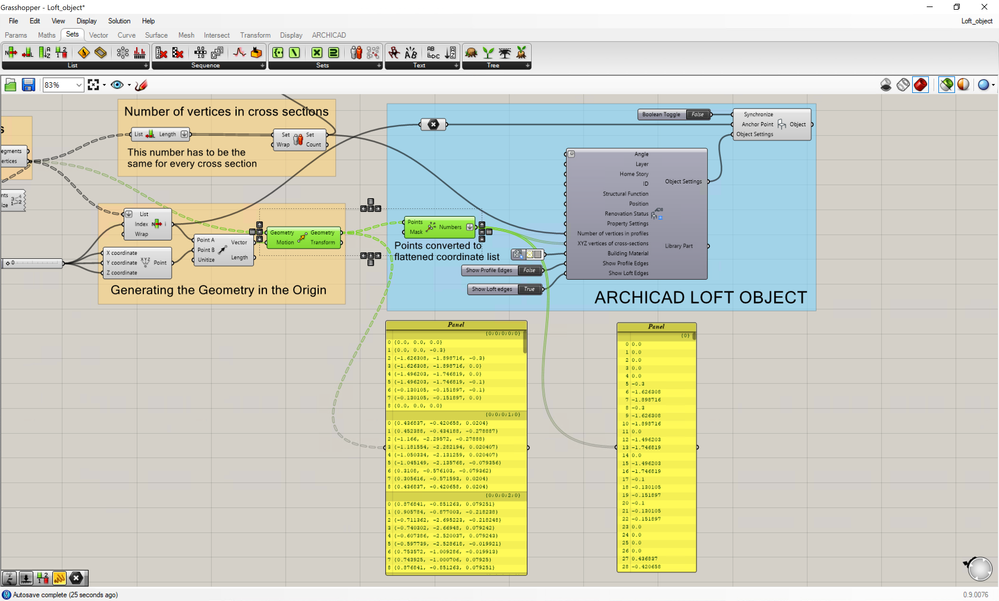
- Connect the number of points in a single cross-section to the corresponding parameter (“Number of Vertices in profiles”)
- Since the geometry was generated in the Rhino Origin, the Anchor Point of the object will need to be set to the first point of the path once more (just like when you moved it to the Origin).
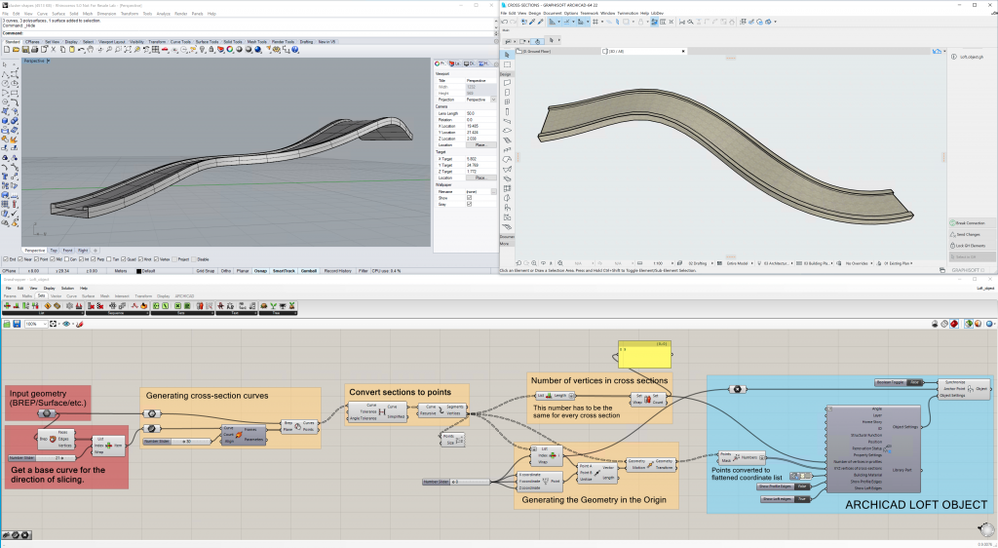
- Connect the Object Settings and the Anchor Point to an ARCHICAD Object component, and see your shape appear inside ARCHICAD.
Advanced Tips & Tricks
Important things about curved cross-sections
When your cross-sections are polygonal, it is easy to turn them into a set of 3D points, because you just have to deconstruct them into their vertices. With curved cross-sections things are a bit more complicated. Here are a few things you should keep in mind:
- The Loft Object (and ARCHICAD for that matter) can only handle straight segments, between points, if you want your object's curves to appear smooth, you will need to generate points relatively close to each other. Make sure that you don't go unnecessarily detailed, as that might cause significant slow-downs. You can use the Divide Curve Component to generate the points and control their density.
- If there are breaks in your curves, you might consider turning on the Kinks for the Divide Curve component. In this case always double-check the number of points in different cross-sections, as the kinks might not exist in all the sections, and/or they might be in different places, and that can mess up the Object!
- Some curves after several iterations of adjustments in Grasshopper can become over-complicated even though they are quite simple. It can be a good idea to run them through the Simplify Curve and Rebuild Curve components for the best results.
Keep guiding rails perpendicular
If you are not generating the cross-sections from scratch inside Grasshopper, but slicing an existing geometry, you might distribute planes along a curve to slice the shape with. In this case, make sure that the first and last segments of the curves are perfectly perpendicular to the start and end faces/sections, otherwise, they might slice them at an angle, and end up with a different (wrong) starting section.
Limit Cutting Plane Size
It is easy to create a shape going along a path, that is parallel with itself at some points (the most simple example is a path shaped like a U). In such situations, cutting planes/frames can cut through 2 parts of the shape at once, creating faulty sections. You can use the Rectangle/Plane Surface Components to limit your cutting plane size.
Avoid capping the first and last section
If you are slicing a shape that is capped with a surface on the beginning and the end, the first and last planes will not generate the section from the tube, but from the parallel plane. This plane can have a different point order, so, in this case, your first and last sections might end up distorted. To avoid this, delete these capping surfaces before slicing the shape.
- Smart roof editing in Archicad: When to crop, When to trim, When to use SEOs in Modeling
- Improved BIMmTool for better point cloud handling in Modeling
- Archicad Start Edition 2024 in Getting started
- Security Update for Archicad 22-25 and License Manager Tool in Installation & update
- Getting started with Graphisoft cloud licensing in Licensing
