- Graphisoft Community (INT)
- :
- Knowledge Base
- :
- Modeling
- :
- Grasshopper Connection Object Guide - Sweep Object
- Subscribe to RSS Feed
- Mark as New
- Mark as Read
- Bookmark
- Subscribe to Topic
- Printer Friendly Page
- Report Inappropriate Content
Grasshopper Connection Object Guide - Sweep Object
- Subscribe to RSS Feed
- Mark as New
- Mark as Read
- Bookmark
- Subscribe to Topic
- Printer Friendly Page
- Report Inappropriate Content
on
2019-11-04
04:56 PM
- edited
3 weeks ago
by
Gordana Radonic
With the Grasshopper - Archicad Live Connection, you can enhance your BIM model with complex shapes that can not be defined easily with the defaultArchicad tools. In order to be able to properly represent and document these shapes, while keeping the geometry and BIM information intact and the speed unaffected, we developed the Grasshopper Sweep Object. This article explains what this tool is capable of, and how to use it.
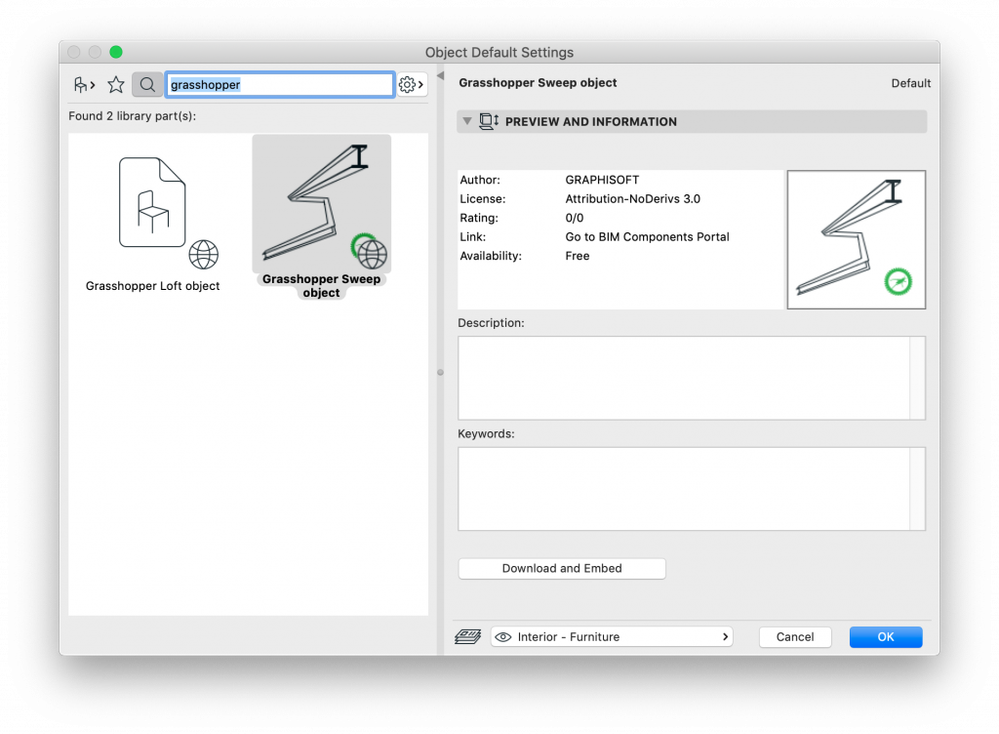
You can get the object from BIMcomponents.com, or you can search for them in the Object Tool Settings dialog Search bar, and download them directly into the embedded library.
Overview
This object is designed to be used through the Grasshopper - Archicad Live connection. This means that to use it you will need to be familiar with Grasshopper, and there are several settings in the object that cannot be set in Archicad.
Similar to how Complex Profiled Beams and Columns work in Archicad (or how the sweep command works in other 3D modeling applications), you can use this Object to extrude the geometry of a Complex Profile along a 3D path. The advantage of this tool against Standard Beams and Columns is that the resulting element will be a single entity, and you can describe shapes with it that cannot be defined with the standard tools (e.g. a beam that is curved both horizontally and vertically at the same time, properly mitered connections between each segment, etc.).
The resulting object will be highly parametric: you can control the Building Material, Hotspot visibility, Level of Detail, Visibility of edges, etc.; and it also allows you to control the floor plan representation, which responds to cut plane settings.
Settings in Grasshopper
There are several parameters in the object that are meant to be controlled through the Object Settings Grasshopper Component:
- XYZ coordinates of the path: A one-dimensional Array Parameter. It is a list of XYZ coordinates that define the path of the sweep in 3D space, in the following format: X1, Y1, Z1, X2, Y2, Z2, X3, Y3, Z3, X4, ... It can only be filled in Grasshopper.
- Profile Rotation: A single Rotation Angle in decimal degrees (°). Defines the rotation of the profile around the axis line all along the path. Can be filled in Archicad.
- Profile rotation at nodes: A one-dimensional Array Parameter. It is a list of rotation angles in decimal degrees (°). The list should contain one entry for each point in the path. The rotation is added to the value in Profile Rotation at each point. The list is in the following format: Rotation1, Rotation2, Rotation3, Rotation4, ... It can only be filled in Grasshopper.
- Top Direction - defines 0 rotation: A one-dimensional Array Parameter. It is a list of 3 values - the XYZ coordinates of a vector pointing from the origin. Its format is the following: X, Y, Z. It can only be filled in Grasshopper.
- Close Path: A checkbox parameter. When checked, the first and last points in the path are connected with a segment to close the path. If it is already connected, it clears the connection between the first and last profile. Can be filled in Archicad.
- Profile: You can choose a complex profile you want to sweep along the path here. Can be filled in Archicad.
The rest of the settings are to control the 2D and 3D representation of the Object. Most of these are standard to other Archicad elements, but there are several settings that are specific to this object:
- End Cut 1/2: Controls the End Cut of both ends of the Object. By default, it is set to 'Perpendicular'. If you set it to custom, you can define the end cut direction in 3D. You can also use the "Start/EndCutCoord" Parameters to control the direction from Grasshopper.
- Show Editable Hotspots in 3D: Turn on this checkbox parameter if you want the editing hotspots to appear in the 3D window. By default, it is turned off to improve performance and hide editing handles.
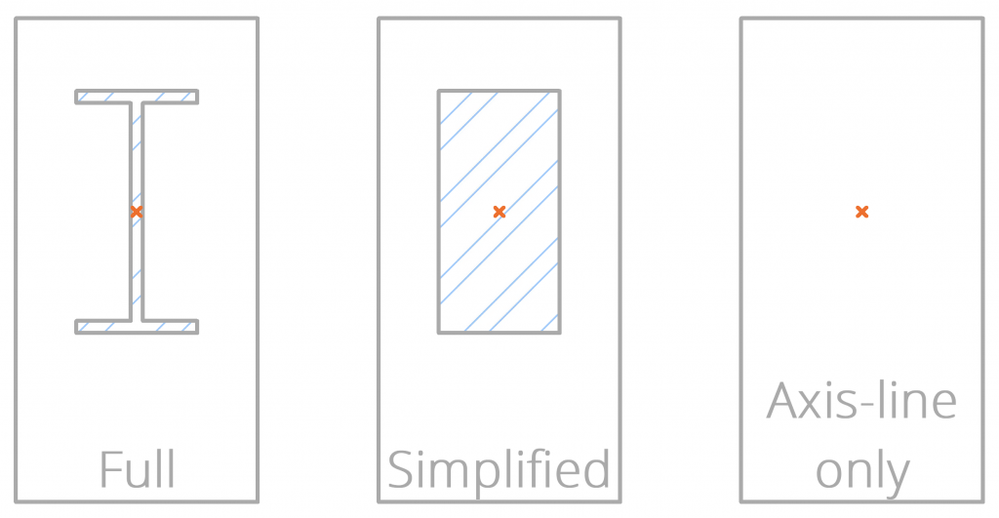
- 3D Detail Level: Choose one of 3 detail levels to change the complexity of the model: Full, Simplified, Axis-line only.
- Shadow: As in most objects, you can turn off shadow-casting to improve performance or hide unnecessary shadows from the model.
How to sweep along a curve (or polyline)
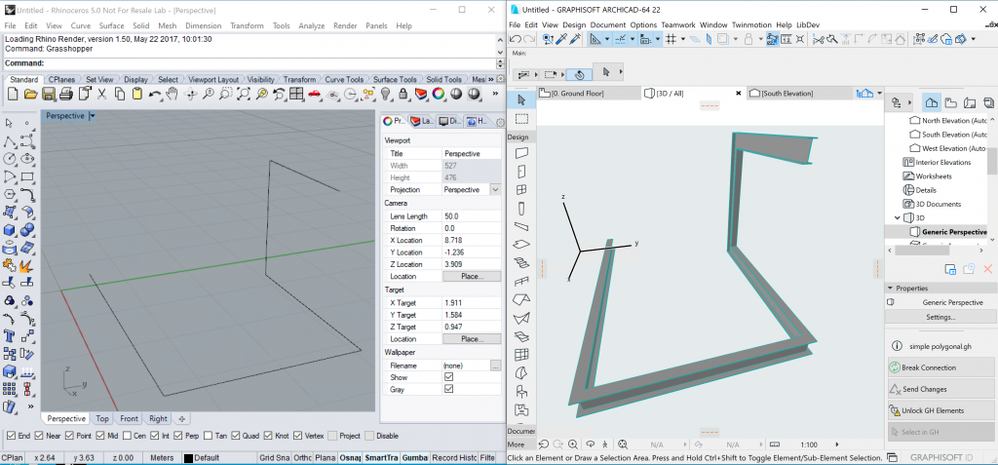
In this example, you will see what are the basics of setting up the Grasshopper Sweep Object. This tutorial will follow the transfer of a simple open curve. You can download this example *.GH file from here.

- Start Archicad, Rhinoceros, and Grasshopper.
- The "Grasshopper Sweep Object" is available on BIMcomponents.com, so if you open the Object tool in Archicad, and search for its name, you will see it amongst the search results (provided you have an internet connection). Select this object from the search, and choose "Download and Embed", to add it to your Embedded Library.
- Open the Grasshopper Connection Palette, and start the Grasshopper - Archicad Connection (Window>Palettes>Grasshopper Connection Palette>Start Connection).
- Create a single continuous Curve Component in Grasshopper to define the path of the sweeping (along Complex Profile Axis).
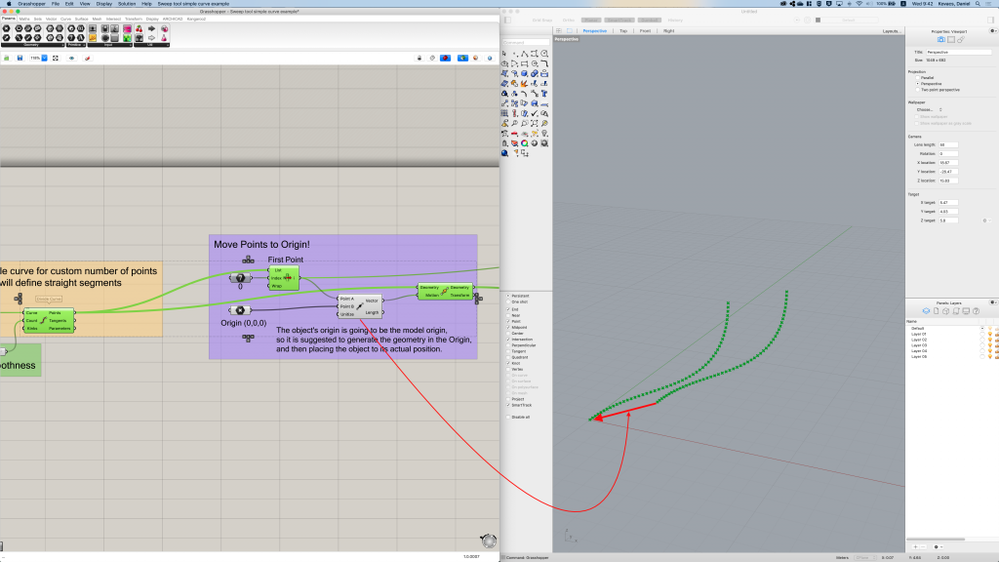
- Break down the Curve into 3D points. In this example we use the divide curve component to do this, so later we can adjust the smoothness of the segments.

- When you generate an object through the connection tool in Archicad, it will always take the Rhino Model origin as the origin for the object. To avoid creating objects that have their geometry far away from their actual origin, it is suggested to generate the object geometry right in the Rhino Origin, and then place the object in its original position after. To do this we picked the first point of the object as the insertion point and moved every point into the origin relative to this point.
- Next place an Archicad Object Settings Component in Grasshopper
- Right-click on the component and choose "Use Existing Library Part"
- Right-click again to select the Object, browse the object and choose its parameters as well, then click OK. For now, we will only use the "Profile" and the "XYZ Coordinates of Path" parameters.
- The Object can only take a list of numbers (one-dimensional array), so you can't input the points directly. You will need to flatten and convert the points (of the path) to a list of numbers. We are using the "Points to numbers" component to do this in this example. Connect this list to the XYZ coordinates of the path Parameter.
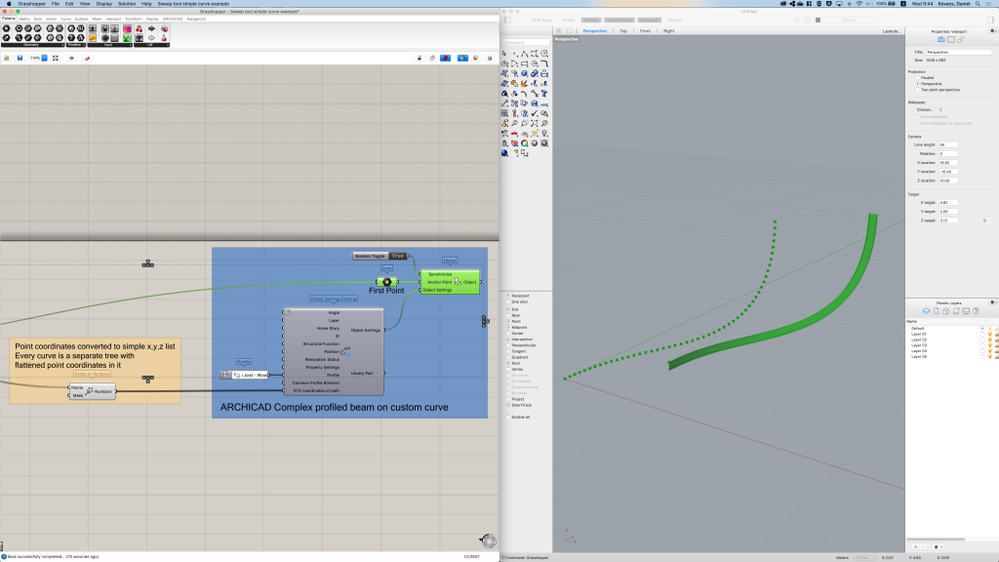
- Since the geometry was generated in the Rhino Origin, the Anchor Point of the object will need to be set to the first point of the path once more (just like when you moved it to the Origin).
- Place a Profile Component, and choose the complex profile you want to extrude/sweep along this path. Connect this to the Profile Input of the Object Settings Component.
- Connect the Object Settings and the Anchor Point to an Archicad Object component, and see your shape appear inside Archicad.
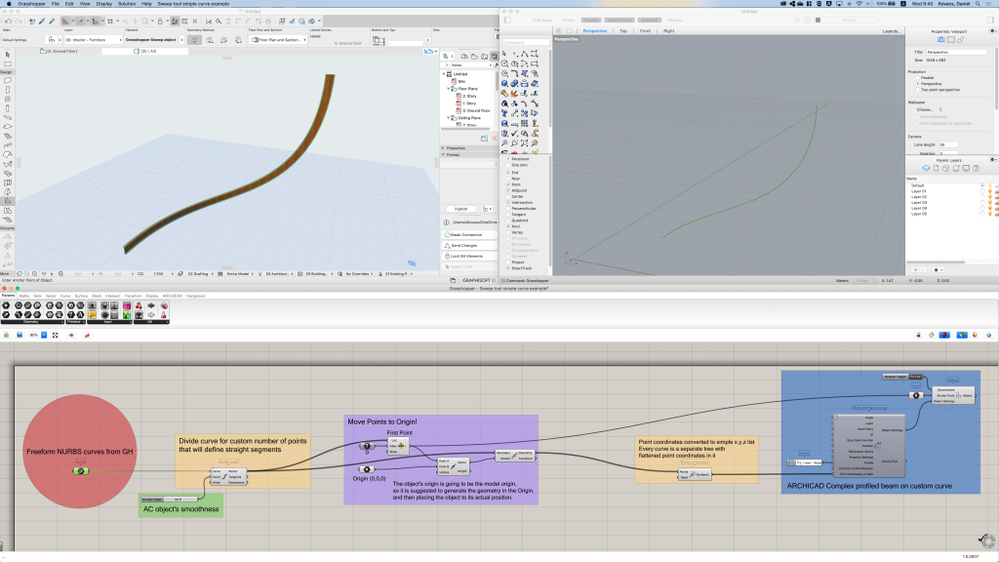
The file also contains a Simple Polyline that can be broken down and transferred virtually the same way.
How to control the direction of the Profile
To get the exact result you want, it is not enough to just select a path and a profile, it also matters in what direction the profile stands around that axis. Let's see what options you have to control this. In the examples below we will be using an example *.GH definition you can download from here.
Common Profile Rotation
If the direction of the profile is consistent all along the path, but, by default, it goes the wrong way, you can rotate the direction of the profile all along the curve at once with a single rotation. Use the "Common Profile Rotation" Parameter in the object to control this. It can be controlled from both Archicad and Grasshopper. The value is an angle in Decimal Degrees (°).
Profile Rotation at Nodes
You can also set a custom rotation for each node in your path separately, with the "Profile Rotation at nodes" parameter. This can only be controlled from Grasshopper, and the input should be a flattened list of rotations (in decimal degrees °), with one value for each node. Can be used together with the Common profile rotation parameter, in that case, this rotation is added to the Common Rotation, it doesn't disable it.
Top Direction
In case you have a planar frame at a random angle, setting the rotation might be hard, as the profile always tends to keep itself vertical all along the path. In order to align the default angle of a planar curve easily, you have to be able to handle the plane of the curve as it was the horizontal plane.
The "Top Direction" parameter is a single vector, the defines which way is up. By default, it points upwards, but if you want to align it to a random plane, you can get the Z-vector of that plane in Grasshopper, and set it as the new Top Direction. This way you can align any profile to lay flat in a random plane.
The input is a flattened list of 3 numbers (the XYZ coordinates of a Z vector, as if it was pointing from the origin - the default format of a vector in Grasshopper). It can be used in combination with the other 2 rotation methods. You can visualize this vector in Archicad with the "Show Editable Hotspots in 3D" checkbox, in the Object Settings dialog.
Advanced Tips & Tricks
Closed curve paths
In case you want to sweep along a closed curve, you can use the "Close Path" checkbox in the settings of the object, to connect the first and the last point with a segment. In case the last and the first point are the same after you deconstruct the curve into a list of points, there won't be an additional segment added, only the connection will be amended.
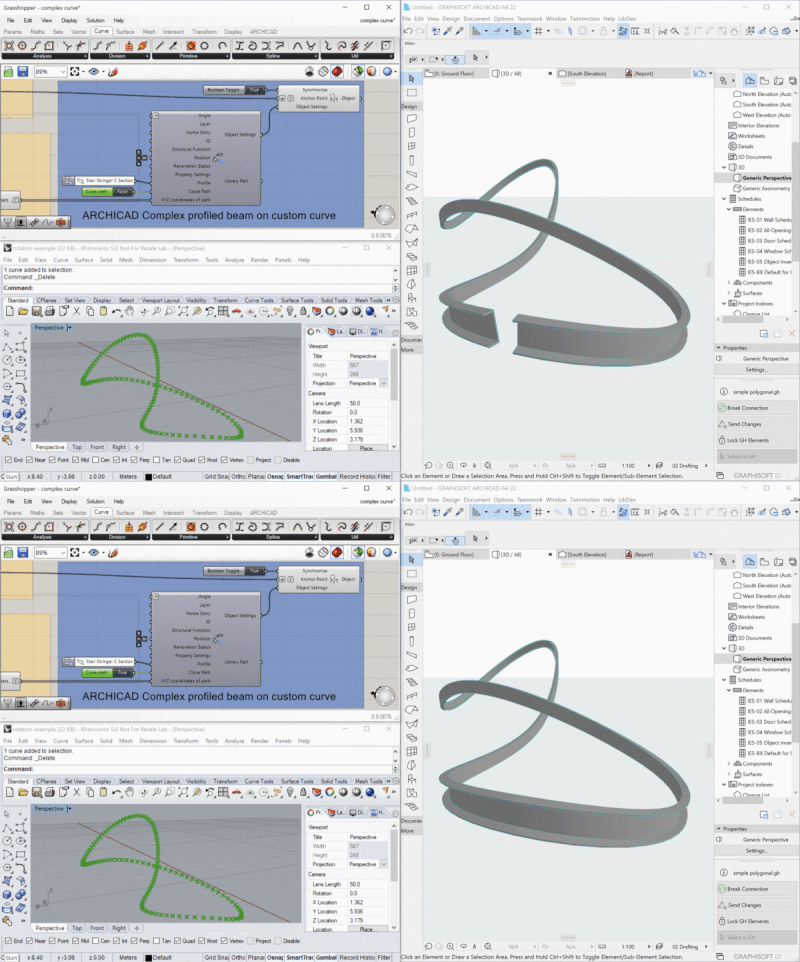
You can control this parameter from both Grasshopper and Archicad.
End Cut Angle
By default, the 2 ends of the Sweep Object will be cut off perpendicularly to the last segment of the path. If you need it to be cut off at a different angle, you can change the cut angle with the "End Cut 1/2" Parameters.
To set a custom angle, you just have to set these parameters to 'custom', and turn on the "Show Editable Hotspots in 3D" option, to adjust it manually. 2 Disks will appear in the 3D window that will let you set the direction in which the path would go if there was one extra segment at the end. The ends will be cut off as they were connecting to this invisible segment.
You can also control the direction from Grasshopper. You can set the direction by defining the position of this same point through the "StartCutCoord" and "EndCutCoord" Parameters. These are also one-dimensional Array parameters that require a flattened list as an input. They both should include 3 values - the XYZ coordinates of this point - in the following format: X, Y, Z.
Show Editable Hotspots in 3D
"Show Editable hotspots in 3D" is a checkbox parameter in the Sweep Object that makes manual editing of each node possible. It is suggested to keep it turned off, as with an extensive amount of points it can cause significant slow-downs (it is turned off by default). When turned one it will let you:
- Move each node in any direction in 3D.
- Rotate the Profile around the axis at each point separately.
- Set the direction of the End Cut.

- Change the direction of the Top Vector manually.
3D Detail Level
You can choose between 3 different detail levels to change the complexity of the 3D representation of the Object with the "3D detail Level" Parameter. In 'Full', it displays according to the actual Complex Profile geometry. In 'Simplified', the bounding box of the Complex profile is swept along the path. In 'Axis-line only', there is no profile, only the 3D path is kept as a single 3D line.
- Smart roof editing in Archicad: When to crop, When to trim, When to use SEOs in Modeling
- Improved BIMmTool for better point cloud handling in Modeling
- Archicad Start Edition 2024 in Getting started
- Security Update for Archicad 22-25 and License Manager Tool in Installation & update
- Getting started with Graphisoft cloud licensing in Licensing
