
Turn on suggestions
Auto-suggest helps you quickly narrow down your search results by suggesting possible matches as you type.
Showing results for
EN
Turn on suggestions
Auto-suggest helps you quickly narrow down your search results by suggesting possible matches as you type.
Showing results for
Options
- Subscribe to RSS Feed
- Mark Topic as New
- Mark Topic as Read
- Pin this post for me
- Bookmark
- Subscribe to Topic
- Mute
- Printer Friendly Page
Anonymous
Not applicable
Options
- Mark as New
- Bookmark
- Subscribe
- Mute
- Subscribe to RSS Feed
- Permalink
- Report Inappropriate Content
2016-03-29
06:31 PM
- last edited on
2023-05-24
08:41 AM
by
![]() Rubia Torres
Rubia Torres
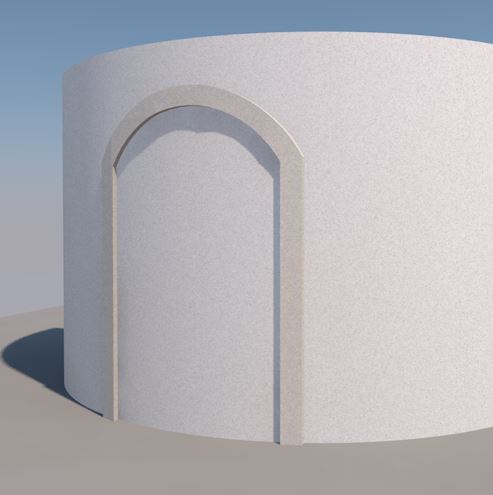
Curved Window Trim
2016-03-29
06:31 PM
Normally the window is on a flat wall and I just create a series of slabs at the different heights and then convert it to a morph and rotate up onto wall. Just not sure you can make a trim that same way and have it curving in 2 directions.
Would you still make the vertical parts (from front door up to where arch starts) like description above and then for the curved arch part make it as a slab following the curved wall, just at a taller height than the vertical arch and do an SEO for the window area? Or does anyone have another idea?

3 Replies 3
Anonymous
Not applicable
Options
- Mark as New
- Bookmark
- Subscribe
- Mute
- Subscribe to RSS Feed
- Permalink
- Report Inappropriate Content
2016-03-31 04:37 PM
2016-03-31
04:37 PM
Hello, this can be done with the shell tool.
Right now I don't have the time to explained step by step, but the idea is simple, create a extruded shell next to the wall then in elevation use the create hole in shell and define contour functions to create what you need.
You can see the Shell videos in the archicad youtube channel to learn all these tricks of the shell tool (which is a very flexible tool).
Anonymous
Not applicable
Options
- Mark as New
- Bookmark
- Subscribe
- Mute
- Subscribe to RSS Feed
- Permalink
- Report Inappropriate Content
2016-03-31 09:05 PM
2016-03-31
09:05 PM
You can also use a series of slabs to cut other slabs using the "Solid Elements Operation Tool". The slabs which will cut out the window and door openings can be on a separate layer than can be turned off (to keep from showing up in the final product).
1.) In Plan view, draw 3 slabs the full height of the trim. A.) Slab #1 will be a rectangle in plan view that is wide enough and deep enough to meet the needed size of trim. B/C.) 2 more slabs will be drawn in Plan view to cut out the unnecessary part of the trim (these 2 pieces will be on a layer to turn off after this is all done. (See Photo #1).
2.) 2 more slabs will be used to cut out the window and door in Isometric or perspective view as shown in Photo #2. These 2 slabs will also be on the layer to turn off so that the final trim is the only thing left showing.
HTH.
Anonymous
Not applicable
Options
- Mark as New
- Bookmark
- Subscribe
- Mute
- Subscribe to RSS Feed
- Permalink
- Report Inappropriate Content
2016-03-31 09:46 PM
2016-03-31
09:46 PM
Thank you so much! That is genius and worked wonders. I've never used the shell tool, but after watching the youtube videos it's a pretty neat tool that I'll have to look into more.
Still looking?
Suggested topics
- Sloped sill in Libraries & objects
- Window Casing on Thick Walls in Libraries & objects
- Need help on window placement on curved walls in Modeling
- HUGE file size because of... schedules??? in Documentation
- Windows in Archicad 28 exterior 2D trim not displaying correctly on plan. in Libraries & objects
