
Turn on suggestions
Auto-suggest helps you quickly narrow down your search results by suggesting possible matches as you type.
Showing results for
EN
Turn on suggestions
Auto-suggest helps you quickly narrow down your search results by suggesting possible matches as you type.
Showing results for
Options
- Subscribe to RSS Feed
- Mark Topic as New
- Mark Topic as Read
- Pin this post for me
- Bookmark
- Subscribe to Topic
- Mute
- Printer Friendly Page
Anonymous
Not applicable
Options
- Mark as New
- Bookmark
- Subscribe
- Mute
- Subscribe to RSS Feed
- Permalink
- Report Inappropriate Content
2014-09-17
10:22 AM
- last edited on
2023-05-23
02:29 PM
by
![]() Rubia Torres
Rubia Torres
Model a double height/Storey Roof
2014-09-17
10:22 AM

6 Replies 6
Anonymous
Not applicable
Options
- Mark as New
- Bookmark
- Subscribe
- Mute
- Subscribe to RSS Feed
- Permalink
- Report Inappropriate Content
2014-09-17 10:23 AM
Barry Kelly
Moderator
Options
- Mark as New
- Bookmark
- Subscribe
- Mute
- Subscribe to RSS Feed
- Permalink
- Report Inappropriate Content
2014-09-17 11:12 AM
2014-09-17
11:12 AM
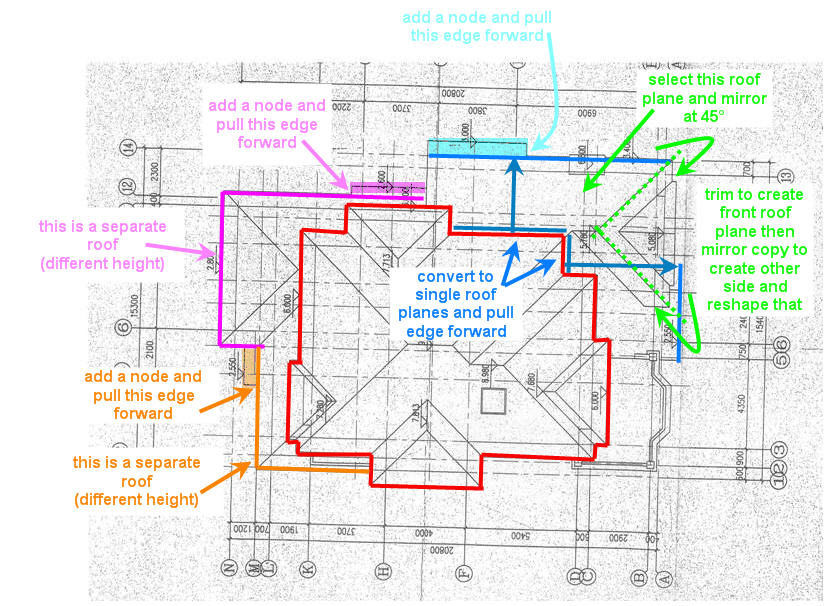
Hopefully the attached image will help.
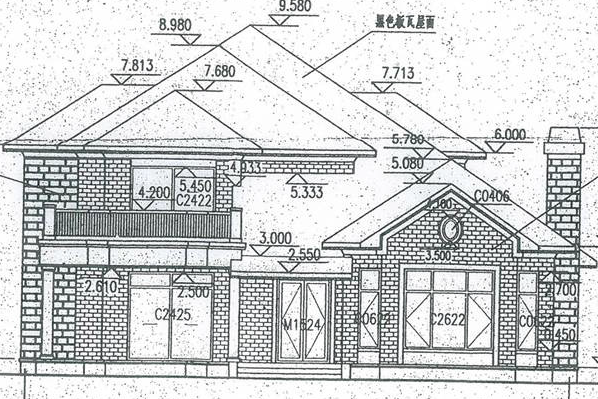
Because your roof spans from one floor to the other you will need to decide what level to start at.
As most of the roof is on the upper floor I would start there and simply stretch down the edges (eaves) so they cover the ground floor.
Do the main upper roof I have shown in red.
Pretend the roof continues for now where I have the double red/blue lines.
You will stretch those edges down to the ground floor.
If you use the multi-plane roof you will need to spit it into single roof planes so you can adjust the shape of the polygon planes.
Stretch the blue edges down to your ground floor and add nodes where you need to step the eaves down further.
To go around the corners for the green section I would take the top (blue) roof plane and mirror a copy at 45° to make the right side roof and then reshape the polygon to the area you need.
Mirror a copy again to make the return bottom plane.
Use the select a roof plane and CTRL click on the edge of another plane to trim the roof planes together to form you valley (and hips). Standard trimming method for single roof planes - you should find it in the reference manual if you are not familiar with it.
The height and positions of the pivot lines for this section of roof won't make a lot of sense (as you are copying upper floor roofs) but this saves you modelling ground floor roofs and then trying to adjust the height to suit.
The front pink and orange roofs are separate roofs at different heights that you will model on the ground floor.
You can use the multi-plane roof again to get the shape where you need it then split into single roof planes and cut off the bits you don't need.
Or just make it from single roof planes to begin with and adjust the shape of the polygons to suit what you need.
Barry.
One of the forum moderators.
Versions 6.5 to 27
i7-10700 @ 2.9Ghz, 32GB ram, GeForce RTX 2060 (6GB), Windows 10
Lenovo Thinkpad - i7-1270P 2.20 GHz, 32GB RAM, Nvidia T550, Windows 11
Versions 6.5 to 27
i7-10700 @ 2.9Ghz, 32GB ram, GeForce RTX 2060 (6GB), Windows 10
Lenovo Thinkpad - i7-1270P 2.20 GHz, 32GB RAM, Nvidia T550, Windows 11
Anonymous
Not applicable
Options
- Mark as New
- Bookmark
- Subscribe
- Mute
- Subscribe to RSS Feed
- Permalink
- Report Inappropriate Content
2014-09-17 12:13 PM
2014-09-17
12:13 PM
Thanks for the quick response Barry im having a go now, i dont understand what do you mean by splitting the multiplane roof into single plane, I have never used that option and cant find it. Or you mean to use the split tool in this case?
D.
D.
Anonymous
Not applicable
Options
- Mark as New
- Bookmark
- Subscribe
- Mute
- Subscribe to RSS Feed
- Permalink
- Report Inappropriate Content
2014-09-17 12:17 PM
2014-09-17
12:17 PM
Found it under Edit>Reshape 
Anonymous
Not applicable
Options
- Mark as New
- Bookmark
- Subscribe
- Mute
- Subscribe to RSS Feed
- Permalink
- Report Inappropriate Content
2014-09-17 01:07 PM
Barry Kelly
Moderator
Options
- Mark as New
- Bookmark
- Subscribe
- Mute
- Subscribe to RSS Feed
- Permalink
- Report Inappropriate Content
2014-09-17 01:37 PM
2014-09-17
01:37 PM
dvalent wrote:You can also select the roof and right click on it.
Found it under Edit>Reshape
Spit to single planes will be in the context menu.
I find multi-plane roofs are great for simple roofs or to get a basic shape.
Anything complex is best done with single planes.
Glad it is working for you.
Barry.
One of the forum moderators.
Versions 6.5 to 27
i7-10700 @ 2.9Ghz, 32GB ram, GeForce RTX 2060 (6GB), Windows 10
Lenovo Thinkpad - i7-1270P 2.20 GHz, 32GB RAM, Nvidia T550, Windows 11
Versions 6.5 to 27
i7-10700 @ 2.9Ghz, 32GB ram, GeForce RTX 2060 (6GB), Windows 10
Lenovo Thinkpad - i7-1270P 2.20 GHz, 32GB RAM, Nvidia T550, Windows 11
Still looking?
