- Graphisoft Community (INT)
- :
- Knowledge Base
- :
- Installation & update
- :
- Altering ARCHICAD behavior - Registry or Preferenc...
- Subscribe to RSS Feed
- Mark as New
- Mark as Read
- Bookmark
- Subscribe to Topic
- Printer Friendly Page
- Report Inappropriate Content
Altering ARCHICAD behavior - Registry or Preferences?
- Subscribe to RSS Feed
- Mark as New
- Mark as Read
- Bookmark
- Subscribe to Topic
- Printer Friendly Page
- Report Inappropriate Content
on
2021-01-28
12:06 PM
- edited on
2023-09-27
10:17 AM
by
Rubia Torres
In some cases, the only way to activate a feature, or change the behavior of ARCHICAD is by editing software configuration keys maintained by the operating system. On a PC this configuration system is called the Registry. On macOS, these configuration settings can be found in a PLIST file in the user's library.
ARCHICAD 23:
- Windows
- HKEY_CURRENT_USER/SOFTWARE/GRAPHISOFT/ARCHICAD/ARCHICAD [version].0.0 XXX R1
- macOS
- /Library/Preferences/com.graphisoft.AC [version].0.0 XXX v1.plist
ARCHICAD 22 and earlier:
- Windows
- HKEY_CURRENT_USER/SOFTWARE/GRAPHISOFT/ARCHICAD-64/ARCHICAD-64 [version].0.0 XXX R1
- macOS
- /Library/Preferences/com.graphisoft.AC-64 [version].0.0 XXX v1.plist
Windows: Registry Editor
How to get to
HKEY_CURRENT_USER/SOFTWARE/GRAPHISOFT/ARCHICAD/ARCHICAD [version].0.0 XXX R1
or
HKEY_CURRENT_USER/SOFTWARE/GRAPHISOFT/ARCHICAD-64/ARCHICAD-64 [version].0.0 XXX R1
Step 1: Run Regedit
Click on the Start button and type regedit, the blue icon of the Run command will appear in the Best match field and press ENTER to open the Registry Editor:

Step 2: Modify the Registry Key
The Registry Editor displays keys organized into folders. An important top most folder is called: HKEY_CURRENT_USER. The keys you might need to change for modifying ARCHICAD's behavior will be located under Software, and then under Graphisoft. Here you will find the keys used by all the installed ARCHICADs on your computer. You might even find keys for ARCHICAD versions that are no longer installed on the computer.
Here is an example of what you might see:
HKEY_CURRENT_USER/SOFTWARE/GRAPHISOFT/ARCHICAD-64/ARCHICAD-64 [version.0.0] INT R1

For a more in-depth discussion, see also Wikipedia article on the Registry.
macOS: Preferences Editor
How to open
com.graphisoft.AC [version].0.0 INT v1.plist
or
com.graphisoft.AC-64 [version].0.0 INT v1.plist
Software configuration keys, commonly called Preferences, are stored in property list files. These files are stored in your Library. The property list files are identified by a .plist extension.
Step 1: Download a PLIST editor
If you have never edited a PLIST file before on your machine, you will need a special program to modify them.
On macOS, there is no built-in software to edit PLIST files (comparing to registry on Windows). Normally, it is recommended to install and use Xcode, but it's a complex and heavy software built for developers.
Prefs Editor is a popular tool designed for this purpose. This small program is lightweight and very easy to get used to.
You can download Prefs Editor from the link below:
https://apps.tempel.org/PrefsEditor/index.php#download
Version 1.2.5 should be compatible with macOS 10.10 or above, while version 1.2.4 can be used on Mac OS X 10.9, 10.8, 10.7, and 10.6.
Step 2: Setting up Prefs Editor
On macOS 10.15 (Catalina): Copy the downloaded application from your assigned download folder into the Applications folder
On macOS 10.14 or older: You can skip this step
Step 3: Run Prefs Editor
Launch Prefs Editor by double-clicking the Prefs Editor (or look for Prefs Editor in Launchpad if you copied Prefs Editor into the Applications folder).
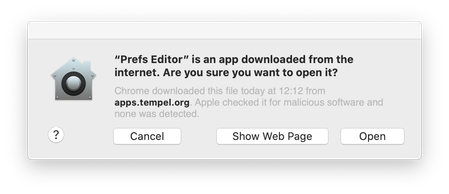
Upon starting the application for the first time, you might be presented with the following message:

Click Open and the application will start:

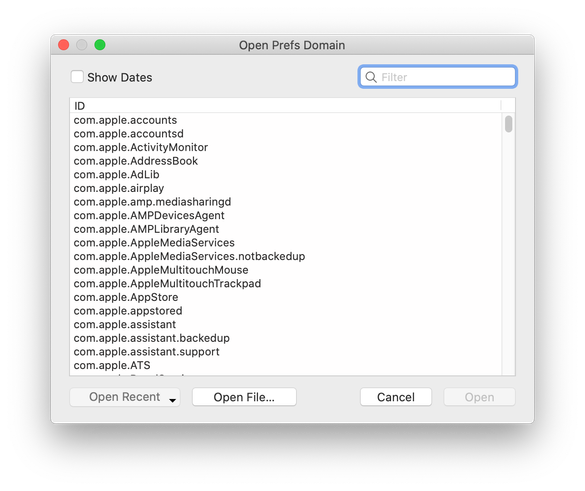
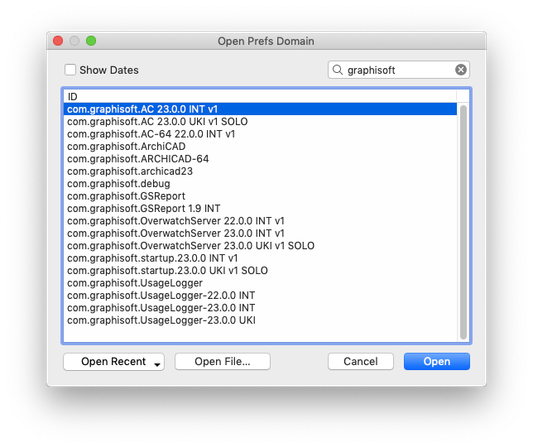
Prefs Editor will automatically list all PLIST files from the <current user>/Library/Preferences folder. Through the Filter field, you can look for the PLIST file to edit by typing in the name of the PLIST file.

Step 4: Edit PLIST files
Select the PLIST file you want to edit and click Open.

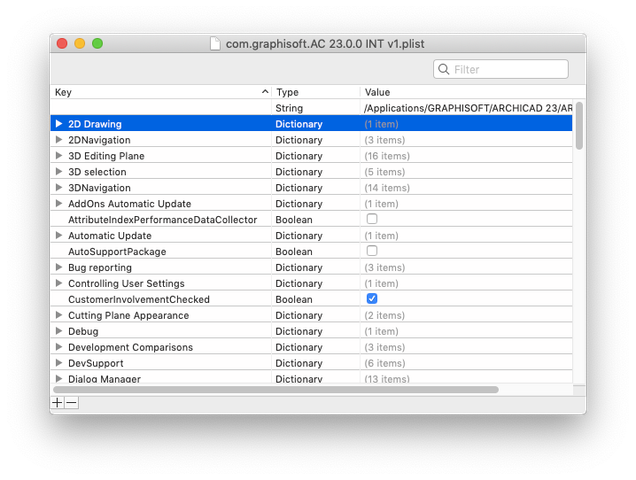
After the file is opened, you can click on the values in the third column to start editing them. On the bottom-left corner, the ( + ) button will add new values, while the ( - ) button will delete the existing values.
Once the modification is made, it is automatically saved to the PLIST file. There is no Save button, but you can Undo all modifications via cmd ⌘ + z hotkey or by going into Edit > Undo.
Click the close button to close the PLIST file. You can get back to the main screen of Prefs Editor by navigating to Prefs Editor's menu bar, File > Open Bundle ID...
For a more in-depth discussion of Property Lists, see also Wikipedia article on the Property Lists
