
Turn on suggestions
Auto-suggest helps you quickly narrow down your search results by suggesting possible matches as you type.
Showing results for
EN
Turn on suggestions
Auto-suggest helps you quickly narrow down your search results by suggesting possible matches as you type.
Showing results for
Options
- Subscribe to RSS Feed
- Mark Topic as New
- Mark Topic as Read
- Pin this post for me
- Bookmark
- Subscribe to Topic
- Mute
- Printer Friendly Page
Anonymous
Not applicable
Options
- Mark as New
- Bookmark
- Subscribe
- Mute
- Subscribe to RSS Feed
- Permalink
- Report Inappropriate Content
2015-12-22 09:54 AM
Imported image not showing in 3d
2015-12-22
09:54 AM
I imported an image using External content > Place external drawing.
I'm able to see the image on plan view but not on 3d. I was hoping to build my model in 3d environment.
trying to make the same one as attached. Was able to do in Vectorworks.
Thanks!

4 Replies 4
Community Admin
Options
- Mark as New
- Bookmark
- Subscribe
- Mute
- Subscribe to RSS Feed
- Permalink
- Report Inappropriate Content
2015-12-22 10:33 PM
2015-12-22
10:33 PM
Yes, it is easier in Vectorworks because there every 2D element is also visible in 3D. This is not the case in ARCHICAD.
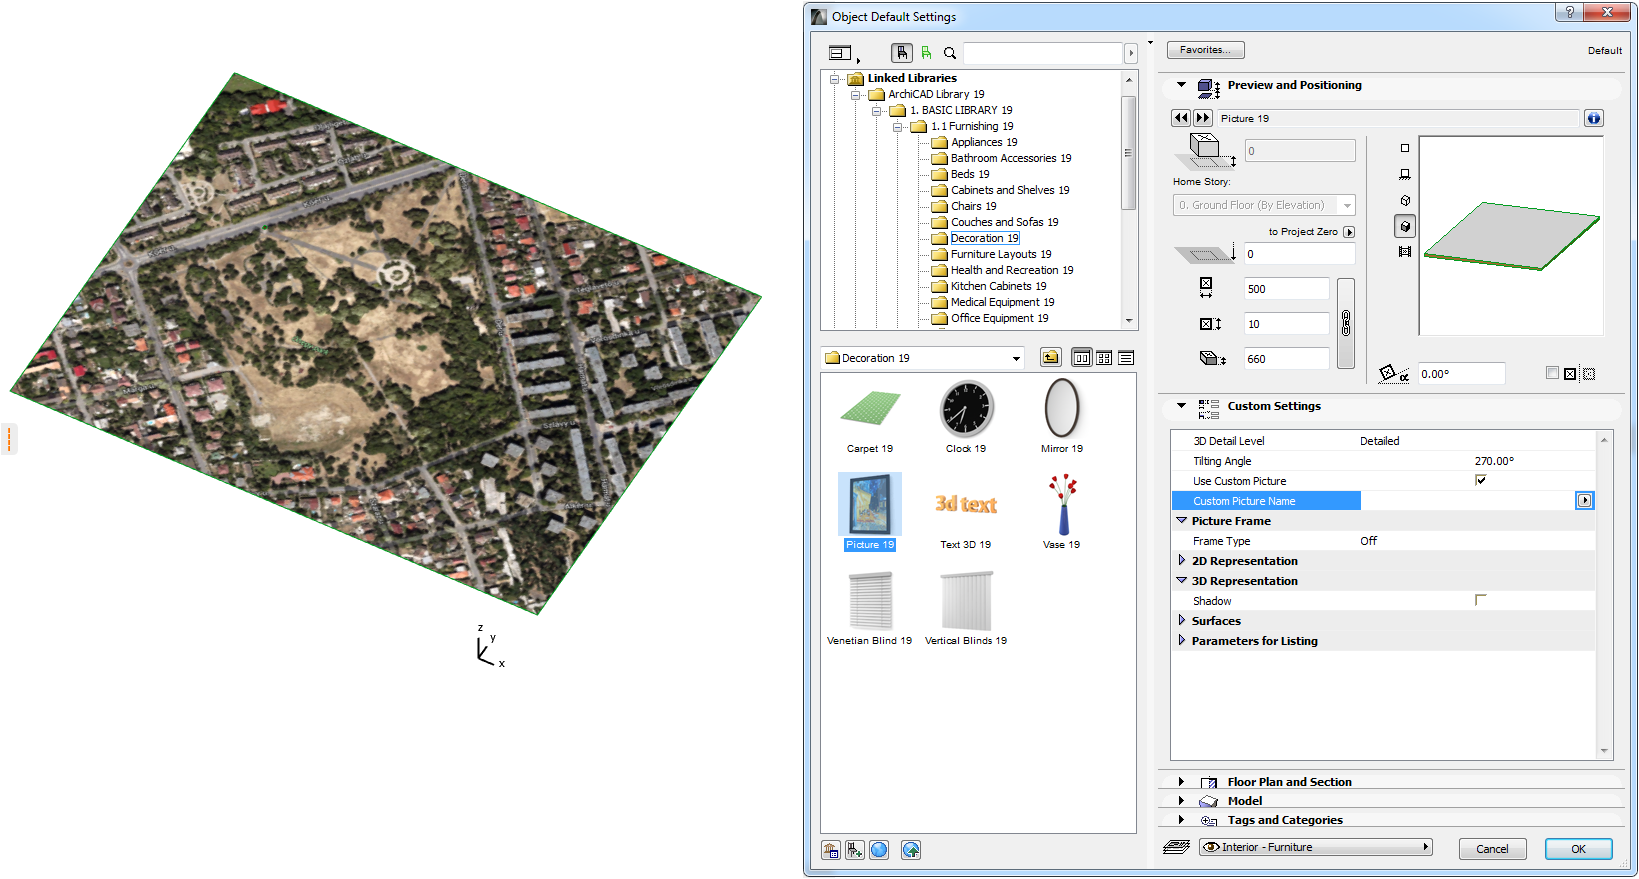
What you can do: use the "Picture 19" GDL Object. Activate the Object Tool and at the top of the left pane search for "Picture", then select the "Picture 19" Object.
Set the Width and Height (not the Depth - see image) to the model sizes of your city map picture (e.g. 120 m by 200 m). Set the "Tilting angle" parameter to 270 degrees so it will lie horizontally instead of hanging vertically. Set the Frame Type parameter to OFF.
Check the "Use Custom Picture" checkbox. Then you will have to specify the name of the image file in the "Custom Picture Name" field.
But before that you will need to load the image file into your project.
OK the Dialog, place the Object, it will be placed with a default picture.
Go to the File\Libraries and Objects\Library Manager Dialog, click the down-pointing arrow portion of the long Add button at the top and use the Browse for Embedded Objects command. Find your image file and load it. It will be listed under Embedded libraries, which means it will be stored as part of the project file. OK the Dialog and go back to the Object Settings Dialog, where you will now be able to select this image file in the "Custom Picture Name" field.
Now that the Picture is using the correct image all you need to do is set the sizes of the Picture correctly so it matches the the model sizes shown in the image.
Loving Archicad since 1995 - Find Archicad Tips at x.com/laszlonagy
AMD Ryzen9 5900X CPU, 64 GB RAM 3600 MHz, Nvidia GTX 1060 6GB, 500 GB NVMe SSD
2x28" (2560x1440), Windows 10 PRO ENG, Ac20-Ac29
AMD Ryzen9 5900X CPU, 64 GB RAM 3600 MHz, Nvidia GTX 1060 6GB, 500 GB NVMe SSD
2x28" (2560x1440), Windows 10 PRO ENG, Ac20-Ac29
Community Admin
Options
- Mark as New
- Bookmark
- Subscribe
- Mute
- Subscribe to RSS Feed
- Permalink
- Report Inappropriate Content
2015-12-23 02:56 PM
2015-12-23
02:56 PM
As was suggested by another user on Twitter:
https://twitter.com/AitorLeceta/status/679419182136598528
you can also use a map as a surface textura, size it to real scale and finally adjust mapping origin and orientation.
Loving Archicad since 1995 - Find Archicad Tips at x.com/laszlonagy
AMD Ryzen9 5900X CPU, 64 GB RAM 3600 MHz, Nvidia GTX 1060 6GB, 500 GB NVMe SSD
2x28" (2560x1440), Windows 10 PRO ENG, Ac20-Ac29
AMD Ryzen9 5900X CPU, 64 GB RAM 3600 MHz, Nvidia GTX 1060 6GB, 500 GB NVMe SSD
2x28" (2560x1440), Windows 10 PRO ENG, Ac20-Ac29
Anonymous
Not applicable
Options
- Mark as New
- Bookmark
- Subscribe
- Mute
- Subscribe to RSS Feed
- Permalink
- Report Inappropriate Content
2015-12-24 07:30 AM
2015-12-24
07:30 AM
Both method works great!
How do you scale a texture applied to a morph surface? When I try resize it scales up the model but not the texture.
Thanks..
How do you scale a texture applied to a morph surface? When I try resize it scales up the model but not the texture.
Thanks..
Community Admin
Options
- Mark as New
- Bookmark
- Subscribe
- Mute
- Subscribe to RSS Feed
- Permalink
- Report Inappropriate Content
2015-12-24 10:11 AM
2015-12-24
10:11 AM
You have to go to the Surface Settings Dialog and in the Texture panel you can set the X and Y sizes for the texture.
Loving Archicad since 1995 - Find Archicad Tips at x.com/laszlonagy
AMD Ryzen9 5900X CPU, 64 GB RAM 3600 MHz, Nvidia GTX 1060 6GB, 500 GB NVMe SSD
2x28" (2560x1440), Windows 10 PRO ENG, Ac20-Ac29
AMD Ryzen9 5900X CPU, 64 GB RAM 3600 MHz, Nvidia GTX 1060 6GB, 500 GB NVMe SSD
2x28" (2560x1440), Windows 10 PRO ENG, Ac20-Ac29
Still looking?
Suggested topics
- Surface (texture) override problem in Modeling
- I’m experiencing an issue with my template after upgrading from Archicad 26 to Archicad 29. in Libraries & objects
- Archicad Door Shop Dwg and Cutting list schedule in Modeling
- RAI Calculation Abacus in Project data & BIM
- Separation line between slab and mesh not showing after boolean operation in Documentation
