
Turn on suggestions
Auto-suggest helps you quickly narrow down your search results by suggesting possible matches as you type.
Showing results for
EN
Turn on suggestions
Auto-suggest helps you quickly narrow down your search results by suggesting possible matches as you type.
Showing results for
- English
- :
- Developer Hub
- :
- GDL
- :
- Re: Is there a tool / object for making a mesh wit...
Options
- Subscribe to RSS Feed
- Mark Topic as New
- Mark Topic as Read
- Pin this post for me
- Bookmark
- Subscribe to Topic
- Mute
- Printer Friendly Page
gedzior84
Booster
Options
- Mark as New
- Bookmark
- Subscribe
- Mute
- Subscribe to RSS Feed
- Permalink
- Report Inappropriate Content
2020-08-30
09:12 AM
- last edited on
2024-09-15
02:55 AM
by
![]() Laszlo Nagy
Laszlo Nagy
Is there a tool / object for making a mesh with a specified thickness?
2020-08-30
09:12 AM
Hello.
As in the topic, I wanted to ask you guys if there exists any tool that would allow me to create a mesh with a specified thickness, or layers.
For example, I have a terrain to model, but the ground has layers: 3cm of grass, 10cm of ground, and some other layers. The terrain is not flat - it has some holes and bumps. Is it possible to create this with one tool/object, not using layered slabs, roofs, and shells?

Labels:
- Labels:
-
Library (GDL)
64 Replies 64
Anonymous
Not applicable
Options
- Mark as New
- Bookmark
- Subscribe
- Mute
- Subscribe to RSS Feed
- Permalink
- Report Inappropriate Content
2020-09-11 07:56 PM
2020-09-11
07:56 PM
New release: I added a VALUE RANGE to the thickness parameters to prevent negative thickness.
@Yves
You are welcome Yves!
About the Cut Pen for each skin: Sorry, but my GDL kung fu is not that strong. Perhaps someone here can give it a try...
Regarding the French translation: Feel free to use/edit/distribute this object as you wish and at your own risk.
The Hotspot object is a great solution! I checked the BIM Components site and found a very good one created by Eric Bobrow. For those interested, look there for "Hotspot Placement Tool".
Cheers,
@Yves
You are welcome Yves!
About the Cut Pen for each skin: Sorry, but my GDL kung fu is not that strong.
Regarding the French translation: Feel free to use/edit/distribute this object as you wish and at your own risk.
The Hotspot object is a great solution! I checked the BIM Components site and found a very good one created by Eric Bobrow. For those interested, look there for "Hotspot Placement Tool".
Cheers,
Yves
Expert
Options
- Mark as New
- Bookmark
- Subscribe
- Mute
- Subscribe to RSS Feed
- Permalink
- Report Inappropriate Content
2020-09-14 01:35 PM
2020-09-14
01:35 PM
Hello Braza
Other languages will be easy to add for other countries (from the main script)

And finally I added the pens of the 2D fill
Here is your object modified from your V7 in archicad 21
Have a good day
Braza wrote:Thank you
@Yves
You are welcome Yves!
Braza wrote:I did it yesterday
About the Cut Pen for each skin: Sorry, but my GDL kung fu is not that strong.
Braza wrote:I also created a "multi-language" user interface (currently English French)
Regarding the French translation: Feel free to use/edit/distribute this object as you wish and at your own risk.
Other languages will be easy to add for other countries (from the main script)
Braza wrote:I just tested it's not a good idea because we add a material that takes the place of the side surface
The Hotspot object is a great solution! I checked the BIM Components site and found a very good one created by Eric Bobrow. For those interested, look there for "Hotspot Placement Tool".
And finally I added the pens of the 2D fill
Here is your object modified from your V7 in archicad 21
Have a good day
Yves Houssier
Belgium
Archicad 19 -> 24
iMac - Mac Os 10,13
Belgium
Archicad 19 -> 24
iMac - Mac Os 10,13
vistasp
Mentor
Options
- Mark as New
- Bookmark
- Subscribe
- Mute
- Subscribe to RSS Feed
- Permalink
- Report Inappropriate Content
2020-09-14 03:51 PM
2020-09-14
03:51 PM
Yves wrote:
I did it yesterday
The power of Open Source...
Thanks, guys!
= v i s t a s p =
bT Square Peg
https://archicadstuff.blogspot.com
https://www.btsquarepeg.com
| AC INT | Win11 | Ryzen 5700 | 64 GB | RTX 3050 |
bT Square Peg
https://archicadstuff.blogspot.com
https://www.btsquarepeg.com
| AC INT | Win11 | Ryzen 5700 | 64 GB | RTX 3050 |
Anonymous
Not applicable
Options
- Mark as New
- Bookmark
- Subscribe
- Mute
- Subscribe to RSS Feed
- Permalink
- Report Inappropriate Content
2020-09-14 07:23 PM
2020-09-14
07:23 PM
Wow Yves! Very Nice! 
Now this is a proper GDL object.
About the 3D Hotspot: Yes. This would add more parameters and potentially lead to inconsistency.
Regarding the individual skin Line Cut Pen: I tested it and found some quirks. The problem is that we can only control the pen color of the cut as a whole. And as the geometries are created by the script, they start to overlay on each other. I think there is no solution for this... I tried some new SUBGROUP{3} options with no success. Unfortunately your solution for this is not acceptable. Ideally, I would be satisfied if I could control the inner and contour cut pens. I will see if I can put some consistency to this.
@Vistasp
Yes. This is an awesome community!
BTW: I found another use for this object. Road markings. Create a single skin object with paint material > use the Railing Tool or 3D Text Object for marking > Finally do a intersection SEO.
A_ Smith
Expert
Options
- Mark as New
- Bookmark
- Subscribe
- Mute
- Subscribe to RSS Feed
- Permalink
- Report Inappropriate Content
2020-09-15 12:12 PM
2020-09-15
12:12 PM
Yves wrote:Thank you. I'm amazed....
For A. Smith. and other users,
Here is the object AC 21
Composite Mesh Object_V5 AC21.zip
AC 22, 24 | Win 10
Yves
Expert
Options
- Mark as New
- Bookmark
- Subscribe
- Mute
- Subscribe to RSS Feed
- Permalink
- Report Inappropriate Content
2020-09-15 12:33 PM
2020-09-15
12:33 PM
Braza wrote:Indeed Braza the cutting lines overlap and I see how to do otherwise.
Unfortunately your solution for this is not acceptable. Ideally, I would be satisfied if I could control the inner and contour cut pens. I will see if I can put some consistency to this.
For me who mainly wants to mark the supporting element, it is sufficient the thickness of the pens giving priority to the display.
(Just 0.01mm for the color to pass in front)
Braza wrote:
Ideally, I would be satisfied if I could control the inner and contour cut pens.
This pen must be thicker to pass in front
Yves Houssier
Belgium
Archicad 19 -> 24
iMac - Mac Os 10,13
Belgium
Archicad 19 -> 24
iMac - Mac Os 10,13
Anonymous
Not applicable
Options
- Mark as New
- Bookmark
- Subscribe
- Mute
- Subscribe to RSS Feed
- Permalink
- Report Inappropriate Content
2020-09-16 10:33 AM
2020-09-16
10:33 AM
Yves wrote:Nice one!
Perhaps by adding at the end of the script a subgroup which takes up the total thickness of the layers with a transparent material and a dedicated pen that would only be displayed in section
BTW: Now that you kindly gave us a proper UI, I will do some optimization on the whole code by creating some arrays for the repetitive parameters and routines.
Cheers,
Anonymous
Not applicable
Options
- Mark as New
- Bookmark
- Subscribe
- Mute
- Subscribe to RSS Feed
- Permalink
- Report Inappropriate Content
2020-09-17 09:59 PM
2020-09-17
09:59 PM
Yves wrote:It seems it did the trick.
Perhaps by adding at the end of the script a subgroup which takes up the total thickness of the skins with a transparent material and a dedicated pen that would only be displayed in section
Thanks for the hint Yves!
I also did some code and UI optimization. I did some tests with it and haven't found any glitches.
Please take a look and check if it is ok, as I did some tweaks on the French translation.
If anybody wants the object to be translated, just copy the following translation tag code > edit/translate it and then post the translated code here. I will then add it to the object and make it available on BIM Components.
IF language = "English" THEN
	ui_text_ObjTitle = 		"COMPOSITE MESH OBJECT"
	ui_text_MeshObjName = 	"Object/Name >>>"
	ui_text_skin = 			"Skin"
	ui_text_skins = 		"Skins"
	ui_text1_bMesh3D = 		"Mesh/3D"
	ui_text_PenCon3d = 		"Pen/3D"
	ui_text_TopSurf = 		"Surface/Top"
	ui_text_lThick = 		"Thickness"
	ui_text_BMAT = 			"Material"
	ui_text_SideSurf = 		"Surface/Side"
	ui_text_BotSurf = 		"Surface/Bottom"
	ui_text_PenCut = 		"Pen/Cut"

	width_intruc = 			210
	intruc_text_tit = 		"Instructions:"
	intruc_text_01 = 		"01. Create a solid mesh with the mesh tool and place 2d hotspots on a reference nodes;"
	intruc_text_02 = 		"02. Select your mesh and open its 'Settings Dialog';"
	intruc_text_03 = 		"03. Open the 'FLOOR PLAN & SECTION' dropdown menu;"
	intruc_text_04 = 		"04. Set your 'CUT SURFACES', 'OUTLINES' and 'COVER FILLS'(Always On) for this object;"
	intruc_text_05 = 		"05. Open the 'MODEL' dropdown menu;"
	intruc_text_06 = 		"06. Override top, skirt and bottom surfaces with 3 diferent surfaces (one for each);"
	intruc_text_07 = 		"07. Set the 3d appearence for this object;"
	intruc_text_08 = 		"08. Click OK on the 'Mesh Selection Settings';"
	intruc_text_09 = 		"09. Select your mesh and reference hotspots and go to File > Libraries & Objects > Save Selection as... > Object;"
	intruc_text_10 = 		"10. Save your object in the embedded library with an unique name;"
	intruc_text_11 = 		"11. Click OK on the 'Change Object's Basic Settings Dialog';"
	intruc_text_12 = 		"12. Select this object (Composite Mesh Object) and open its 'Settings Dialog';"
	intruc_text_13 = 		"13. Open the 'CUSTOM SETTINGS' dropdown menu; ;"
	intruc_text_14 = 		"14. On 'Mesh Object Name >>>>>>' type the name of your saved embedded mesh object;"
	intruc_text_15 = 		"15. Finally set the following parameters as you wish!"
	intruc_text_obs = 		"Obs.: If you need to edit the original mesh, repeat steps 09 to 11 and reload your library."
ENDIF
And finally here is the object.
Cheers,
Yves
Expert
Options
- Mark as New
- Bookmark
- Subscribe
- Mute
- Subscribe to RSS Feed
- Permalink
- Report Inappropriate Content
2020-09-18 03:49 PM
2020-09-18
03:49 PM
Very nice job thank you very much Braza
Just for fun add
ui_dialog ui_text_dialog
ui_text_dialog = "Options Composite Mesh Object"
ui_text_dialog = "Options Maillage Composite Objet"
I look this weekend
Just for fun
ui_dialog ui_text_dialog
ui_text_dialog = "Options Composite Mesh Object"
ui_text_dialog = "Options Maillage Composite Objet"
I look this weekend
Yves Houssier
Belgium
Archicad 19 -> 24
iMac - Mac Os 10,13
Belgium
Archicad 19 -> 24
iMac - Mac Os 10,13
Anonymous
Not applicable
Options
- Mark as New
- Bookmark
- Subscribe
- Mute
- Subscribe to RSS Feed
- Permalink
- Report Inappropriate Content
2020-09-21 05:49 PM
2020-09-21
05:49 PM
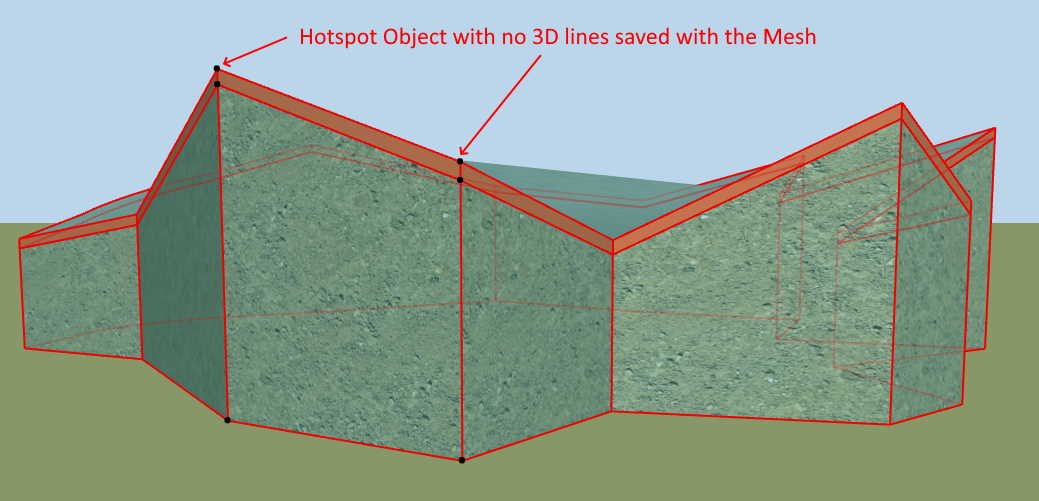
Ok. I figure it out that the object had a major flaw related to the number of pen parameters in the saved Mesh object. So I decide to workaround it and managed to get it work regardless the number of pens or even if it has a 2d cover fill. It also allow to use that 3d hotspot saved with the Mesh, although I don't think it is a good idea as it puts a hotspot on every instance of the called Mesh.
So... I think it is now
Here are some screenshots of the current stage of this object.
@Yves
Please check the instructions guide, as I simplified the workflow.
Thanks!
So... I think it is now
Here are some screenshots of the current stage of this object.
@Yves
Please check the instructions guide, as I simplified the workflow.
Thanks!
Didn't find the answer?
Check other topics in this Forum
Back to ForumRead the latest accepted solutions!
Accepted SolutionsStart a new conversation!
