
Turn on suggestions
Auto-suggest helps you quickly narrow down your search results by suggesting possible matches as you type.
Showing results for
EN
Turn on suggestions
Auto-suggest helps you quickly narrow down your search results by suggesting possible matches as you type.
Showing results for
Options
- Subscribe to RSS Feed
- Mark Topic as New
- Mark Topic as Read
- Pin this post for me
- Bookmark
- Subscribe to Topic
- Mute
- Printer Friendly Page
Anonymous
Not applicable
Options
- Mark as New
- Bookmark
- Subscribe
- Mute
- Subscribe to RSS Feed
- Permalink
- Report Inappropriate Content
2011-04-06 09:28 PM
How do i create a curved glass with a print on?
2011-04-06
09:28 PM
I know how to create the curved glass, its the printed pattern that is the problem.
Thx
8 Replies 8
Graphisoft Alumni
Options
- Mark as New
- Bookmark
- Subscribe
- Mute
- Subscribe to RSS Feed
- Permalink
- Report Inappropriate Content
2011-04-06 11:04 PM
2011-04-06
11:04 PM
Dave555,
The best way is to create a PNG in Photoshop or GIMP and apply it as a material to the glass wall. I checked to see how well it would work with a curved wall, works great. See below.
Use this tutorial from Florian Heise as a guide:http://education.heise.com.au/DEB201-2010/Archicad%20Mini%20Tutorial%2013b%20-%20Creating%20Billboar...
The best way is to create a PNG in Photoshop or GIMP and apply it as a material to the glass wall. I checked to see how well it would work with a curved wall, works great. See below.
Use this tutorial from Florian Heise as a guide:
Nicholas Cornia
Technical Support Team - GRAPHISOFT North America
Tutorials
GRAPHISOFT Help Center
Technical Support Team - GRAPHISOFT North America
Tutorials
GRAPHISOFT Help Center
Anonymous
Not applicable
Options
- Mark as New
- Bookmark
- Subscribe
- Mute
- Subscribe to RSS Feed
- Permalink
- Report Inappropriate Content
2011-04-07 09:20 AM
2011-04-07
09:20 AM
Another mode: If you would like to have a circular elements, we come to the aid of the command SEO (Solid Element Operation) - Intersection:
1. Model View (plan) through walls, make fence element desired shape (rectangular metal profiles)
2. Now create vault (arc, elliptical, any shape - Complex Profile) with an appropriate radius and put it in the right position in relation to previously constructed walls
3. Select the walls and vault and displays them in 3D box
4. Run SEO Target walls, vault operator, select Intersection and press Execute
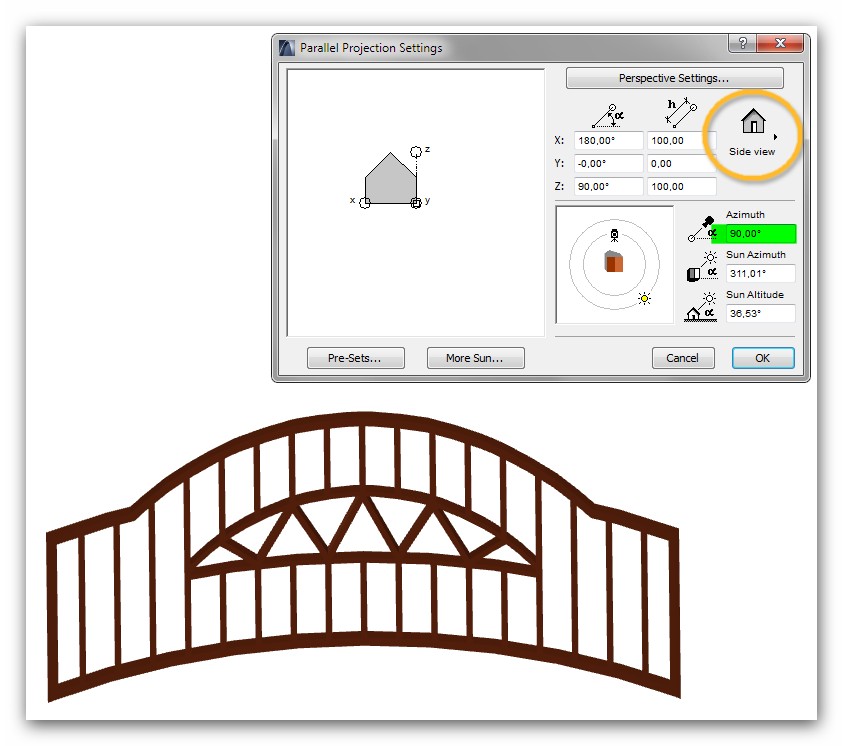
5. Now put the dome on a invisible Layer and then show off. You see the finished fence element, which is not yet properly turned into the space. Select the Parallel Projection Settings> Settings Perspective> Side View and Azimuth 90 °> OK.
6. Fence components are now visible in the bird perspective. Select them, choose the command File> Libraries and Objects> Save 3D Model as .... Object (under Options> Non-editable binary 3D data, but if you later want to add an object parameter, select Editable GDL Script).
7. Use this object for the new fence installation. Looking at vertical sections from the inside, we see that they are not facing normal to the curvature of the auxiliary arch. In this case you should use the "sloping walls" instead of vertical.

1. Model View (plan) through walls, make fence element desired shape (rectangular metal profiles)
2. Now create vault (arc, elliptical, any shape - Complex Profile) with an appropriate radius and put it in the right position in relation to previously constructed walls
3. Select the walls and vault and displays them in 3D box
4. Run SEO Target walls, vault operator, select Intersection and press Execute
5. Now put the dome on a invisible Layer and then show off. You see the finished fence element, which is not yet properly turned into the space. Select the Parallel Projection Settings> Settings Perspective> Side View and Azimuth 90 °> OK.
6. Fence components are now visible in the bird perspective. Select them, choose the command File> Libraries and Objects> Save 3D Model as .... Object (under Options> Non-editable binary 3D data, but if you later want to add an object parameter, select Editable GDL Script).
7. Use this object for the new fence installation. Looking at vertical sections from the inside, we see that they are not facing normal to the curvature of the auxiliary arch. In this case you should use the "sloping walls" instead of vertical.
Anonymous
Not applicable
Options
- Mark as New
- Bookmark
- Subscribe
- Mute
- Subscribe to RSS Feed
- Permalink
- Report Inappropriate Content
2011-04-07 09:25 AM
2011-04-07
09:25 AM
Picture 2:

Anonymous
Not applicable
Options
- Mark as New
- Bookmark
- Subscribe
- Mute
- Subscribe to RSS Feed
- Permalink
- Report Inappropriate Content
2011-04-07 09:26 AM
Anonymous
Not applicable
Options
- Mark as New
- Bookmark
- Subscribe
- Mute
- Subscribe to RSS Feed
- Permalink
- Report Inappropriate Content
2011-04-07 09:33 AM
Anonymous
Not applicable
Options
- Mark as New
- Bookmark
- Subscribe
- Mute
- Subscribe to RSS Feed
- Permalink
- Report Inappropriate Content
2011-04-07 09:34 AM
Anonymous
Not applicable
Options
- Mark as New
- Bookmark
- Subscribe
- Mute
- Subscribe to RSS Feed
- Permalink
- Report Inappropriate Content
2011-04-07 09:35 AM
2011-04-07
09:35 AM
Picture 6:

Anonymous
Not applicable
Options
- Mark as New
- Bookmark
- Subscribe
- Mute
- Subscribe to RSS Feed
- Permalink
- Report Inappropriate Content
2011-04-07 09:35 AM
Still looking?
Suggested topics
- how do I create a "curved tunnel" in Modeling
- How to model curved vertical wood slat wall paneling + fluted glass wall. Efficient workflow? in Modeling
- Curved wall following polyline in Modeling
- Slab Curvature in Modeling
- How to Create a Continuous 3D Curved Wall in Grasshopper? Looking for Component Suggestions in Parametric design
