- Subscribe to RSS Feed
- Mark Topic as New
- Mark Topic as Read
- Pin this post for me
- Bookmark
- Subscribe to Topic
- Mute
- Printer Friendly Page
- Mark as New
- Bookmark
- Subscribe
- Mute
- Subscribe to RSS Feed
- Permalink
- Report Inappropriate Content
2024-04-01
07:59 PM
- last edited on
2024-04-04
06:21 PM
by
Laszlo Nagy
Reference Axis - Show in Other Direction
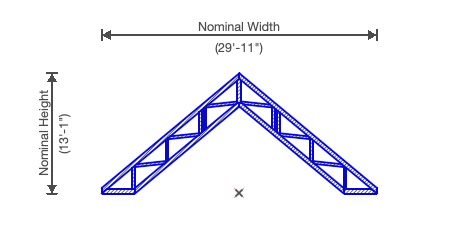
The reference axis shows in the short horizontal direction (3 1/2"), rather than down the middle length of the 29-11.
Solved! Go to Solution.
- Labels:
-
Complex Profiles
Accepted Solutions
- Mark as New
- Bookmark
- Subscribe
- Mute
- Subscribe to RSS Feed
- Permalink
- Report Inappropriate Content
2024-04-04 09:19 PM - edited 2024-04-04 09:21 PM
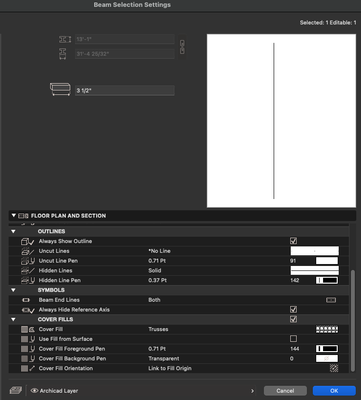
I used the following settings (a linear symbol fill that creates a long line).
This solution allows complex profile editing.
- Mark as New
- Bookmark
- Subscribe
- Mute
- Subscribe to RSS Feed
- Permalink
- Report Inappropriate Content
2024-04-01 09:43 PM
No, everything is as it should be.
The reference line is the extrusion vector basically. And if you do a truss like that it will extrude like the "thickness" of the profile – the only spatial parameter still lacking input (X and Z are already in the profile definition itself). In 3D the blue reference line will go through the local origin of the profile (here: at the bottom center).
It's a change of perspective but once you got it you will be enlightened and utilize this to your advantage.
My List of AC shortcomings & bugs | I Will Piledrive You If You Mention AI Again |
POSIWID – The Purpose Of a System Is What It Does /// «Furthermore, I consider that Carth... yearly releases must be destroyed»
- Mark as New
- Bookmark
- Subscribe
- Mute
- Subscribe to RSS Feed
- Permalink
- Report Inappropriate Content
2024-04-01 10:23 PM
A rotate axis line built into complex profiles would be awesome.
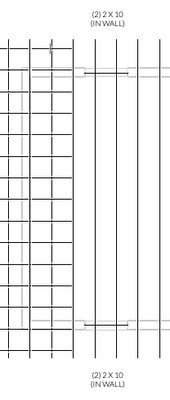
I assume the only way to achieve the below visual to draw a line over the profile, and combine the two as an object?
- Mark as New
- Bookmark
- Subscribe
- Mute
- Subscribe to RSS Feed
- Permalink
- Report Inappropriate Content
2024-04-02 02:26 AM
Just place one truss, then select and save as an object, then edit the 2D symbol in the object.
Or as you suggested, draw a line, select the line and the truss and save as an object - you might still need to edit the 2D symbol.
Barry.
Versions 6.5 to 27
i7-10700 @ 2.9Ghz, 32GB ram, GeForce RTX 2060 (6GB), Windows 10
Lenovo Thinkpad - i7-1270P 2.20 GHz, 32GB RAM, Nvidia T550, Windows 11
- Mark as New
- Bookmark
- Subscribe
- Mute
- Subscribe to RSS Feed
- Permalink
- Report Inappropriate Content
2024-04-04 09:19 PM - edited 2024-04-04 09:21 PM
I used the following settings (a linear symbol fill that creates a long line).
This solution allows complex profile editing.
Still looking?
- Lightest way to reference an IFC in Archicad in Collaboration with other software
- Side-by-Side Modeling: Reusing Previous Projects as “Live” References Instead of template file in Project data & BIM
- Send to Back in General discussions
- Autotext Detail References in Schedules in Documentation
- Stair Tolerance for Tread/Riser Gap in Modeling


