
Turn on suggestions
Auto-suggest helps you quickly narrow down your search results by suggesting possible matches as you type.
Showing results for
EN
Turn on suggestions
Auto-suggest helps you quickly narrow down your search results by suggesting possible matches as you type.
Showing results for
Options
- Subscribe to RSS Feed
- Mark Topic as New
- Mark Topic as Read
- Pin this post for me
- Bookmark
- Subscribe to Topic
- Mute
- Printer Friendly Page
Anonymous
Not applicable
Options
- Mark as New
- Bookmark
- Subscribe
- Mute
- Subscribe to RSS Feed
- Permalink
- Report Inappropriate Content
2008-12-02
02:40 AM
- last edited on
2023-05-25
06:09 PM
by
![]() Rubia Torres
Rubia Torres
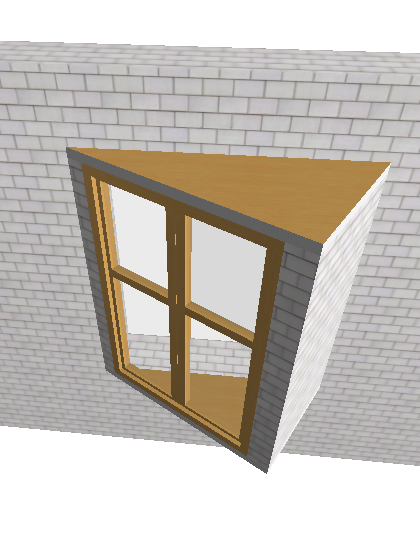
bay window with not-perpendicular opening?
2008-12-02
02:40 AM
However, I still dunno how to do so.
Anyone know? thanks

6 Replies 6
Community Admin
Options
- Mark as New
- Bookmark
- Subscribe
- Mute
- Subscribe to RSS Feed
- Permalink
- Report Inappropriate Content
2008-12-02 12:09 PM
2008-12-02
12:09 PM
Since a Window can only be placed into a Wall:
Draw them as Walls and then place the Windows into them.
Draw them as Walls and then place the Windows into them.
Loving Archicad since 1995 - Find Archicad Tips at x.com/laszlonagy
AMD Ryzen9 5900X CPU, 64 GB RAM 3600 MHz, Nvidia GTX 1060 6GB, 500 GB NVMe SSD
2x28" (2560x1440), Windows 10 PRO ENG, Ac20-Ac29
AMD Ryzen9 5900X CPU, 64 GB RAM 3600 MHz, Nvidia GTX 1060 6GB, 500 GB NVMe SSD
2x28" (2560x1440), Windows 10 PRO ENG, Ac20-Ac29
Karl Ottenstein
Moderator Emeritus
Options
- Mark as New
- Bookmark
- Subscribe
- Mute
- Subscribe to RSS Feed
- Permalink
- Report Inappropriate Content
2008-12-02 07:40 PM
2008-12-02
07:40 PM
Actually, using the library 'bay' assemblies as an example, this does not need to be done with walls and inserted windows - although it certainly can be.
You can model the entire bay assembly consisting of the extended sill (or floor), window frame, glass, ceiling and roof as well as a wall cutting slab with the ID=wallhole in the floor plan using normal tools and then save the entire assembly as a window. Placing the result in the wall will cut the hole.
Remember that when you assemble a custom window in plan, you do so flat on the ground, with the zero height equal to the outside of the building. So, your bay would be built below zero. The window walls would have to be done with roofs or tilted (complex or not) columns.
Cheers,
Karl
Vote for Wish: Copy/Paste in 3D
AC 29 USA and earlier • hardware key • macOS Tahoe 26.5.2 MacBook Pro M2 Max 12CPU/30GPU cores, 32GB
AC 29 USA and earlier • hardware key • macOS Tahoe 26.5.2 MacBook Pro M2 Max 12CPU/30GPU cores, 32GB
Anonymous
Not applicable
Options
- Mark as New
- Bookmark
- Subscribe
- Mute
- Subscribe to RSS Feed
- Permalink
- Report Inappropriate Content
2008-12-03 02:36 AM
2008-12-03
02:36 AM
laszlonagy wrote:
Since a Window can only be placed into a Wall:
Draw them as Walls and then place the Windows into them.
But one side is shorter than the other side
Anonymous
Not applicable
Options
- Mark as New
- Bookmark
- Subscribe
- Mute
- Subscribe to RSS Feed
- Permalink
- Report Inappropriate Content
2008-12-03 02:41 AM
2008-12-03
02:41 AM
Karl wrote:sorry, I can't place the window without a wall
Actually, using the library 'bay' assemblies as an example, this does not need to be done with walls and inserted windows - although it certainly can be.l
You can model the entire bay assembly consisting of the extended sill (or floor), window frame, glass, ceiling and roof as well as a wall cutting slab with the ID=wallhole in the floor plan using normal tools and then save the entire assembly as a window. Placing the result in the wall will cut the hole.That mean I have to model whole window again? it is so inconvenient.....
Anonymous
Not applicable
Options
- Mark as New
- Bookmark
- Subscribe
- Mute
- Subscribe to RSS Feed
- Permalink
- Report Inappropriate Content
2008-12-03 02:51 AM
Karl Ottenstein
Moderator Emeritus
Options
- Mark as New
- Bookmark
- Subscribe
- Mute
- Subscribe to RSS Feed
- Permalink
- Report Inappropriate Content
2008-12-03 04:32 AM
2008-12-03
04:32 AM
angus wrote:The 'bay'Karl wrote:sorry, I can't place the window without a wall
Actually, using the library 'bay' assemblies as an example, this does not need to be done with walls and inserted windows - although it certainly can be.l
You can model the entire bay assembly consisting of the extended sill (or floor), window frame, glass, ceiling and roof as well as a wall cutting slab with the ID=wallhole in the floor plan using normal tools and then save the entire assembly as a window. Placing the result in the wall will cut the hole.That mean I have to model whole window again? it is so inconvenient.....
The alternative is an empty opening combined with two walls and two slabs (at least) as you have done ...the walls, window and slabs could be a hotlinked module, allowing one change to change all instances later - but the wallhole would have to be placed individually and the modules aligned.... And the bay walls will not clean up correctly with your main walls, although you could make them polywalls I suppose...?
Let us know what ends up working best for you.
Karl
Vote for Wish: Copy/Paste in 3D
AC 29 USA and earlier • hardware key • macOS Tahoe 26.5.2 MacBook Pro M2 Max 12CPU/30GPU cores, 32GB
AC 29 USA and earlier • hardware key • macOS Tahoe 26.5.2 MacBook Pro M2 Max 12CPU/30GPU cores, 32GB
Still looking?
Suggested topics
- Archicad to Revit for MEP: the workaround Graphisoft's own method couldn't give me in Collaboration with other software
- Wrap exterior skins of wall closure for Door Openings in Modeling
- files with Hotlinks do not open in Installation & update
- Profile Stack 2D Detail object in Libraries & objects
- Archicad 29 - Slow zoom and pan in General discussions
