- Graphisoft Community (INT)
- :
- Knowledge Base
- :
- Documentation
- :
- Using Expressions to Label Partition Types
- Subscribe to RSS Feed
- Mark as New
- Mark as Read
- Bookmark
- Subscribe to Topic
- Printer Friendly Page
- Report Inappropriate Content
Using Expressions to Label Partition Types
- Subscribe to RSS Feed
- Mark as New
- Mark as Read
- Bookmark
- Subscribe to Topic
- Printer Friendly Page
- Report Inappropriate Content
on
2019-03-04
05:11 PM
- edited on
2021-11-26
02:05 PM
by
Rubia Torres

1. Go to Options > Composites to open the composites dialogue box.
2. Examine the composite name. Make sure that an abbreviation is separated from the rest of the name via a distinct character. Add a separating character if needed.
Note: A separating character will be needed to split and abbreviate the composite name for use with a partition tag. For example "A1 | Wood 3 1/2" - Gypsum - Gypsum" will be shortened to "A1."

3. If complex profiles are being used in the project, go to Options > Complex Profiles > Profile Manager and repeat step 2.
4. Go to Options > Property Manager... to open the Property Manager dialogue box.
5. Click the New button to the New Property / Group dialogue box.

6. In the New Property / Group dialogue box, select Group, enter the Group Name and click OK.
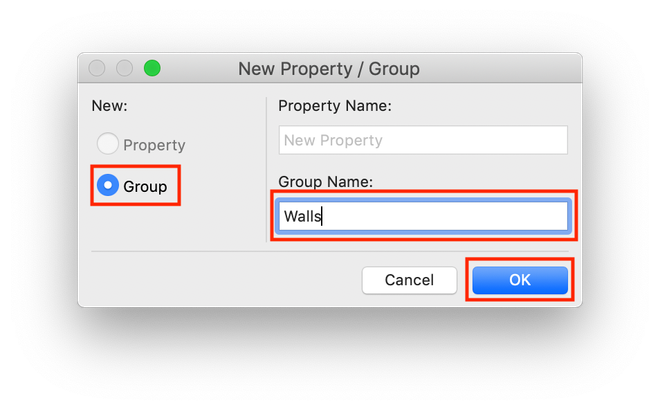
7. Click the New button again to open the New Property / Group dialogue box.
8. In the New Property / Group dialogue box, select Property, enter the Property Name, set Add to Group to the group that was just created and click OK.

9. Select the newly created group, under the Availability for Classifications tab select Custom and click Edit...

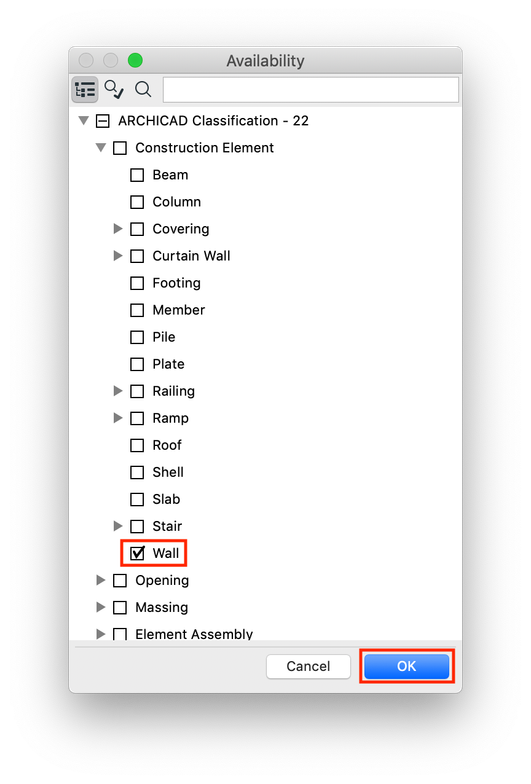
10. In the Availability dialogue box select Wall and click OK.
Note: This will allow the property being created to be assigned to walls within the project. If a different classification system exists in the file, choose the classification that is used for walls.

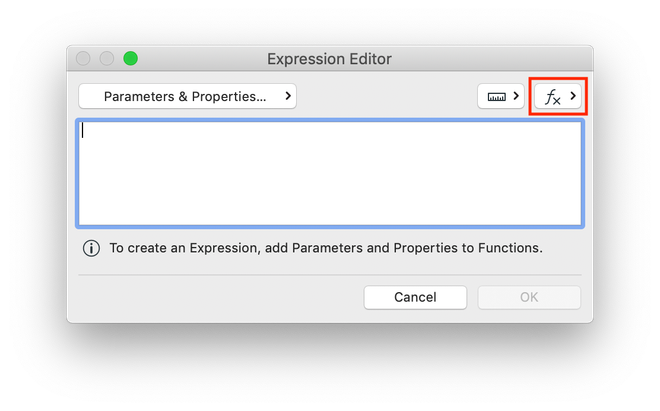
12. In the Expression Editor dialogue box, click the Operators & Functions button.
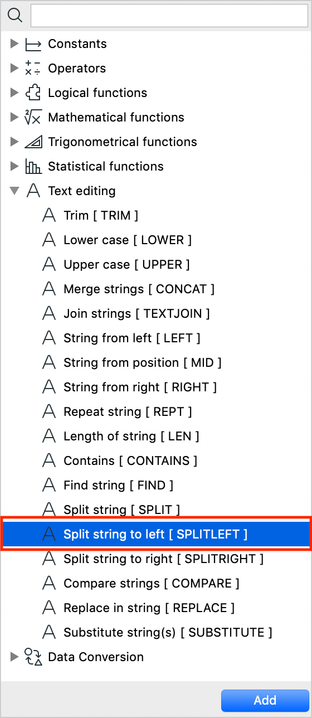
13. In the pull down menu, select Split string to left [ SPLITLEFT ] and click Add.
Note: This function will allow the user to discard all information to right of the trimming character. If the wall partition abbreviation was at the end of the name then SPLITRIGHT would be used.
14. The function will appear in the Expression Editor.
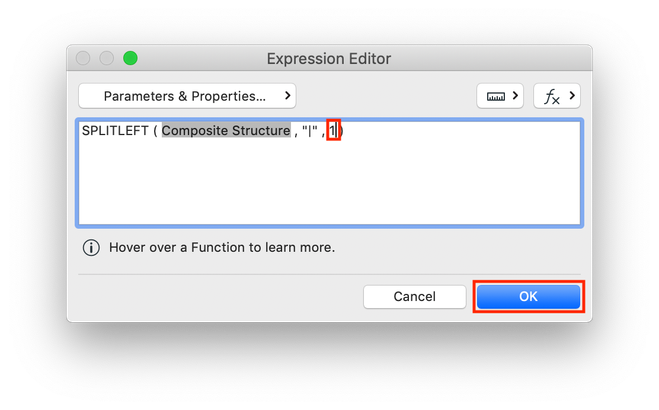
Note: The function contains three components. "Text" is the text data that will be split. In this example that is the composite name. The "Delimiter" is the character in the text that will be used to designate where the split will occur. In the example that will be the "|" in composite name. The PartIndex is an integer that designates which part to keep. With this example, 1 will be entered to keep the first part.

15. Select "Text" (including the quotation marks) and click the Parameters & Properties... button.

16. In the pulldown menu, under the General Parameters tab, select Composite Structure and click Add.

17. Select and delete Delimiter (DO NOT include the quotation marks) and enter the trimming character "|".

18. Select and delete PartIndex, enter "1" and click OK.
19. If complex profiles are applied to walls in the project, click the Add button under the Value Definition tab. If complex profiles are not used, skip to step 27.
Note: Steps 19-26 essentially repeat the process for creating an expression for editing a composite name but for complex profiles.
20. In the Expression Editor dialogue box, click the Operators & Functions button.
21. In the pull down menu, select Split string to left [ SPLITLEFT ] and click Add.
22. The function will appear in the Expression Editor.
23. Select "Text" (including the quotation marks) and click the Parameters & Properties... button.
24. In the pulldown menu, under the General Parameters tab, select Complex Profile and click Add.
25. Select and delete Delimiter (DO NOT include the quotation marks) and enter the trimming character "|".
26. Select and delete PartIndex, enter "1" and click OK.
27. The expressions for composites and complex profiles will be listed. Click OK to save changes and exit the Property Manager.

28. Open the Label Default Settings and select Property Label 22. Adjust the appearance settings.
29. Under the Symbol Label Custom Setting tab, migrate to the General Settings section. Under Arrange Content select Property Value and choose the newly created property. Click OK.

30. Place the label on a wall.
Note: Consider saving a favorite for the partition label to save time in the future.

- Mark as Read
- Mark as New
- Bookmark
- Permalink
- Report Inappropriate Content
Excuse my ignorance, but I can't imagine the context where that would be useful.
In my little world, the Wall Tag is a reference symbol/Label that corresponds to the Wall Types Legend, which also describes the components/Skins of the Wall, displayed by another Label, perhaps some dimensions.... For example, something like this:
- Mark as Read
- Mark as New
- Bookmark
- Permalink
- Report Inappropriate Content
Wall Tags don't require any Expressions, you can do it with the basic Labels provided in the program. https://www.youtube.com/watch?v=YJYUc0vpQyw
However, I do appreciate the example for how to create and Expression. Very good. Thanks.
- Mark as Read
- Mark as New
- Bookmark
- Permalink
- Report Inappropriate Content
Steve,
In your video, your Composites have very simple names like "1", "2", etc. For that, you can use the Label the way you showed it in the video.
In the above article, Composites and Complex Profiles have more complex names that consist of an ID and an Description, separated by a Delimiter character. This is why you need to use Property Expressions to extract just the ID part from the name. Also, it works for both Composites and Complex Profiles.
- Mark as Read
- Mark as New
- Bookmark
- Permalink
- Report Inappropriate Content
Yes, I understand. I think very few people use Archicad like I do. Perhaps I am the only one 🙂
- Mark as Read
- Mark as New
- Bookmark
- Permalink
- Report Inappropriate Content
Here is my 2 cents.
One of my concerns regarding the initial implementation of Expressions was that in most cases a change to (say a wall ) would not take on the Properties of the changed element.
I have attached a JPEG showing a possible solution.
- Modelling my hand-drawn University Project in Archicad in Modeling
- Graphic Overrides series: Pieces from Conceptual to Developed Design, by Abraham Smith Merlos in Documentation
- Why should I use Teamwork? in Getting started
- Get Your Free Twinmotion 2021 in Visualization
- Using Expressions to Calculate the Maximum Number of Occupants Automatically in Project data & BIM


